Rediscovering Archaic Tools and Techniques
This page is the based on notes I made for my talk at Lutherie 2023, the seminar day marking the 50th anniversary of the Newark School of Violin Making. The majority of the content is the same as my lecture, with a few bits swapped around but omitting some of the introduction given on the day.
Introduction
This talk is about my experiments in making instruments using old-fashioned methods and tools which I think are more consistent with those used by the Italian makers from the 16th to 18th centuries, experiments which started gradually when I first started working for myself, but which have rapidly gained momentum over the last three years.
When thinking about a title for this talk, I considered using the term ‘authentic’ to describe these methods, but that immediately begged the question – authentic for what, authentic for when? For Andrea Amati in 1550 or del Gesu in 1740, for Cremona or Venice, for France or for Germany? Given the paucity of solid evidence other than the instruments themselves, aiming at a possible authenticity is probably as great a claim that can be made, though the more experience I have gained with these ‘new’ methods, the happier I am that they are significantly closer than the methods I was taught forty years ago.
Using the word archaic in the title, is however, more accurate, and perhaps a surprising word to choose, given that so many violin makers are so keen to emulate the great violin makers of the past, assiduously trying to reproduce every detail. But on the other hand, we often seem happy to ‘correct’ the original maker’s deviations from the symmetrical, whilst using the latest tools from the tool catalogue, and even when we do know how the classical makers used to do something, we often don’t do it ourselves, whilst still hoping to emulate the work of the past.
To understand why it might be useful to use the methods and tools of the past, let me briefly revisit what it is about the classical Italian instruments in particular, that makes them special. I remember when I was in my first year at college here in Newark, struggling to use tools, learning how to make a tidy instrument, we had a visit from Charles Beare who brought with him the ‘Vieuxtemps’ del Gesu made in 1742. An instrument more asymmetric and wilder in concept and execution, it would be hard to imagine, and yet this was one of the most highly regarded instruments of all time. Even from this one instrument, though reinforced many times whilst I worked in Germany and saw many more, it was clear that the makers of that time had different priorities, different standards, and different intentions from us. Their work may have been essentially the same as what followed, but their aesthetic sense must have been different; to lump them all into one sentence, they displayed a coherence of intent and a mastery of their tools allowing a fluidity which included and allowed asymmetry, inaccuracy and signs of the tools used, whilst producing an instrument with presence and individuality. This is a view I am sure many of us share, though to explain my understanding of how and why this might be, please see my 2014 BVMA article, ‘The Spirit of Classical Violin Making‘.
Looking at these instruments, it seems clear that they were not made slowly and cautiously, but were made with fluidity and probably quite quickly; they were made in a workmanlike manner. Workmanlike is a term we don’t use much nowadays, the concept is alien to much of society as so few of us do handwork anymore; if anything looks like physical work we tend to turn to machines, or as instrument makers, we try and squeeze ourselves into the ghetto of the artist where you can take a long as you want and obsess over every detail. But that is not how traditional craftsmen worked, they had to do the hard graft by hand so they learnt how to do it quickly and efficiently. They used the right tools, did everything in the right order and did not leave a job half done only to return to it later, they ‘struck while the iron was hot,’ a concept you can only properly appreciate if you have done some work on a forge, but it encapsulates the absolute need to work quickly and effectively. Besides the mentality of getting on with the job, my experiments have increasingly led me to understand that the tools and the techniques employed by the makers during the grand epoch of violin making were major factors in producing the freshness and immediacy of those instruments we so admire.
Sources
Finding out how the classical violin makers worked is difficult, contemporary sources are almost non existent, and much romantic nonsense has been written since. We do, however, have many instruments which sometimes give up clues, though usually slowly and under detailed examination, opportunities that are rare for most of us. Without daily exposure to such instruments, we have the observations of Simone Sacconi and Roger Hargrave in their books on Stradivari and Giuseppe Guarneri, as well as their interpretations of those observations. As to the tools themselves, for general woodworking there are paintings from the time [fortunately for us Jesus is often pictured as a carpenter] and some written works such as Joseph Moxon’s ‘Mechanick’s exercises’ from 1680 and Andre Jacob Roubo’s ‘L’Art du Menuisier’ from 1770, but as these are woodworking books, not violin making books, they take us only so far.
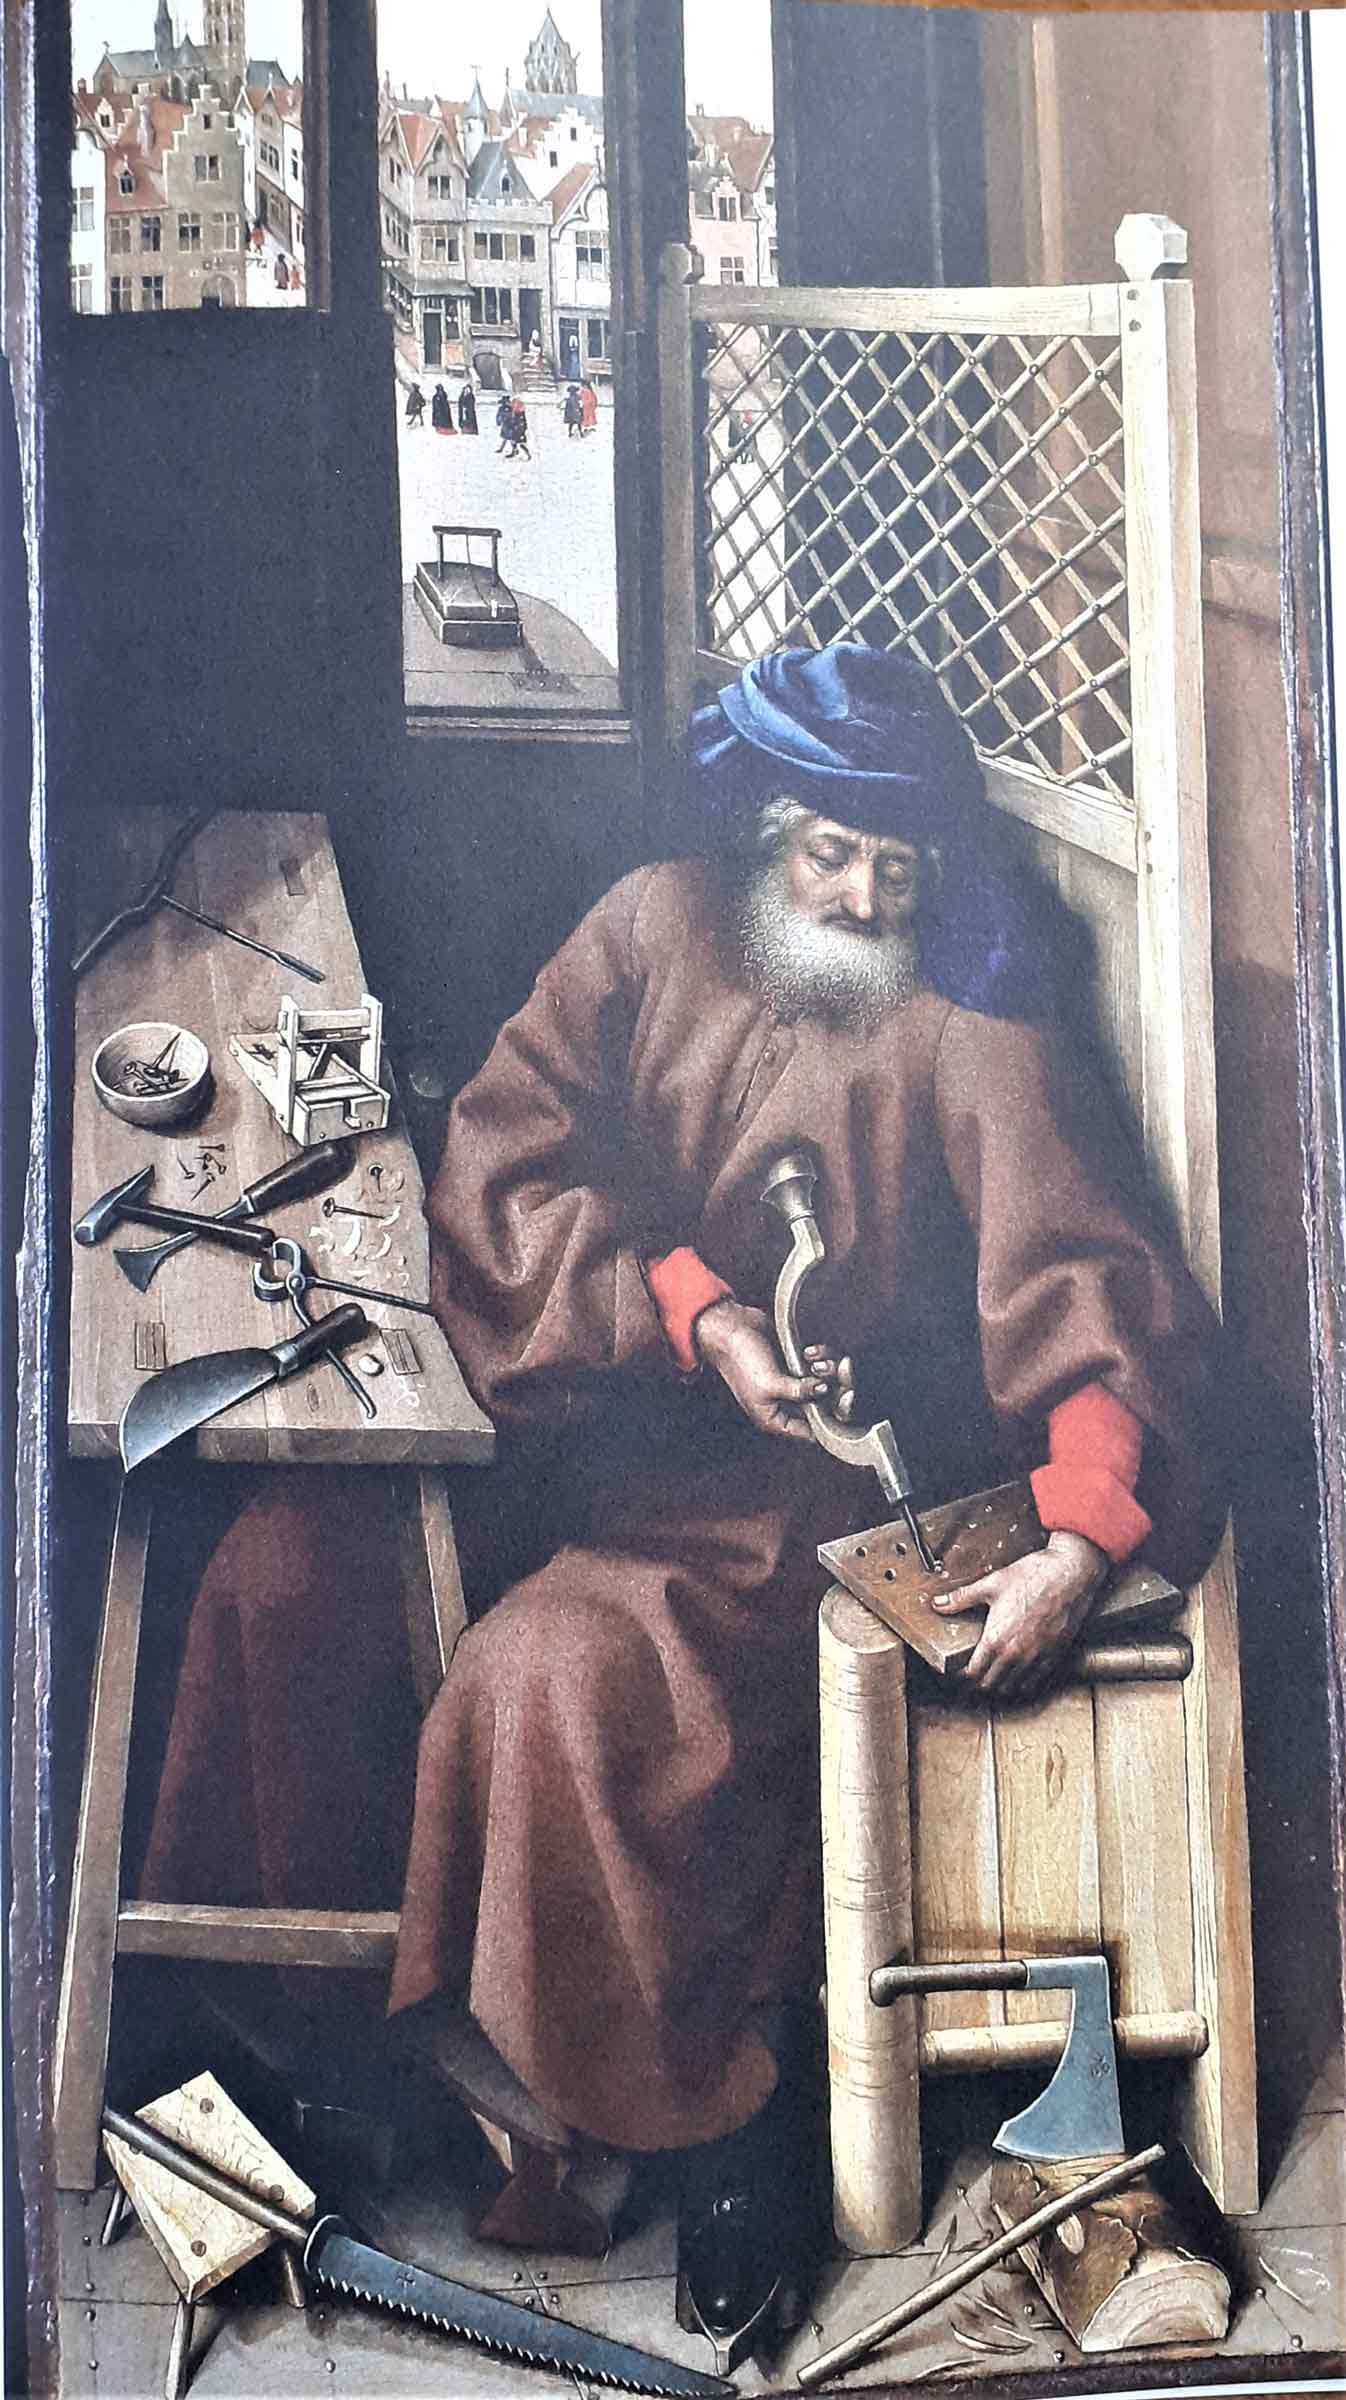
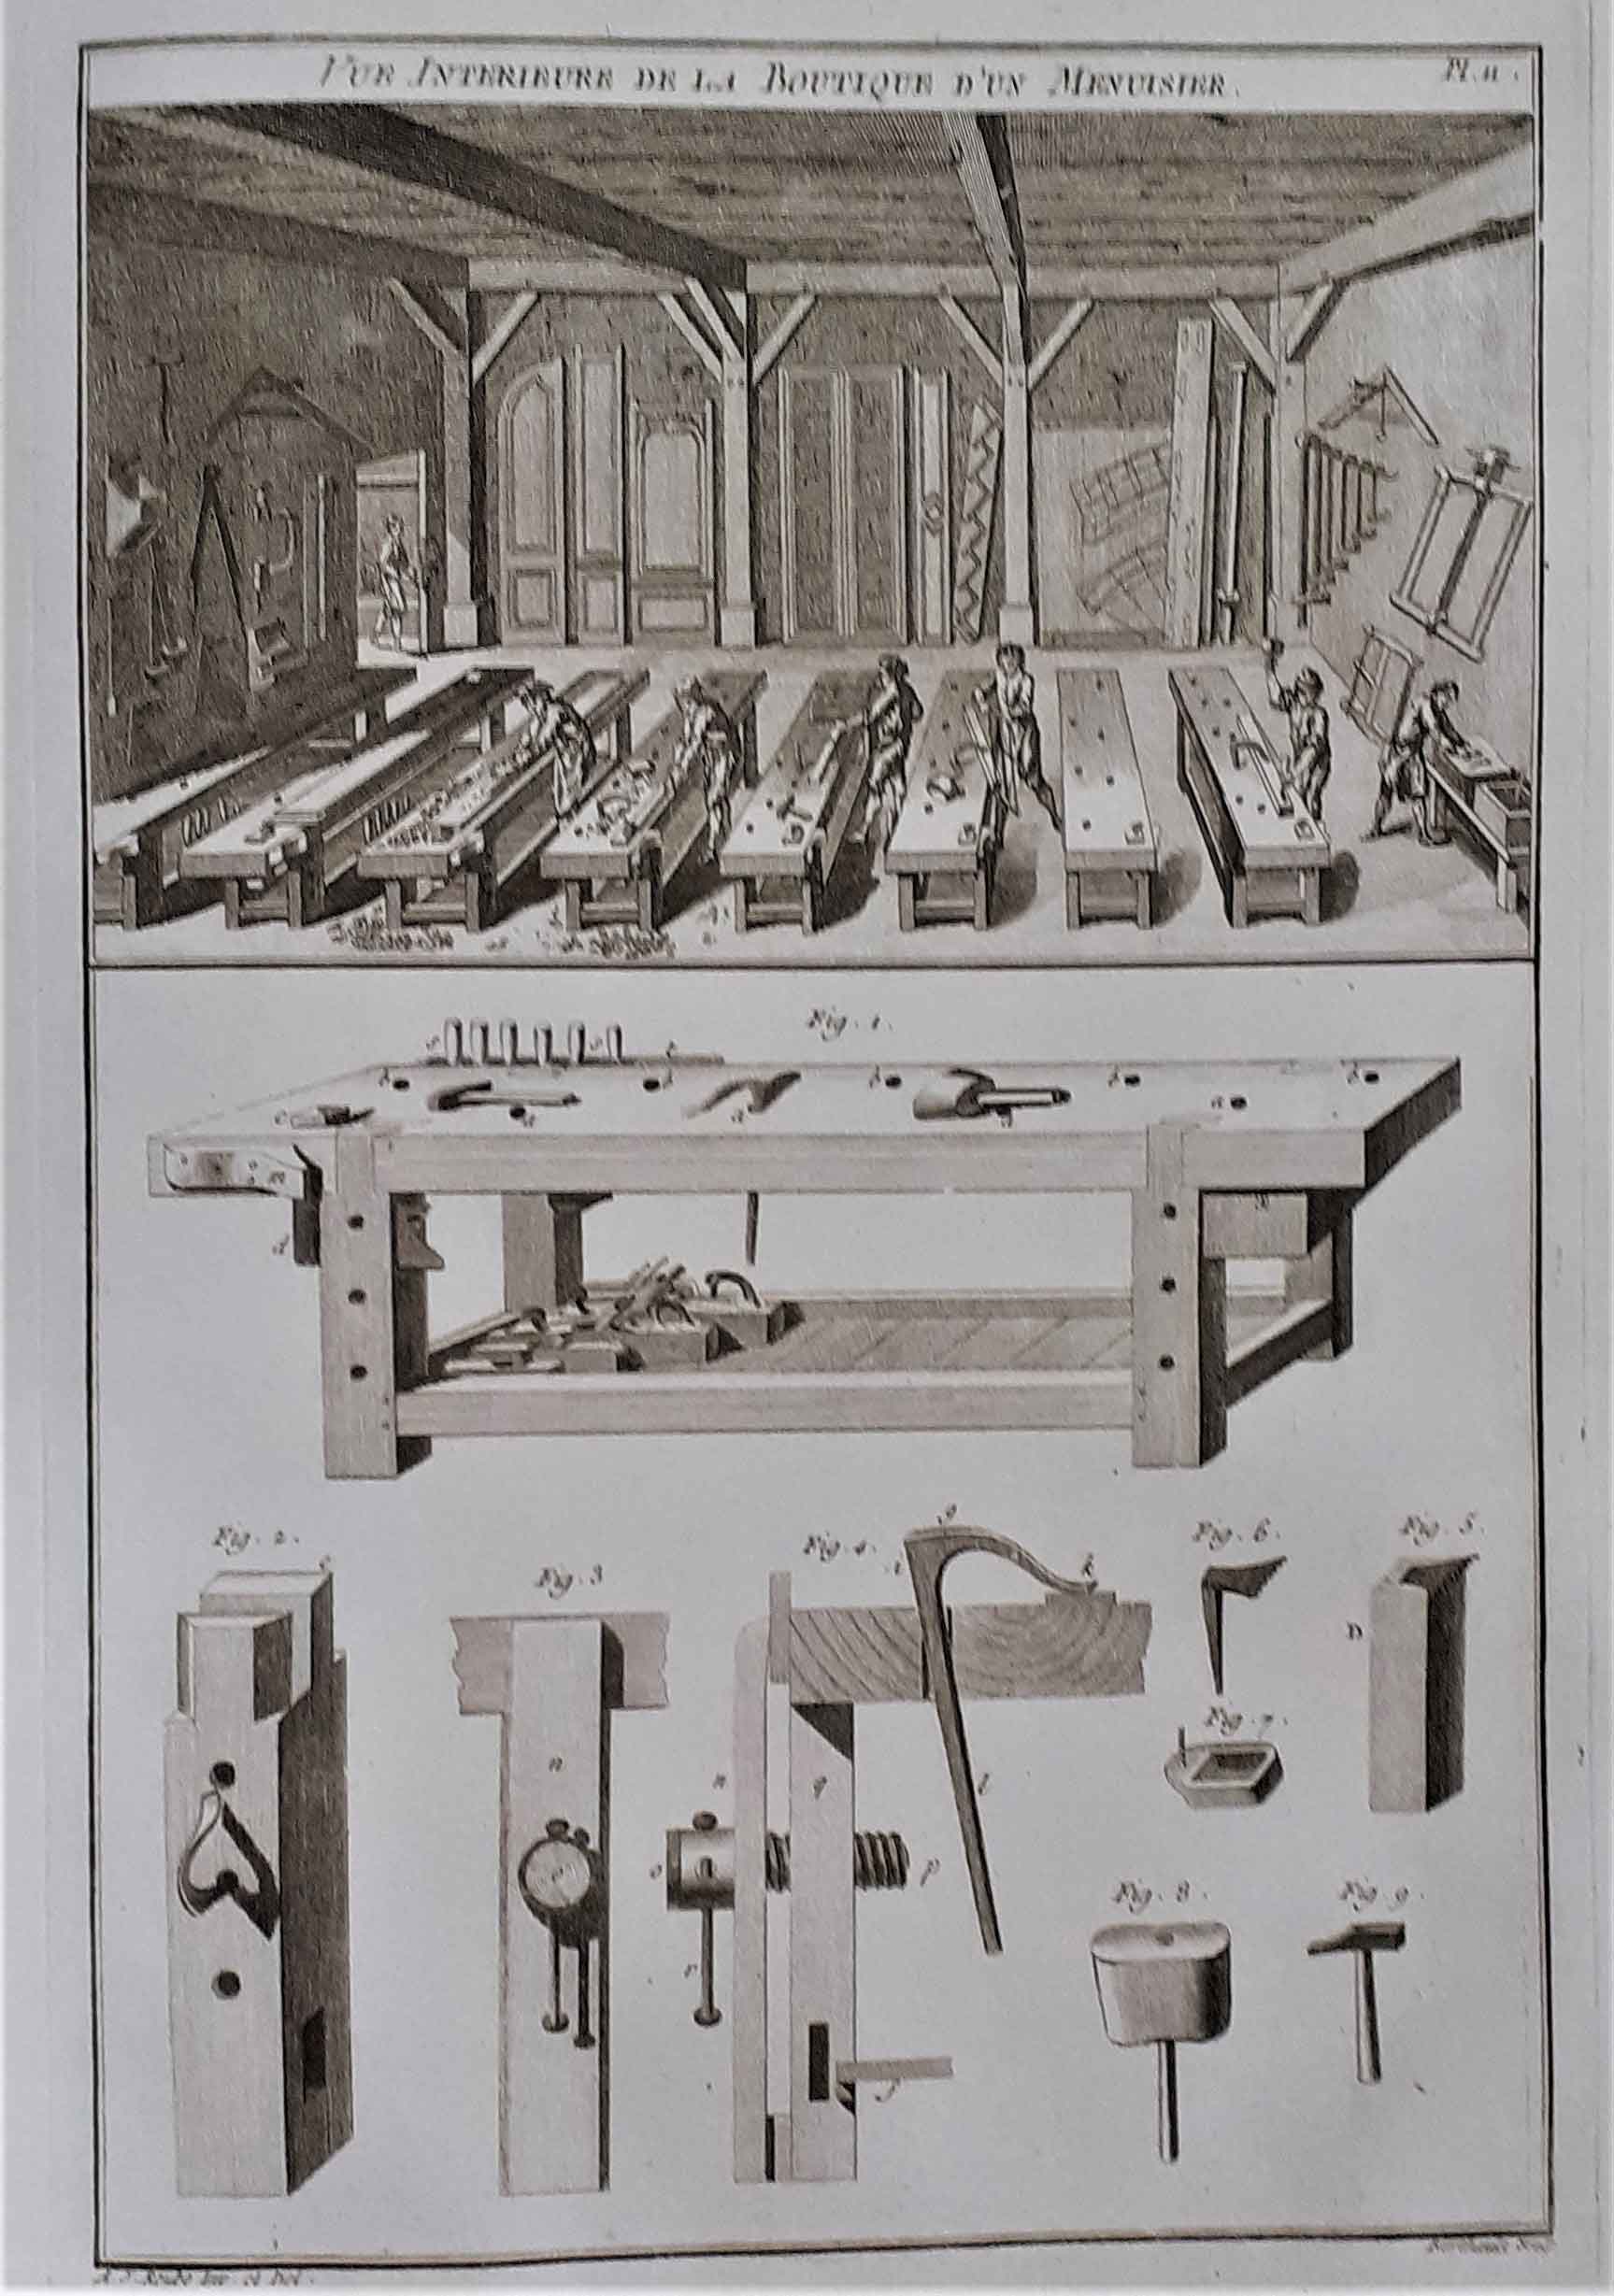
Then there are the tools in the Museo del Violino in Cremona, some of which come from Stradivari’s workshop, though it is not always clear which are from his workshop and which are later. The only written source about violin making that I know of is within Denis Diderot’s Encyclopédie, [or Dictionnaire Raisonné des Sciences, des Arts et des Métiers] from 1751, picturing and naming many of the tools used, a useful but nonetheless restricted glimpse into a luthier’s workshop from mid-eighteenth-century France.
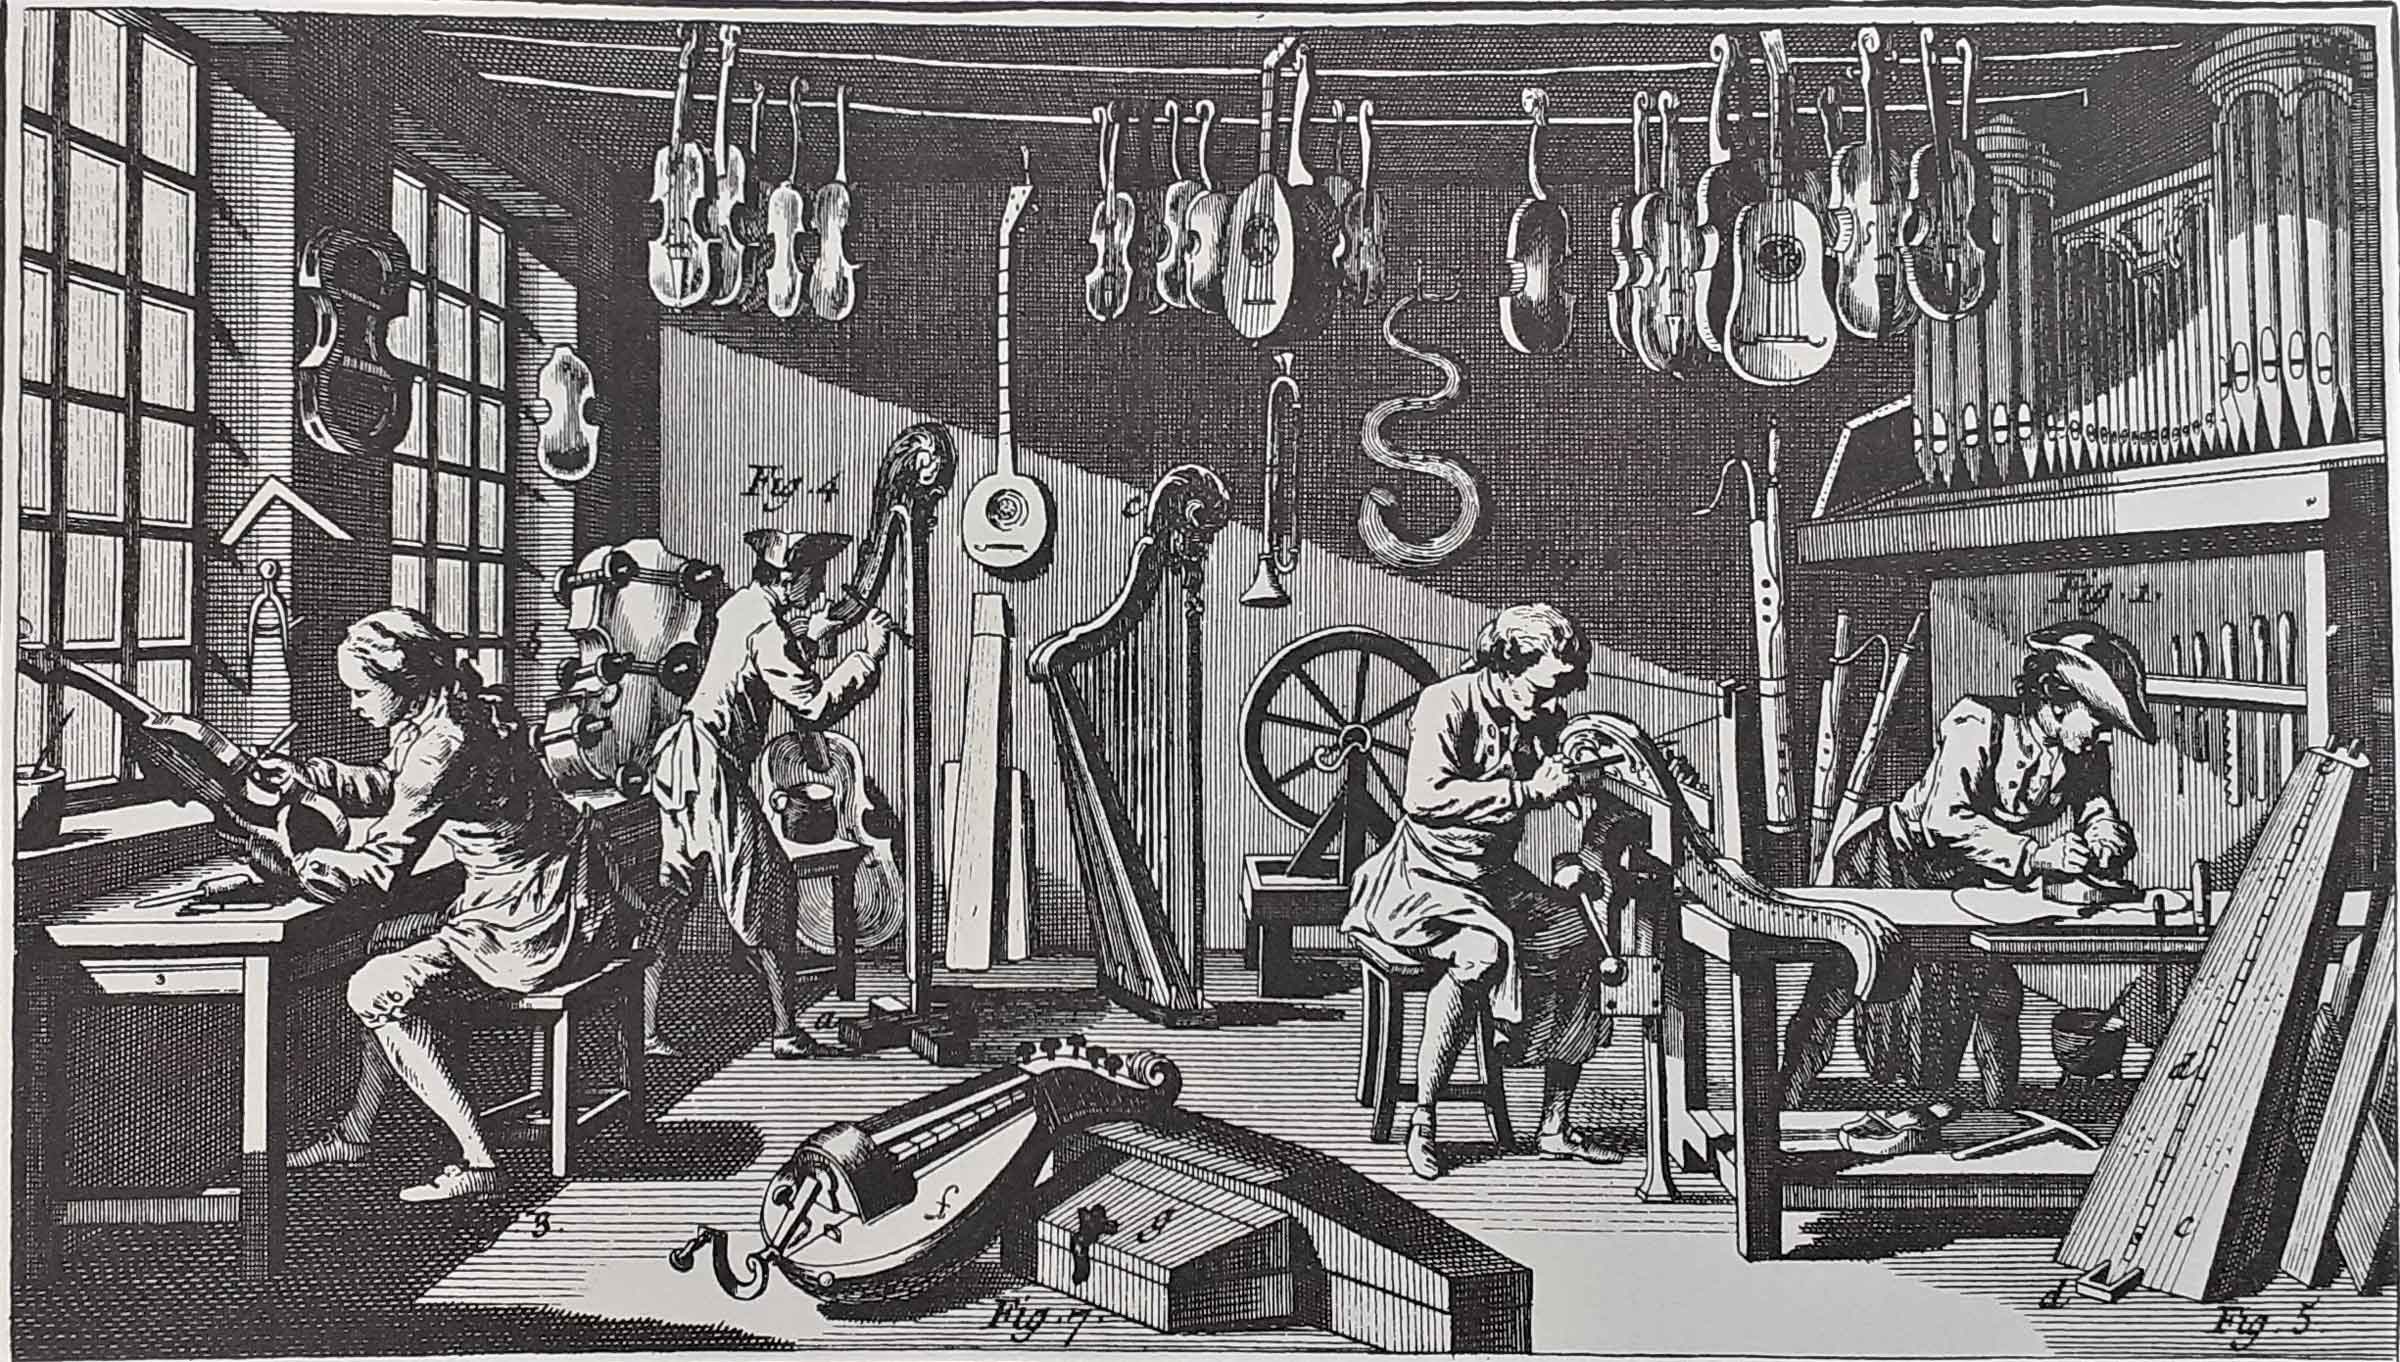
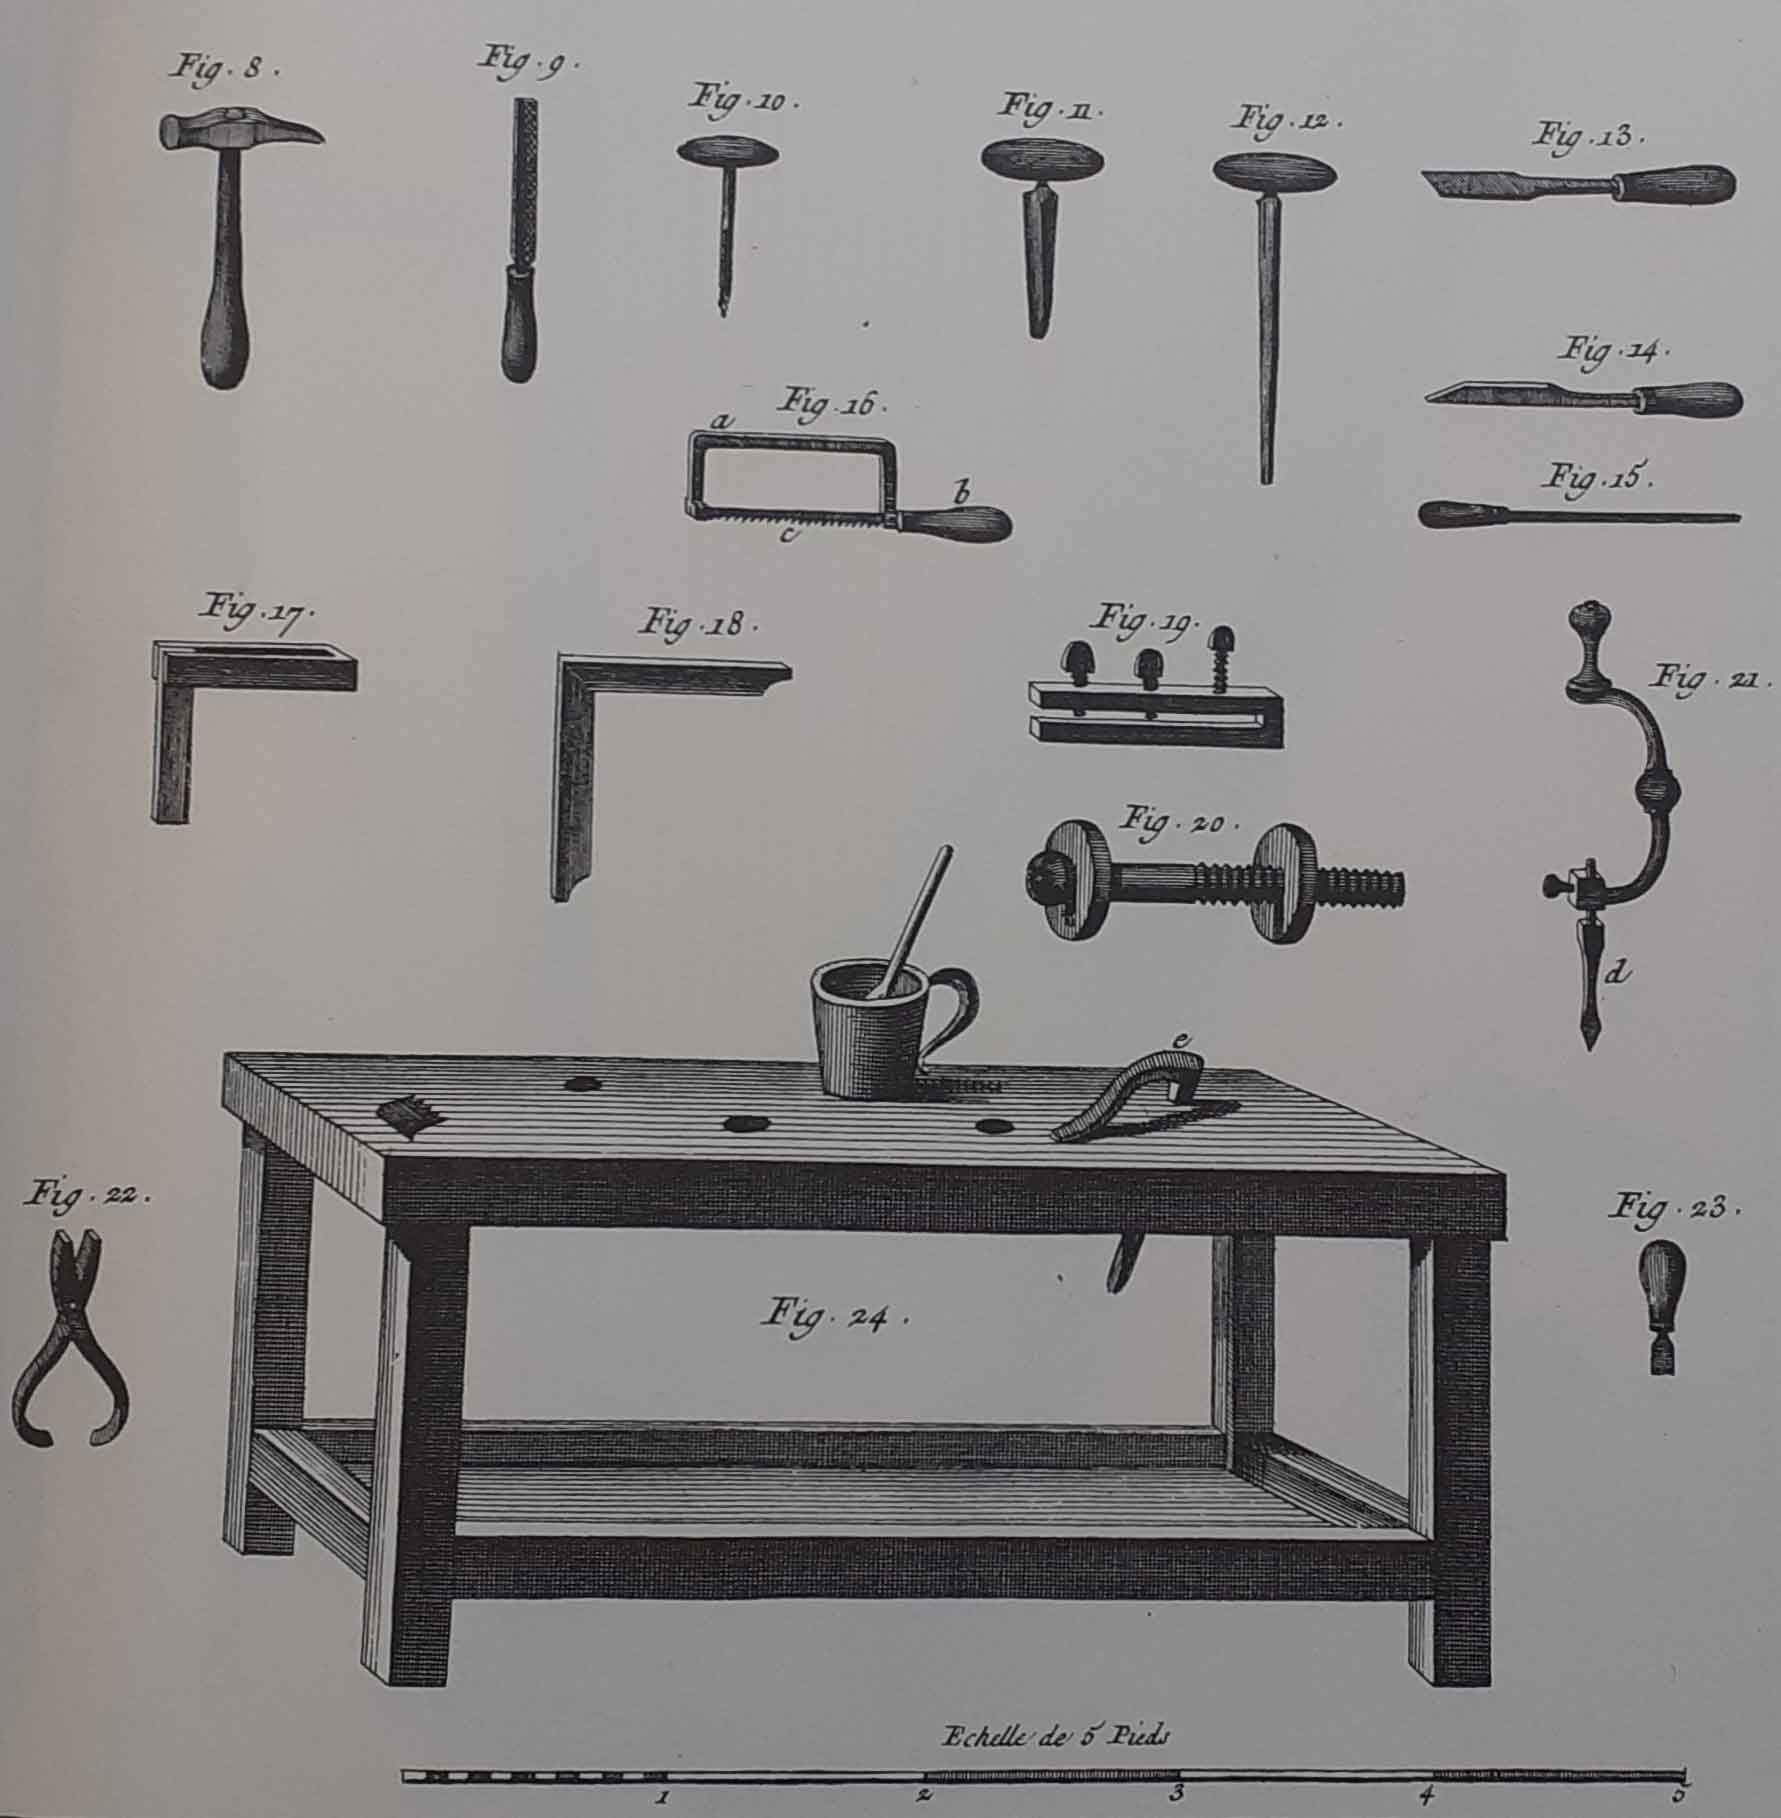
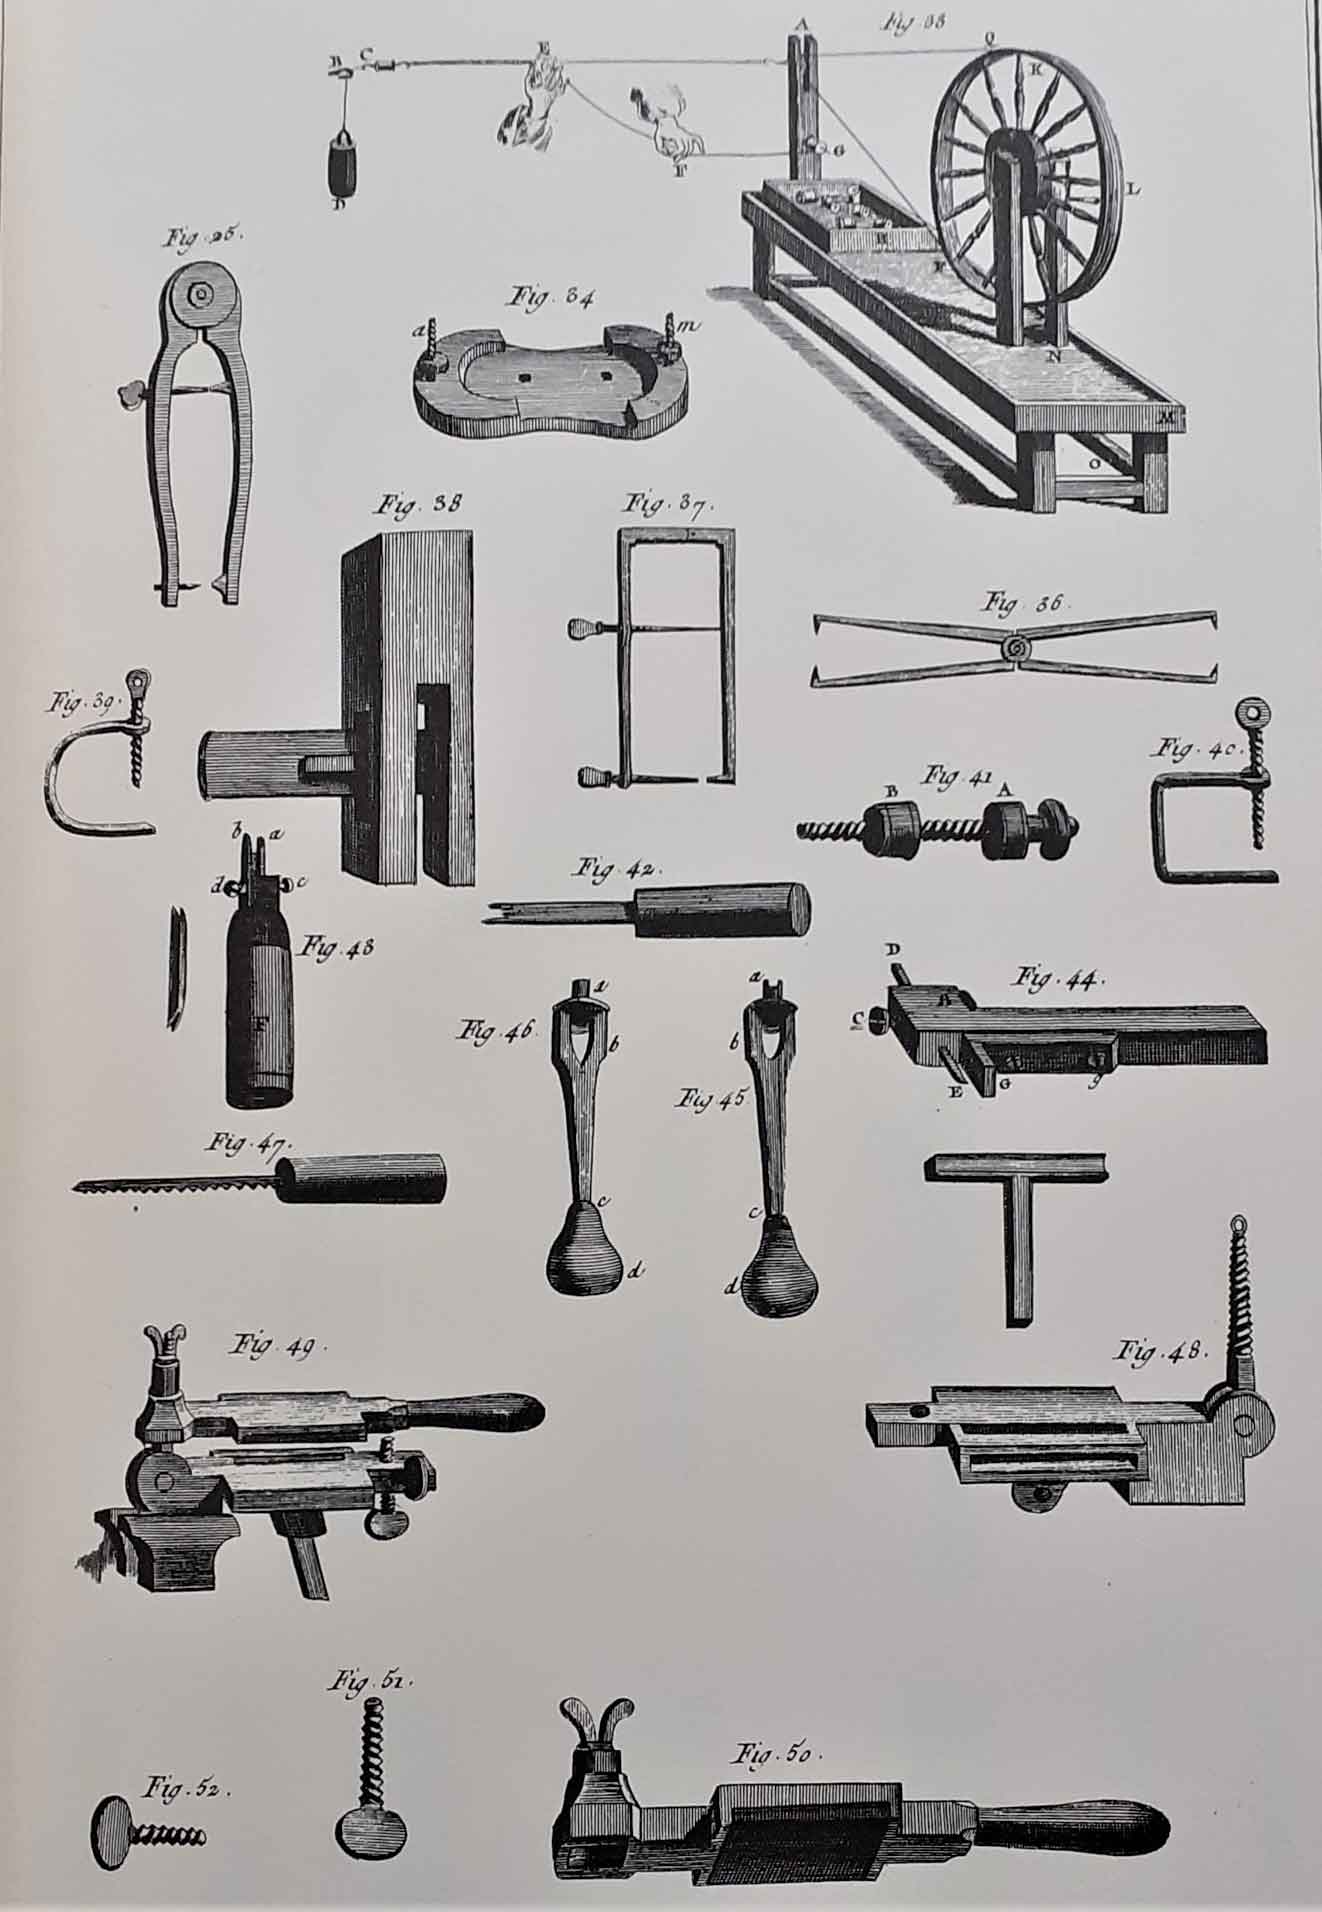
Lastly, there is what we do now as violin makers, some of which may, or may not, be the same as three hundred years ago. With all these sources, care must be taken, neither to accept someone else’s thoughts unchallenged or to write off a technique just because it is unfamiliar, because you haven’t got the tool working right yet or because it does not fit in with a preconceived notion of how the techniques fit together.
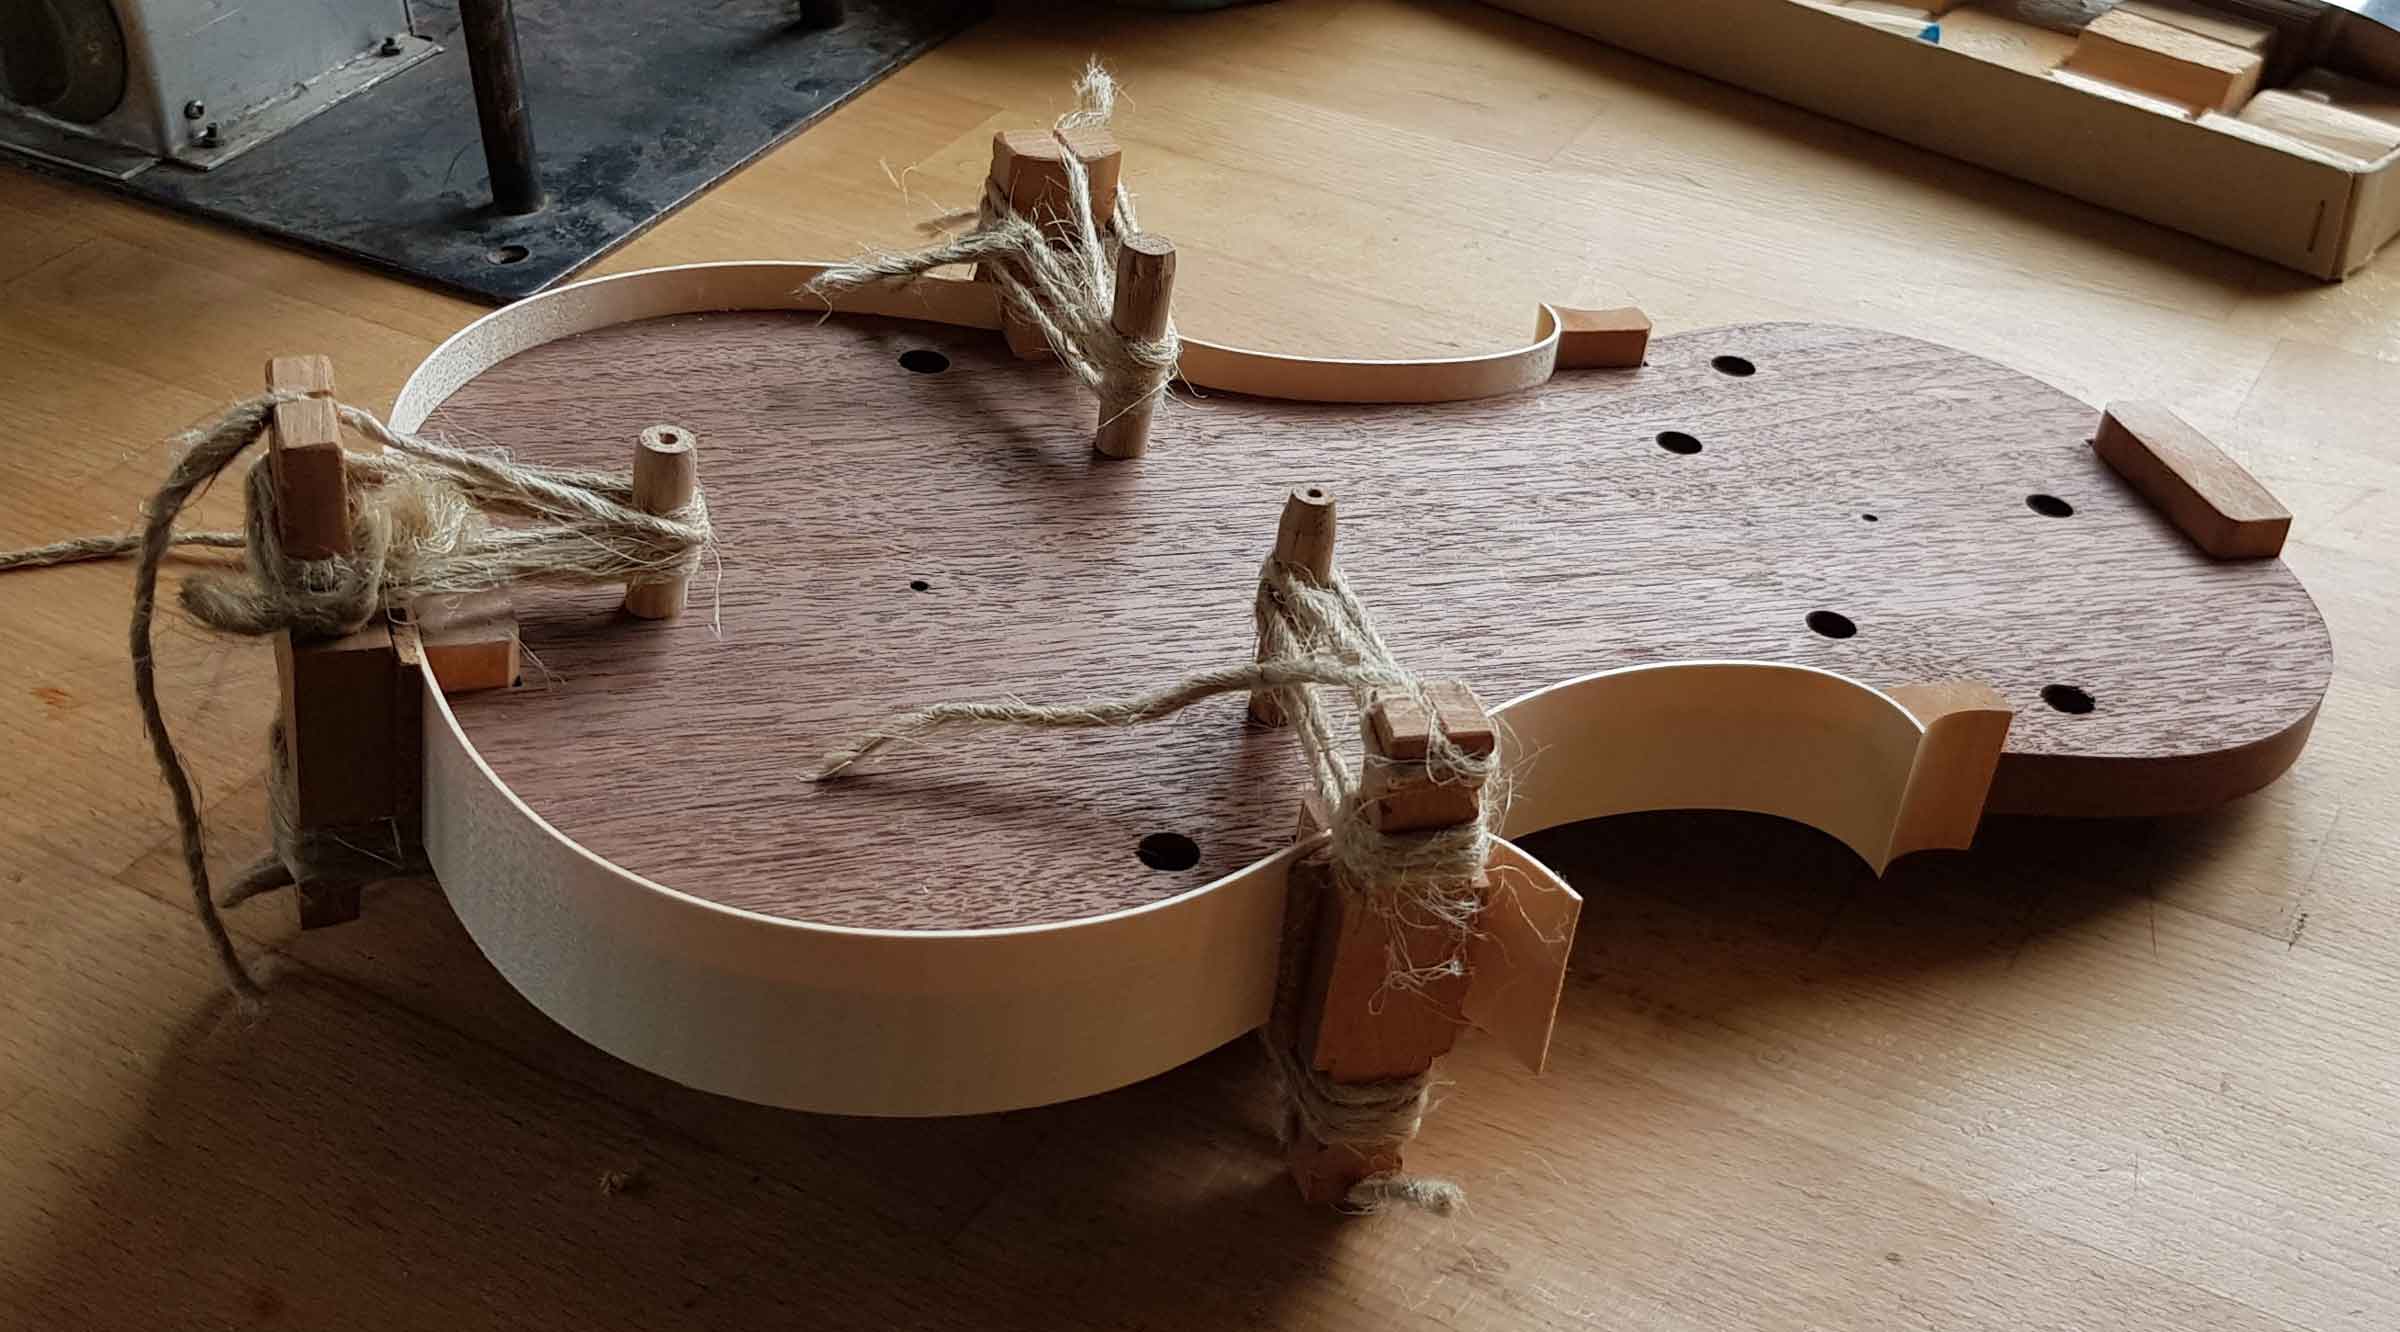
Some of the methods I now use have been normal procedure for some years. I have been gluing the c ribs onto the mould with string since I was in my twenties, and using a purfling cutter, rather than a marker and knife, for over a decade, along with scrub planes for arching and hollowing. Other tools are a more recent addition as my workshop has been gradually transformed through trying stuff out. Sometimes I have made tools, such as holdfasts and the Moxon vice without knowing how they would work or when I would use them, but once you have a tool, you try it out; my thinking being that if you have a 21st century tool you get 21st century result, but use an 18th century tool and the result might be more interesting. Then in 2020, during the Covid lockdown, I decided to use every ‘new’ method and tool I could think of on one instrument, making a few more tools before I started, and, in the spirit of experimentation, even trying some techniques I thought were likely to be less good or less authentic. My final criterion for this instrument was not to worry about the outcome, a crucial decision to allow myself the freedom to experiment.
For this violin, the main difference in the order of making was going to be the construction of the body. At college, we were taught to make the plates by rough arching with a gouge, then finalise the outline and edge thickness and do the purfling. Then it was straight to a smaller gouge or two to cut the fluting before returning to a big gouge followed by thumb planes and scrapers to finish the arching. Hollowing involved the same sequence of big gouge, thumb planes, then scraper. This was a sequence I continued to use until 2020, partially because I was used to it, but it also has advantages – you can see all the arching at once, including the fluting, so it is easier to copy an existing instrument, and because the arching is fully finished before hollowing, you can thickness it precisely into the edge. Sacconi, however, suggested that the instruments were purfled and fluted after the box was together. This is how I made the 2020 violin, but it does have disadvantages, namely that it is difficult to copy an arching when the fluting is not yet done, it is harder to hold the work when purfling and fluting, and because the inside is finished before the fluting is done, the thicknessing into the fluting is only approximate. The evidence for purfling when the body was together, however, is convincing, Stradivari, amongst others, cut through the locating pins with his purfling, and at least on one occasion, del Gesu cut straight into a corner block when cutting a purfling channel. However, that does not necessarily mean that they also did the fluting when the body was glued together. This was one lesson learnt from doing the 2020 violin and is one reason I no longer use this aspect of Sacconi’s method.
Making an instrument – the rib structure
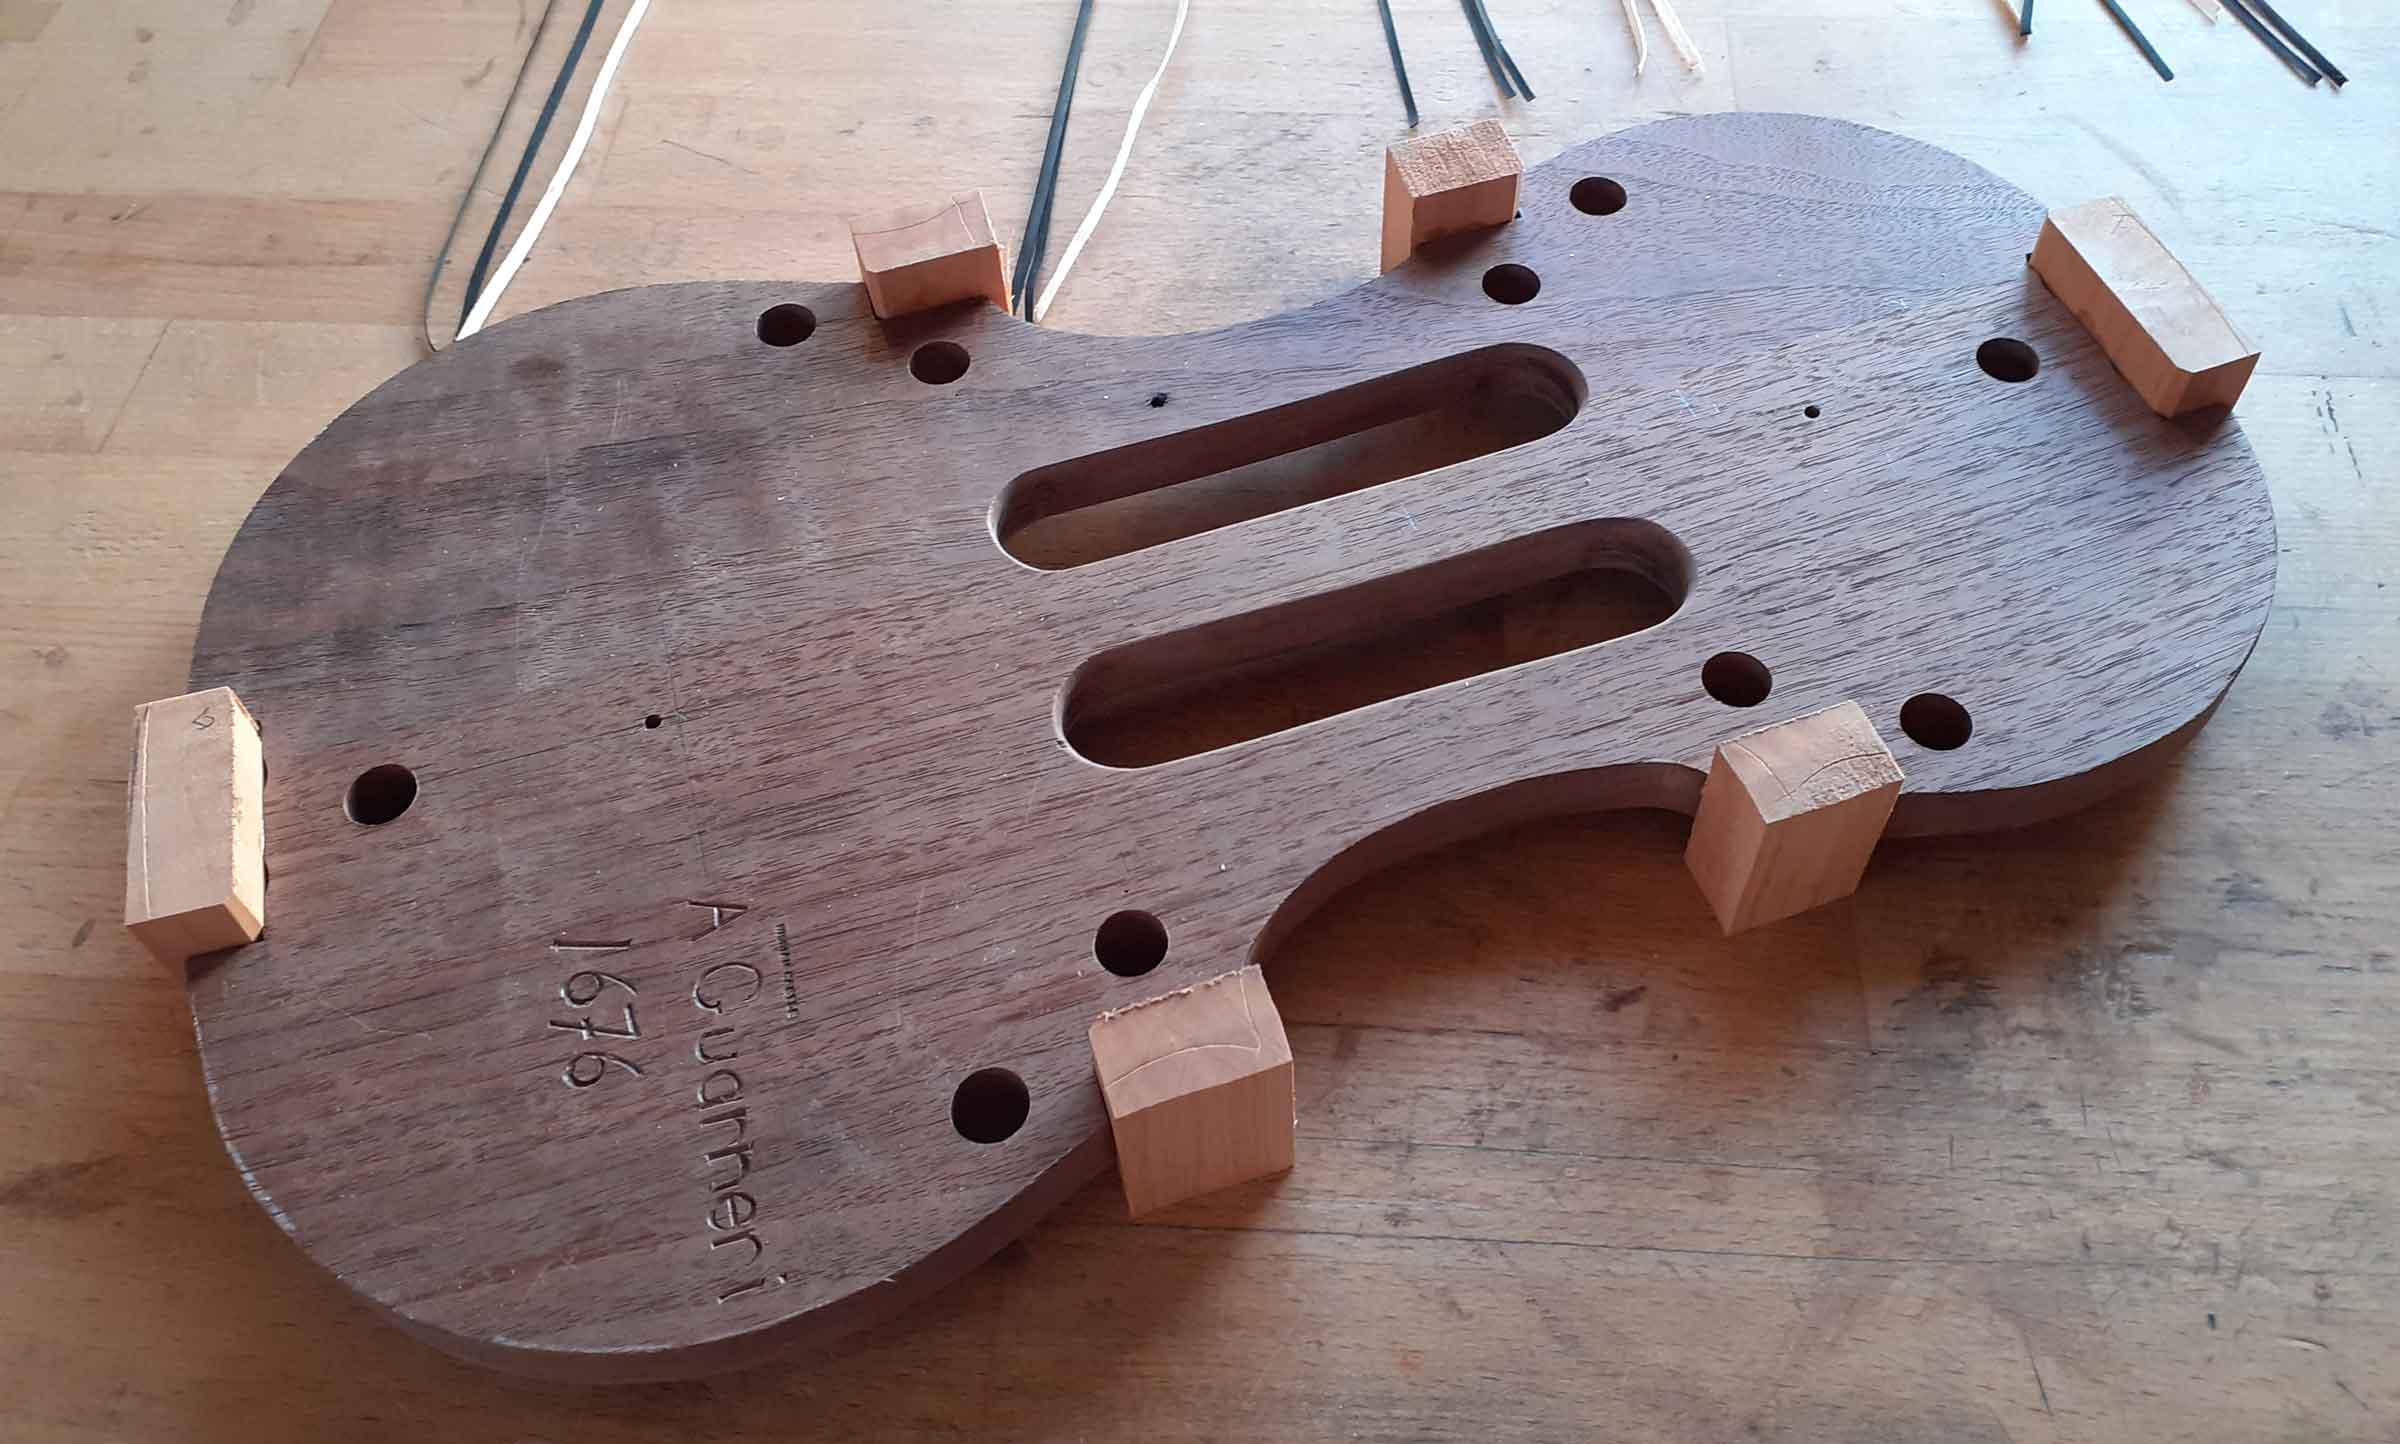
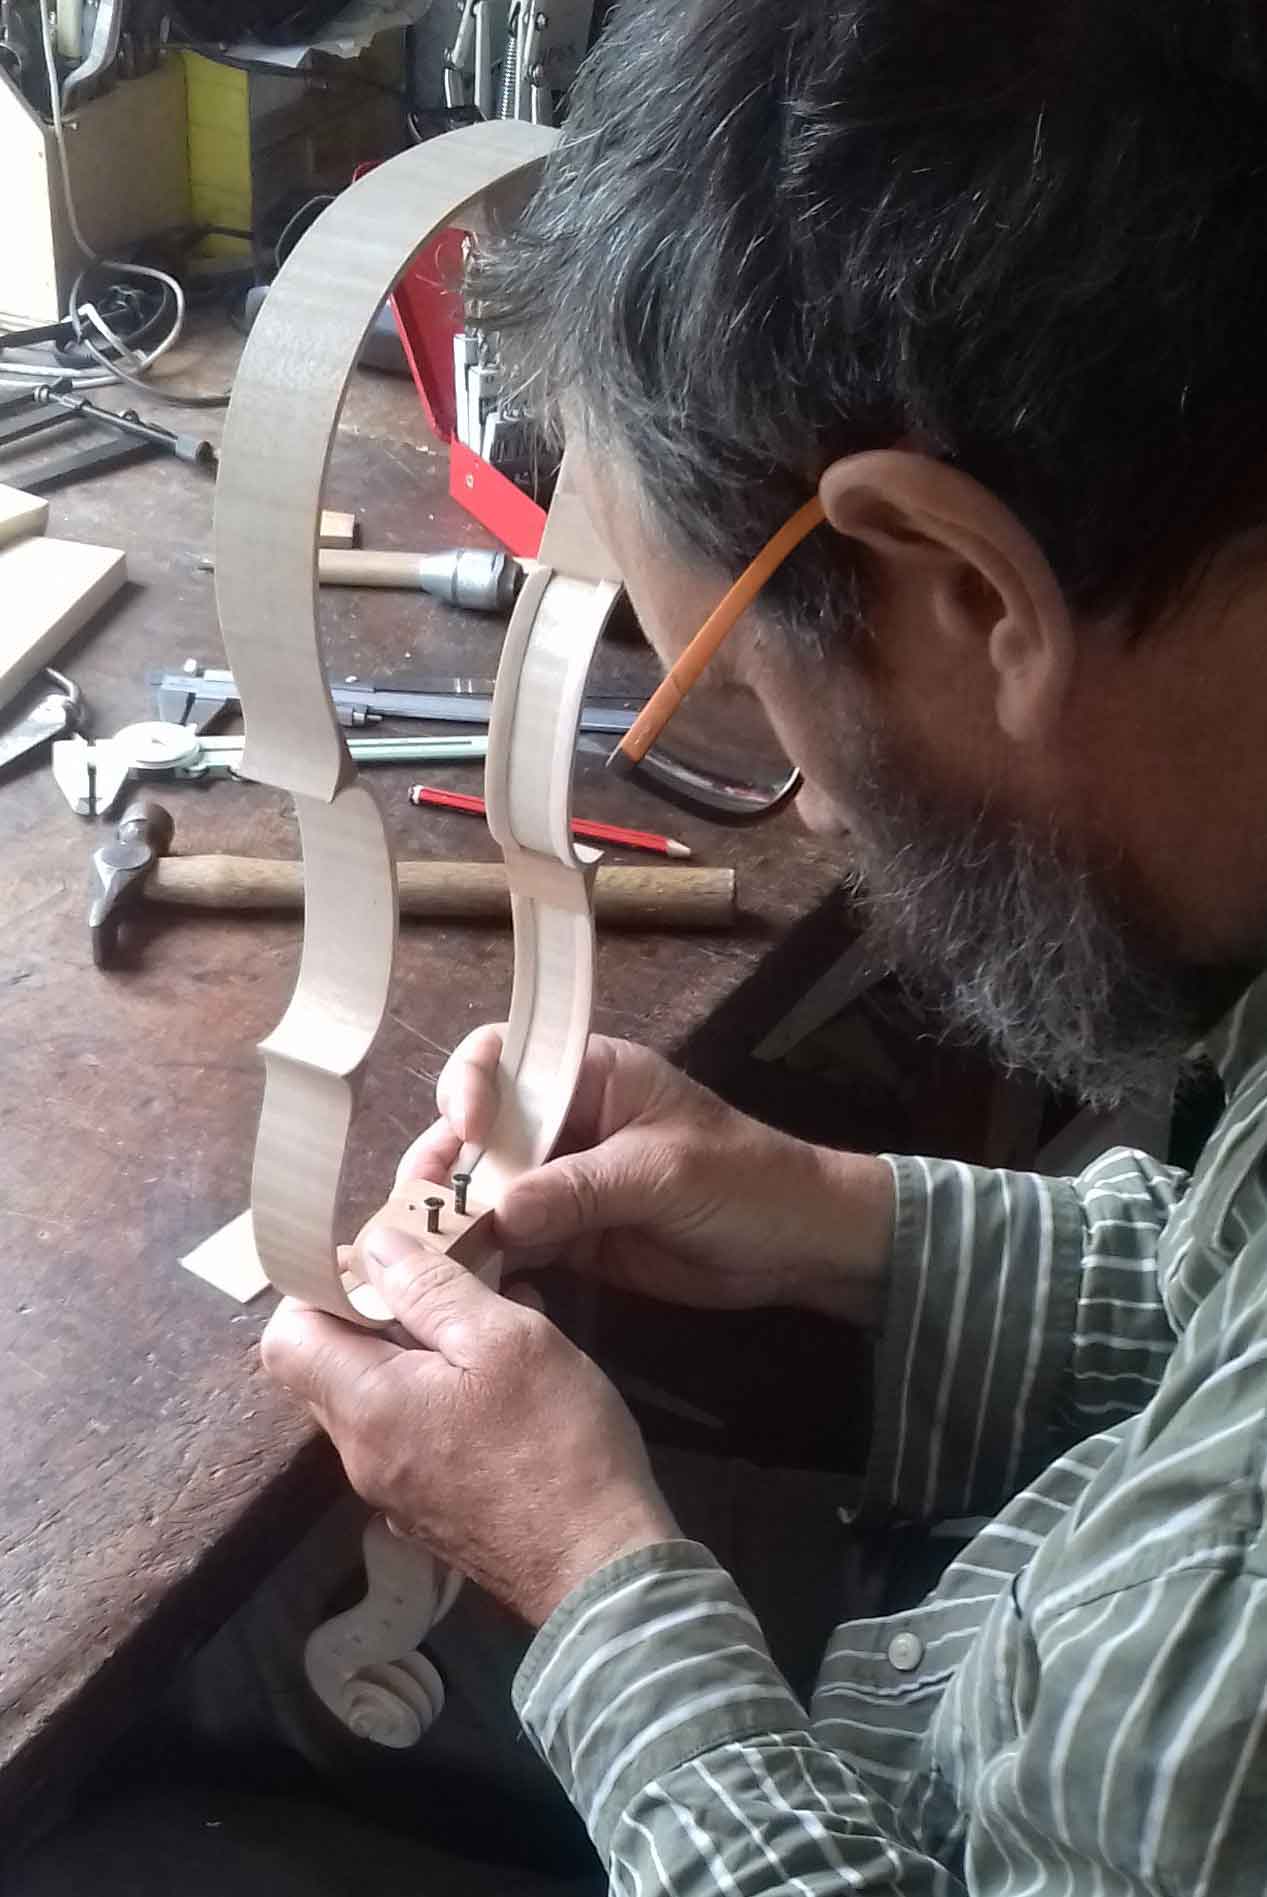
We know, because they are still in existence, that Stradivari used internal moulds for the ribs, and it is likely that other Cremonese makers did so too, though elsewhere techniques did vary. There are a number of reasons to use a mould; they could have been used for the sake of precision, repeatability, ease or speed. We know that outlines of instruments made by the classical violin makers who probably used moulds do vary in outline, between bass and treble sides, between back and belly, and in the case of Stradivari, [because we have the moulds] between instruments made on the same mould, so precision does not seem to be the answer. The distortion of the wood after the instrument was made also cannot account for all the discrepancy, nor can a lack of care when bending ribs. Part of the asymmetry can be accounted for by the need to nail the neck onto the rib structure, a procedure worked out by Roger Hargrave using features we see on original instruments. It is obvious that the neck was not nailed on when the body was closed, nailing when the back was on would have produced a poor joint between neck root and the button, so is unlikely, and although it would be possible to nail when the belly was on, you would need to do it whilst resting the neck root on the far edge of the bench and reaching over to hammer – scarcely a workmanlike practise. Nailing the neck when the ribs are free therefore seems like the most likely scenario, a process which is not an exact science, and which can leave the neck slightly off-centre on the ribs. The process to re-establish the centre line when the outline is marked on the back, however, following Hargrave’s method, copes with this potential inaccuracy whilst instigating some asymmetry.
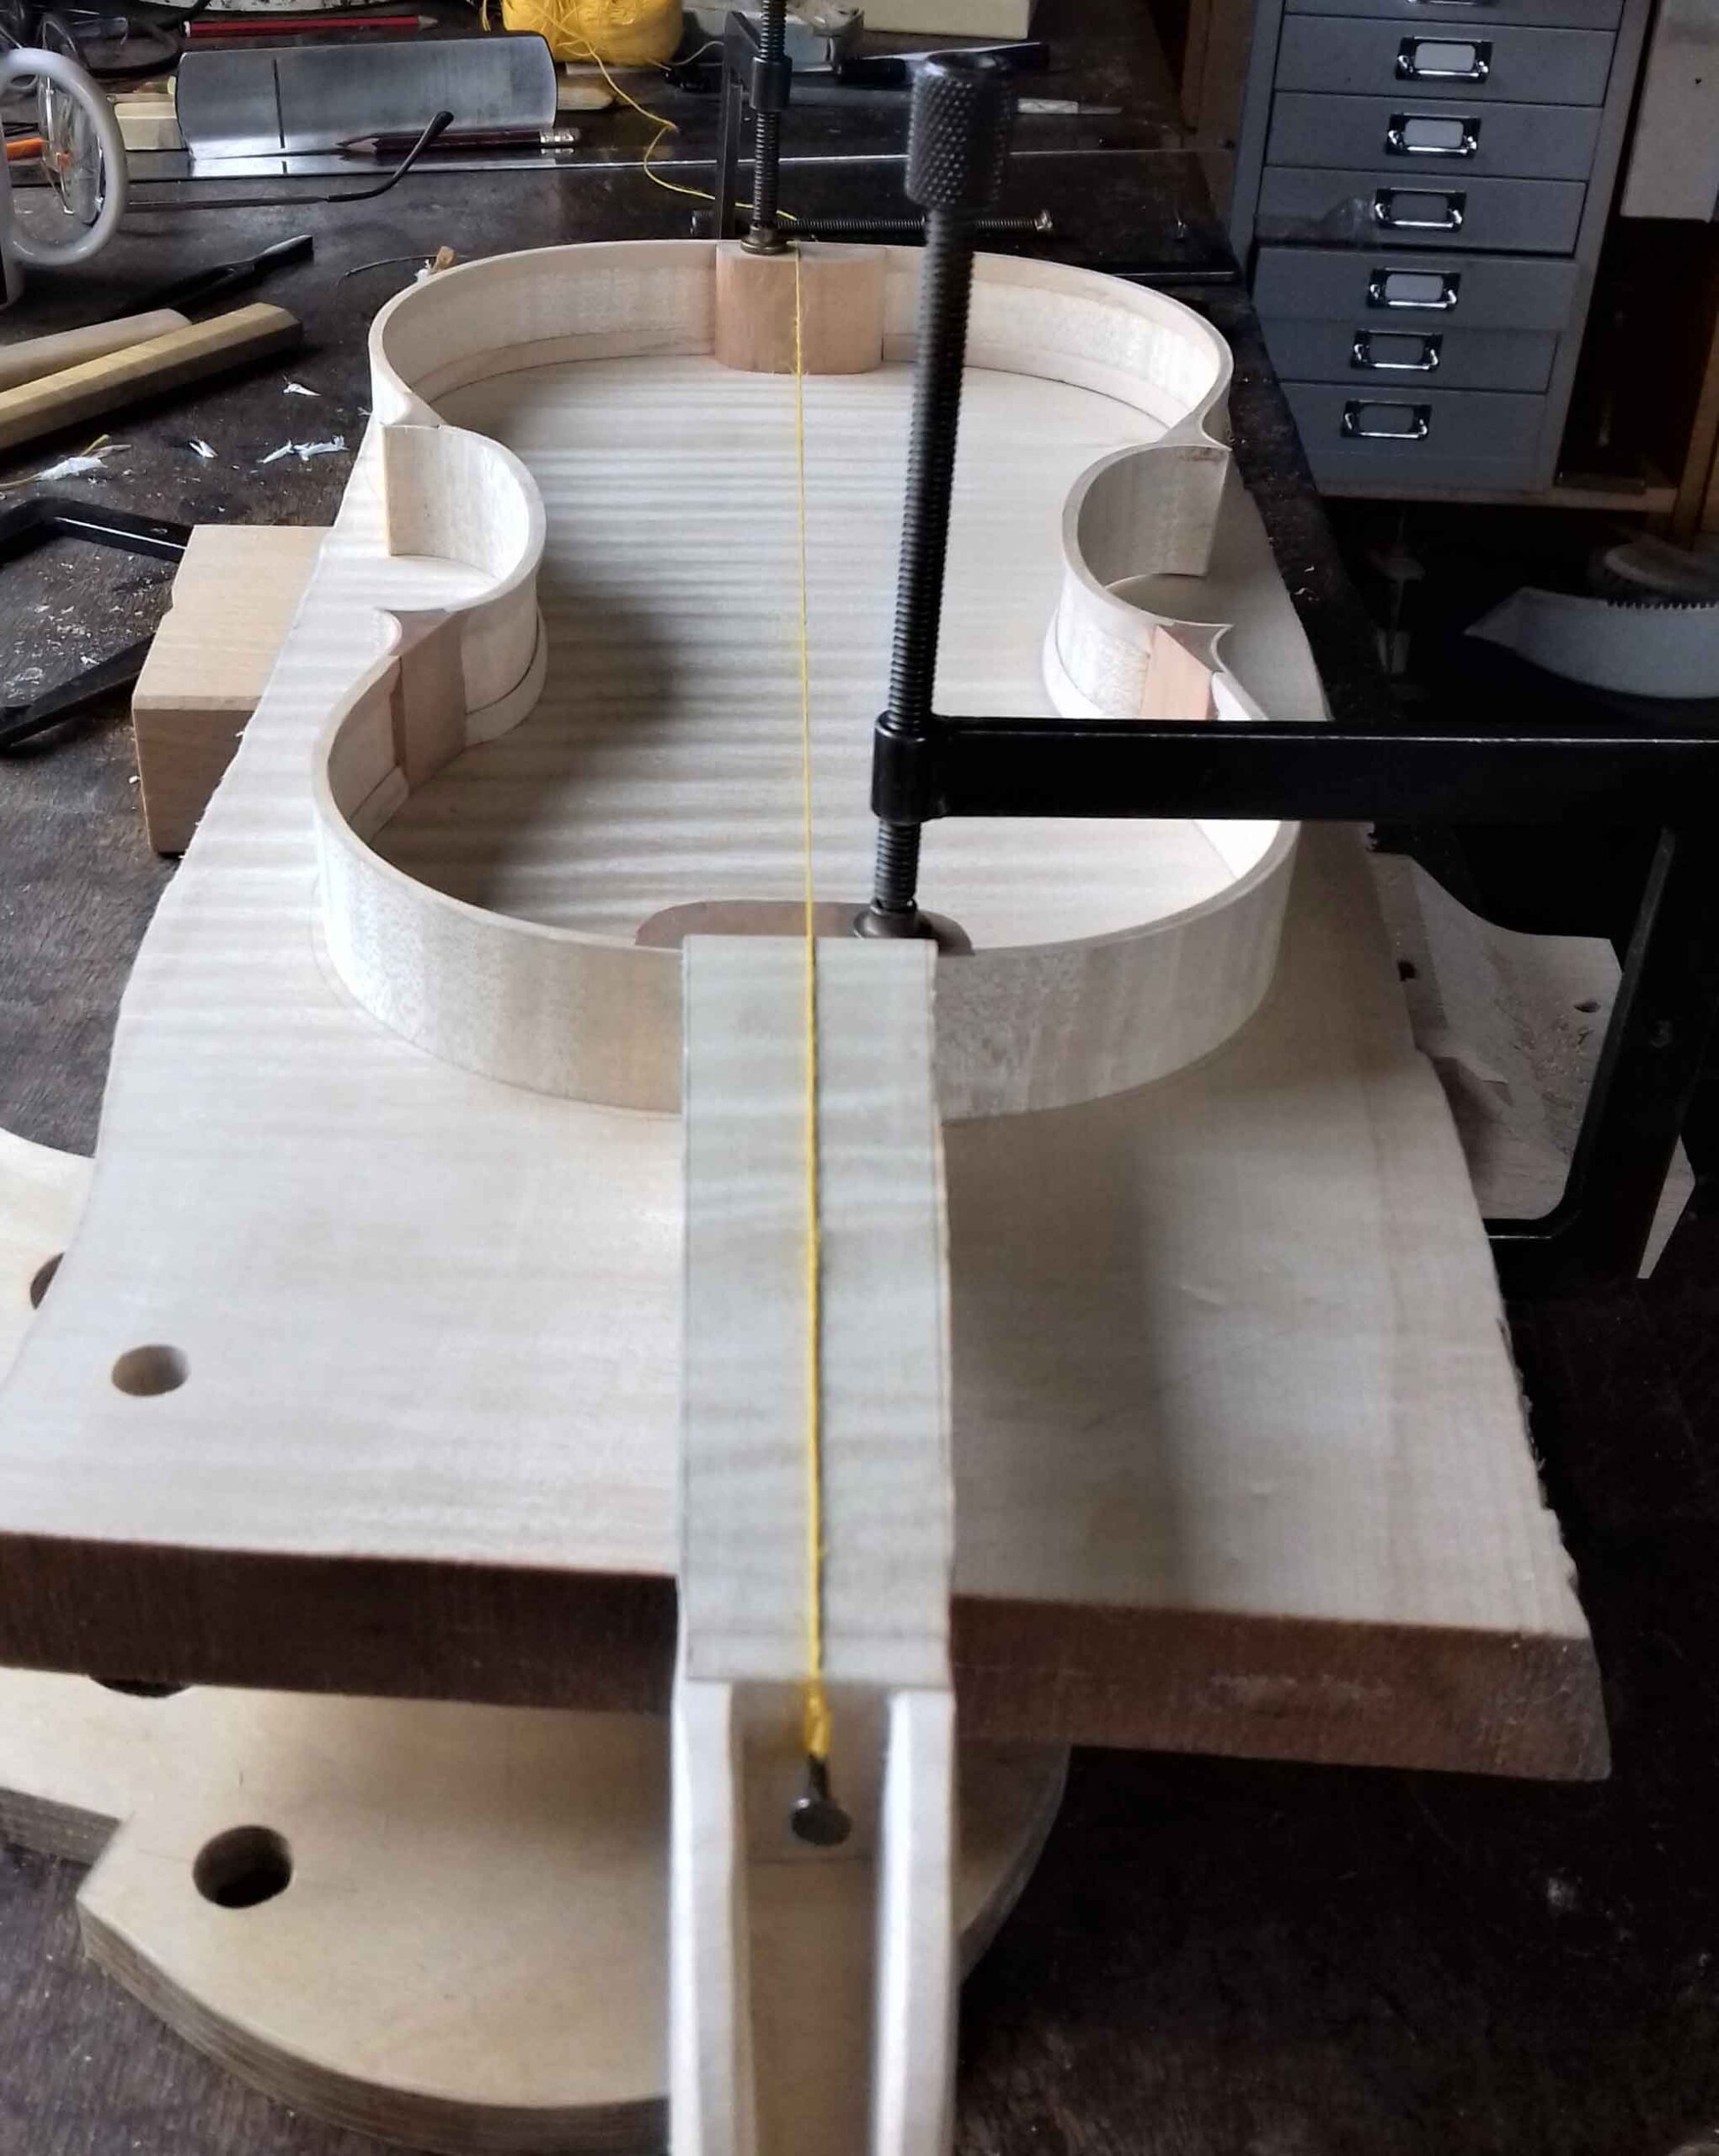
The way this works is that once the neck is nailed on and the glue is dry, the neck root is planed level with the top block so the rib structure lies flat on the back. The top and bottom blocks are then located with the two locating pins through the back. With a piece of string from the endpin hole to a pin nailed temporarily into the inside of the pegbox, the neck is pivoted on the pins so the string lies down the centre of the neck.
If, when aligning the neck, the scroll needs to be moved towards the treble side, this has the effect of pushing the C rib on the treble side downwards, increasing the bend in the bottom rib and slightly straightening the top rib, with the opposite happening on the bass side. Conversely, if the scroll is pushed towards the bass side, the C bout on the bass side ends up lower than the treble C rib.
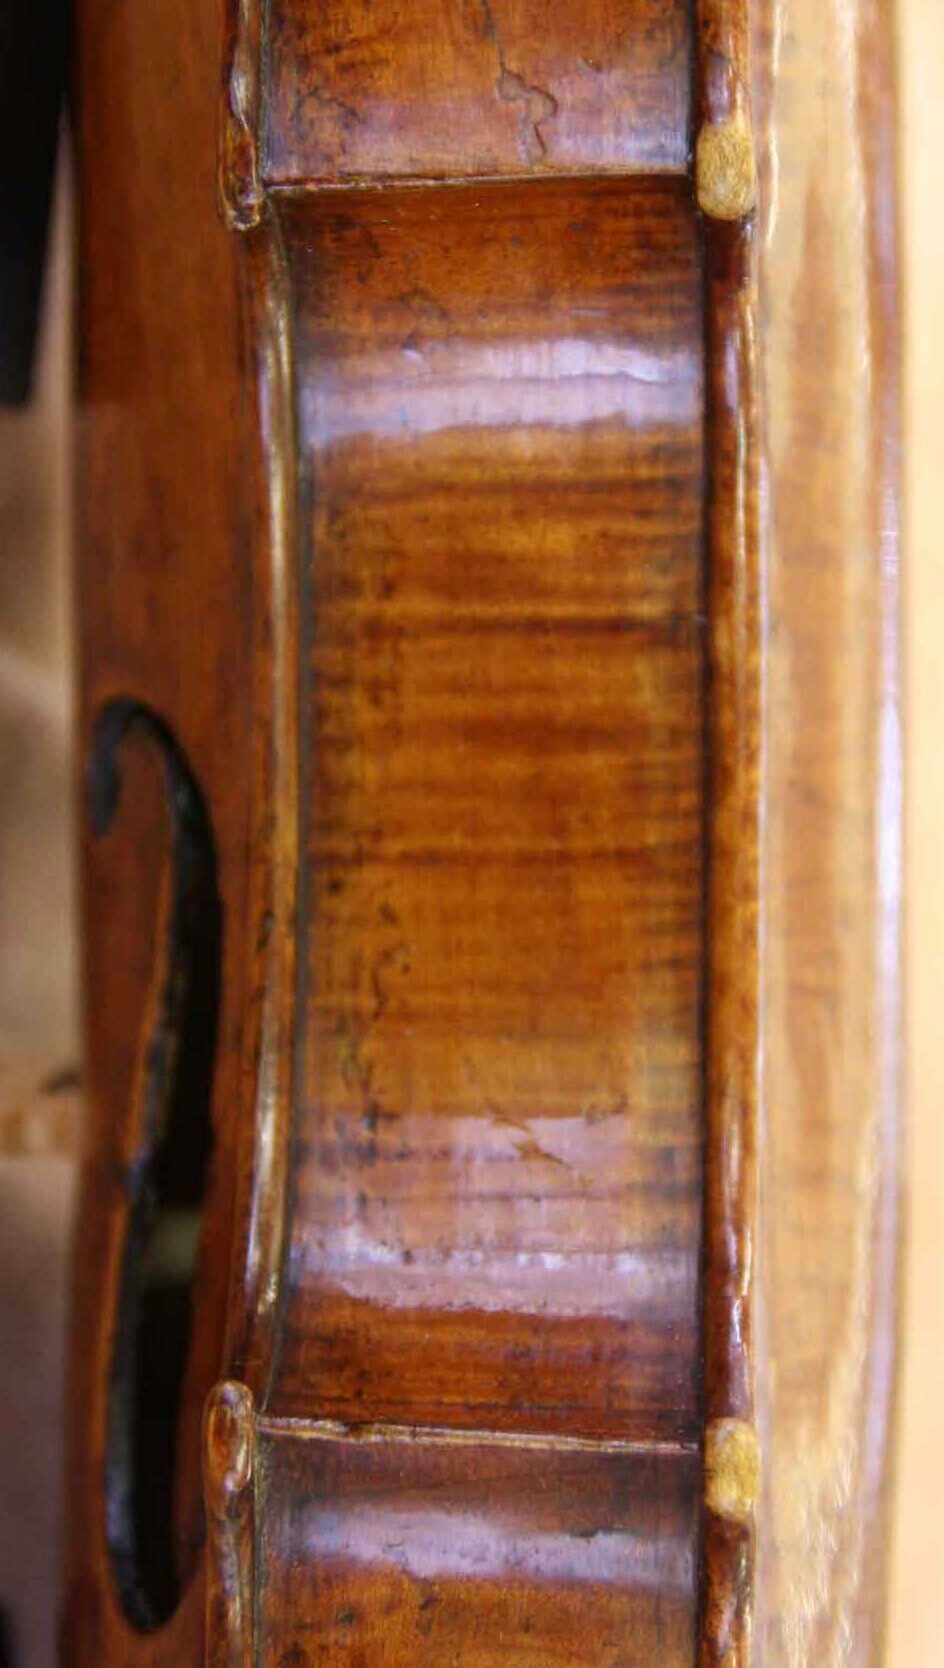
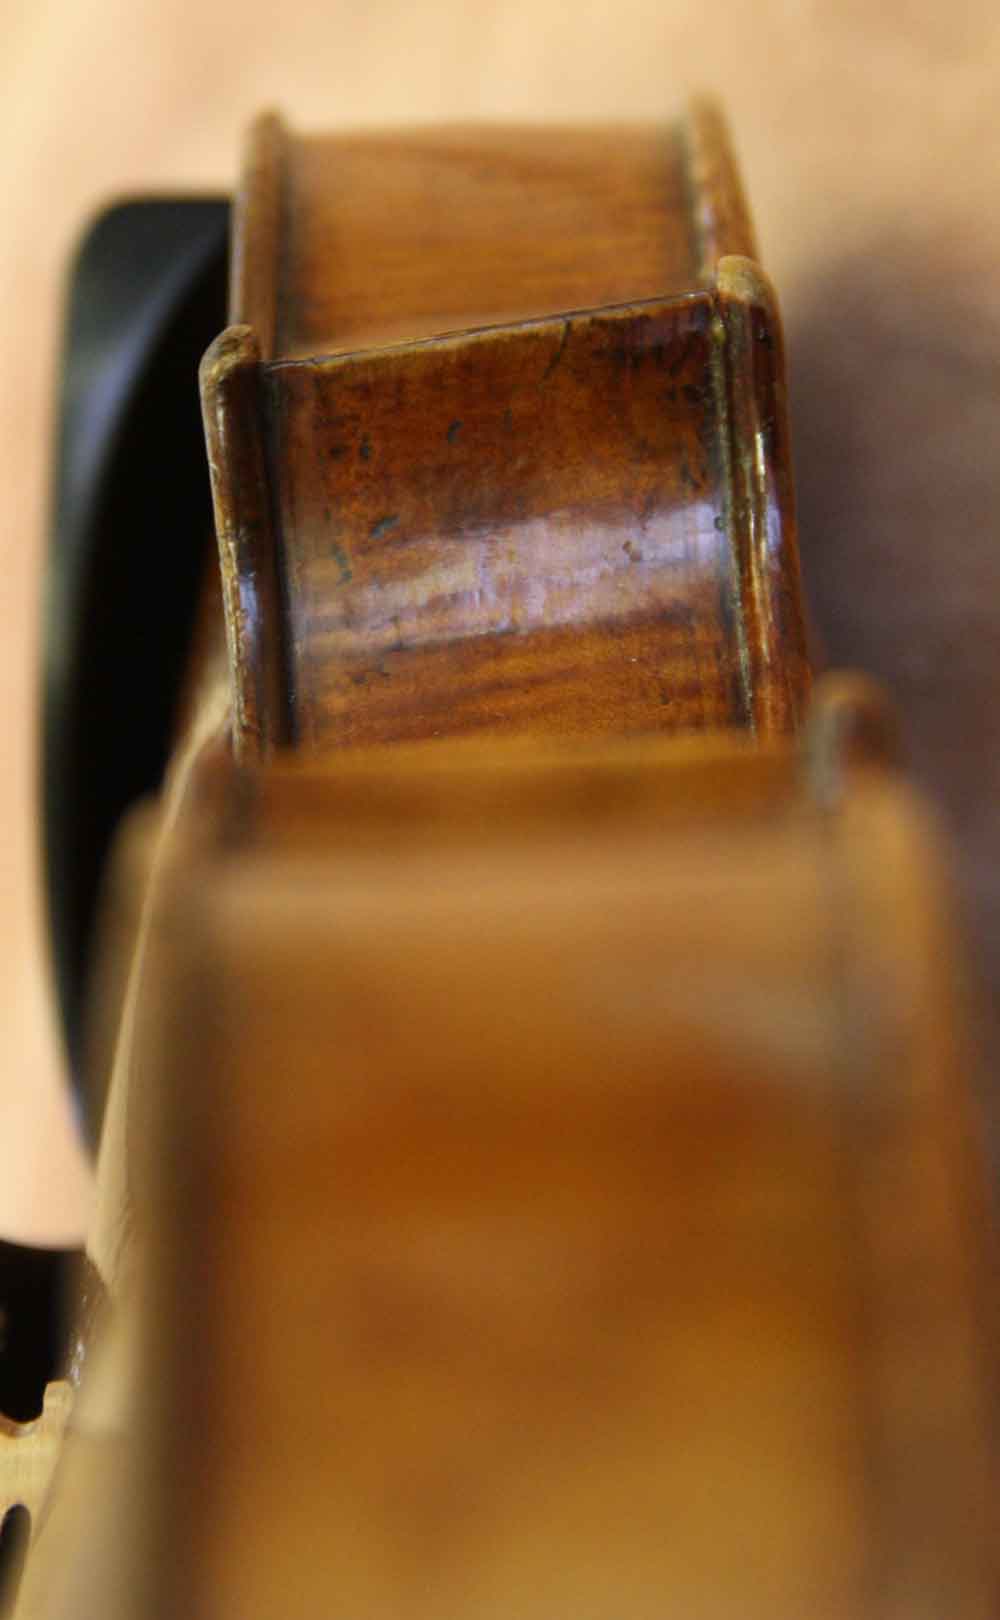
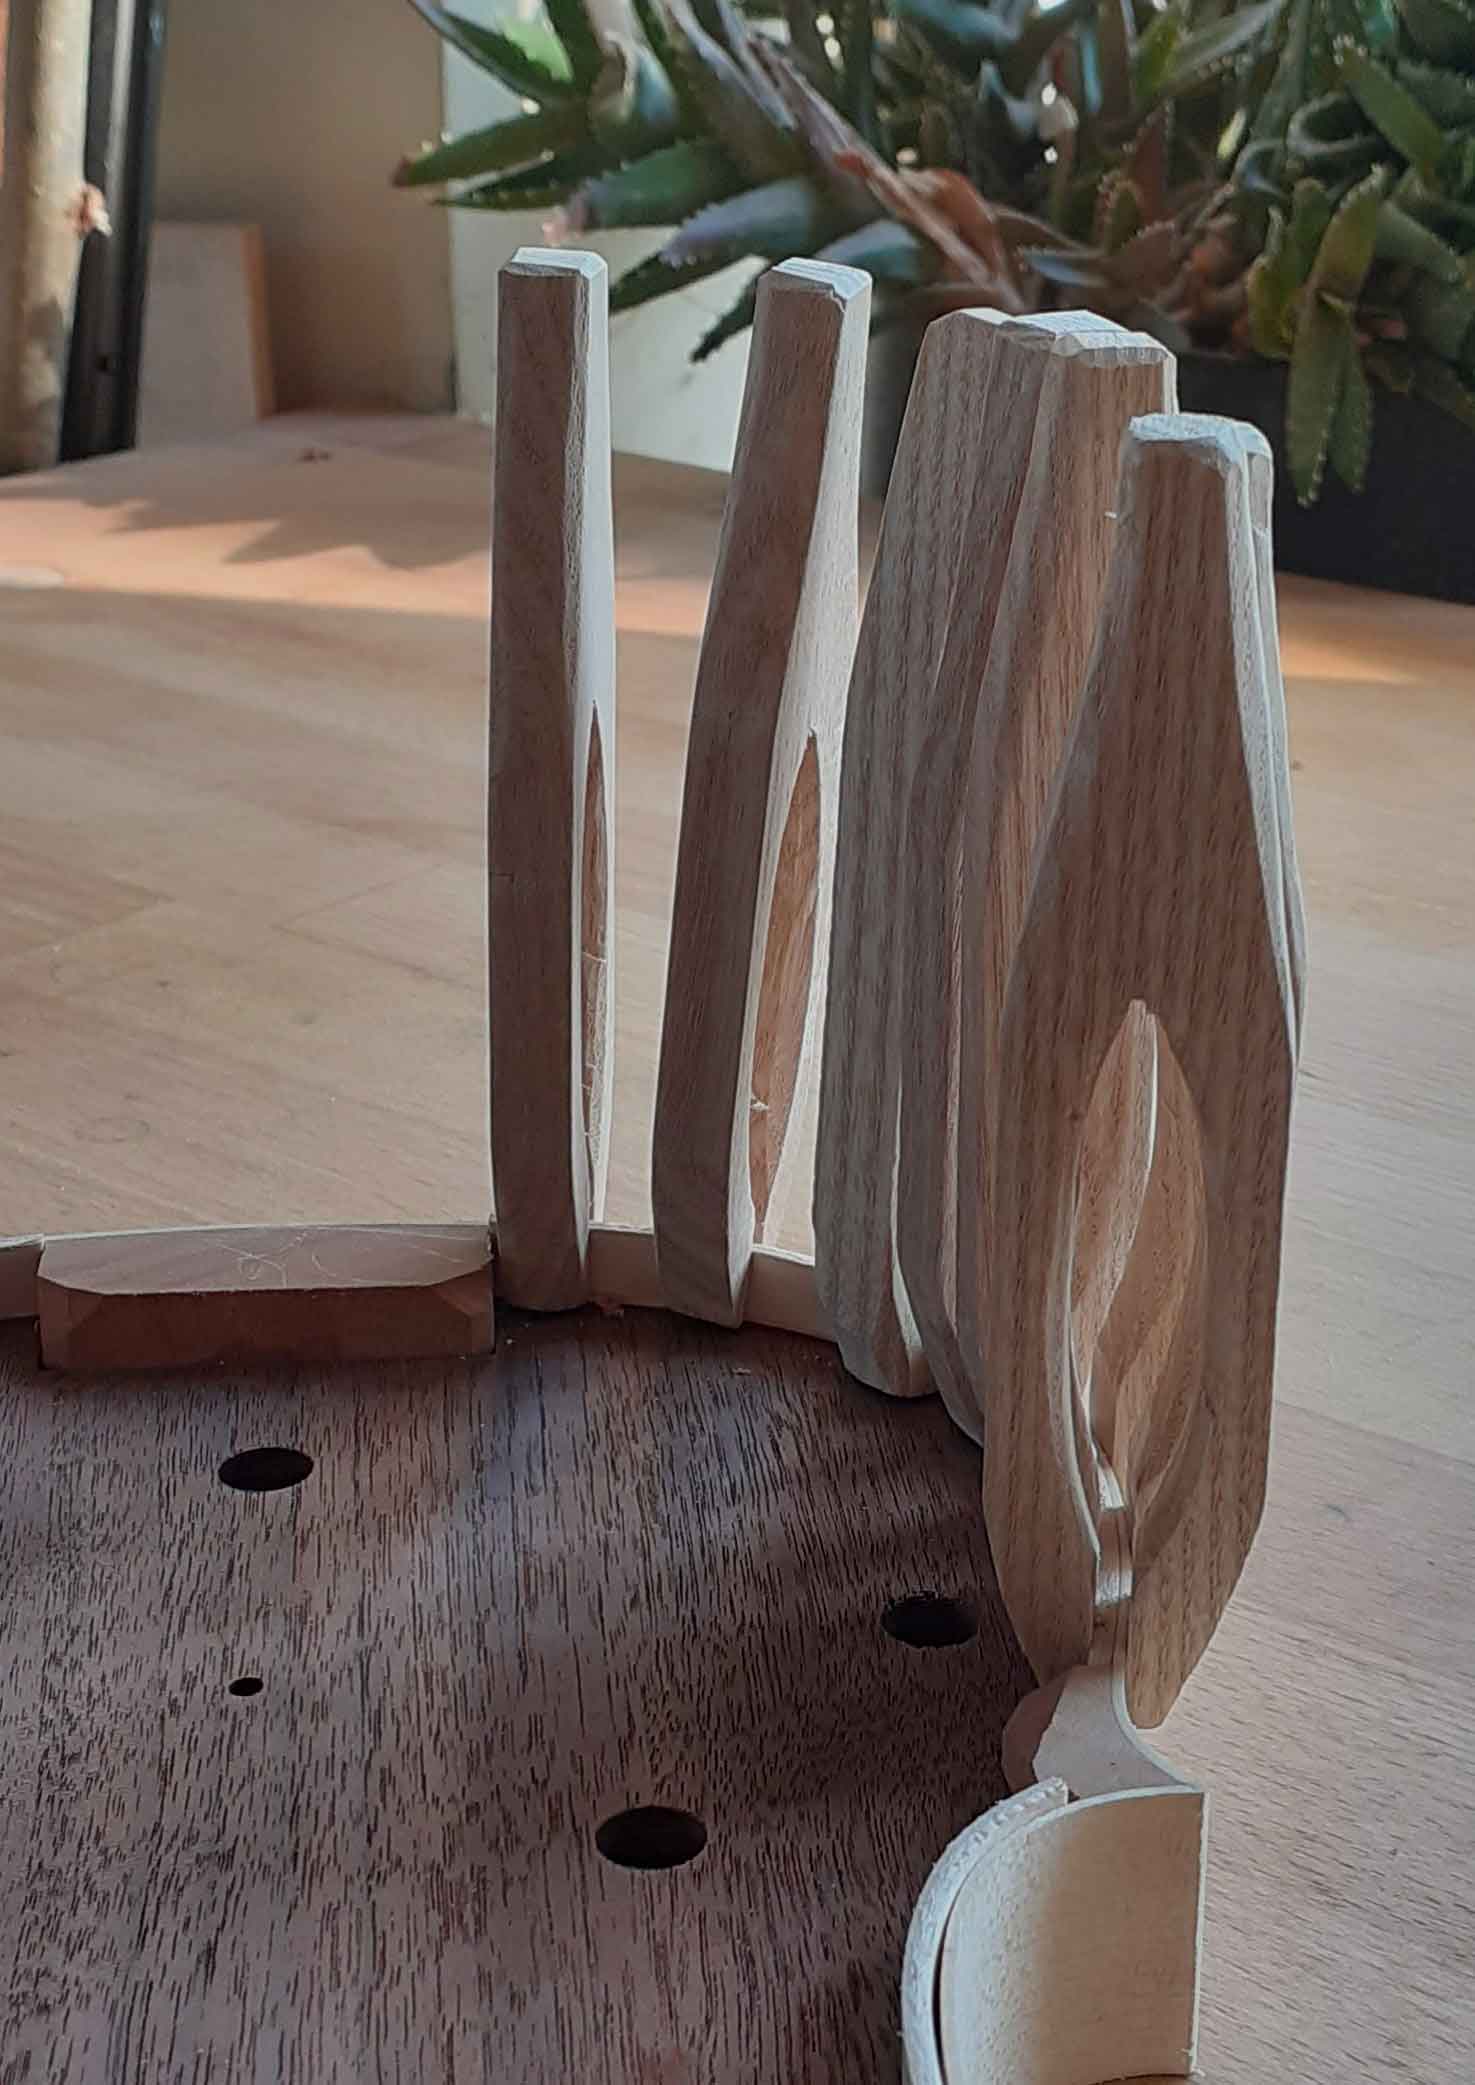
However, this technique of fixing the neck, any inaccurate rib bending, and the freedom of the ribs when off the mould only go so far in accounting for all the discrepancies in the ribs, particularly why the back and belly outlines often diverge so much from each other. An obvious reason, often overlooked, especially when we take a back outline from an instrument and ignore the outline of the belly, is the cutting of the blocks. In this example of an Andrea Guarneri violin, [pics left and middle] the lack of squareness in the blocks is particular obvious. Although this may be an extreme example, most ribs from the classical era are not parallel, certainly not as clinically precise as most modern rib structures, even Stradivari’s ribs [right picture] showing some deviance from the parallel.
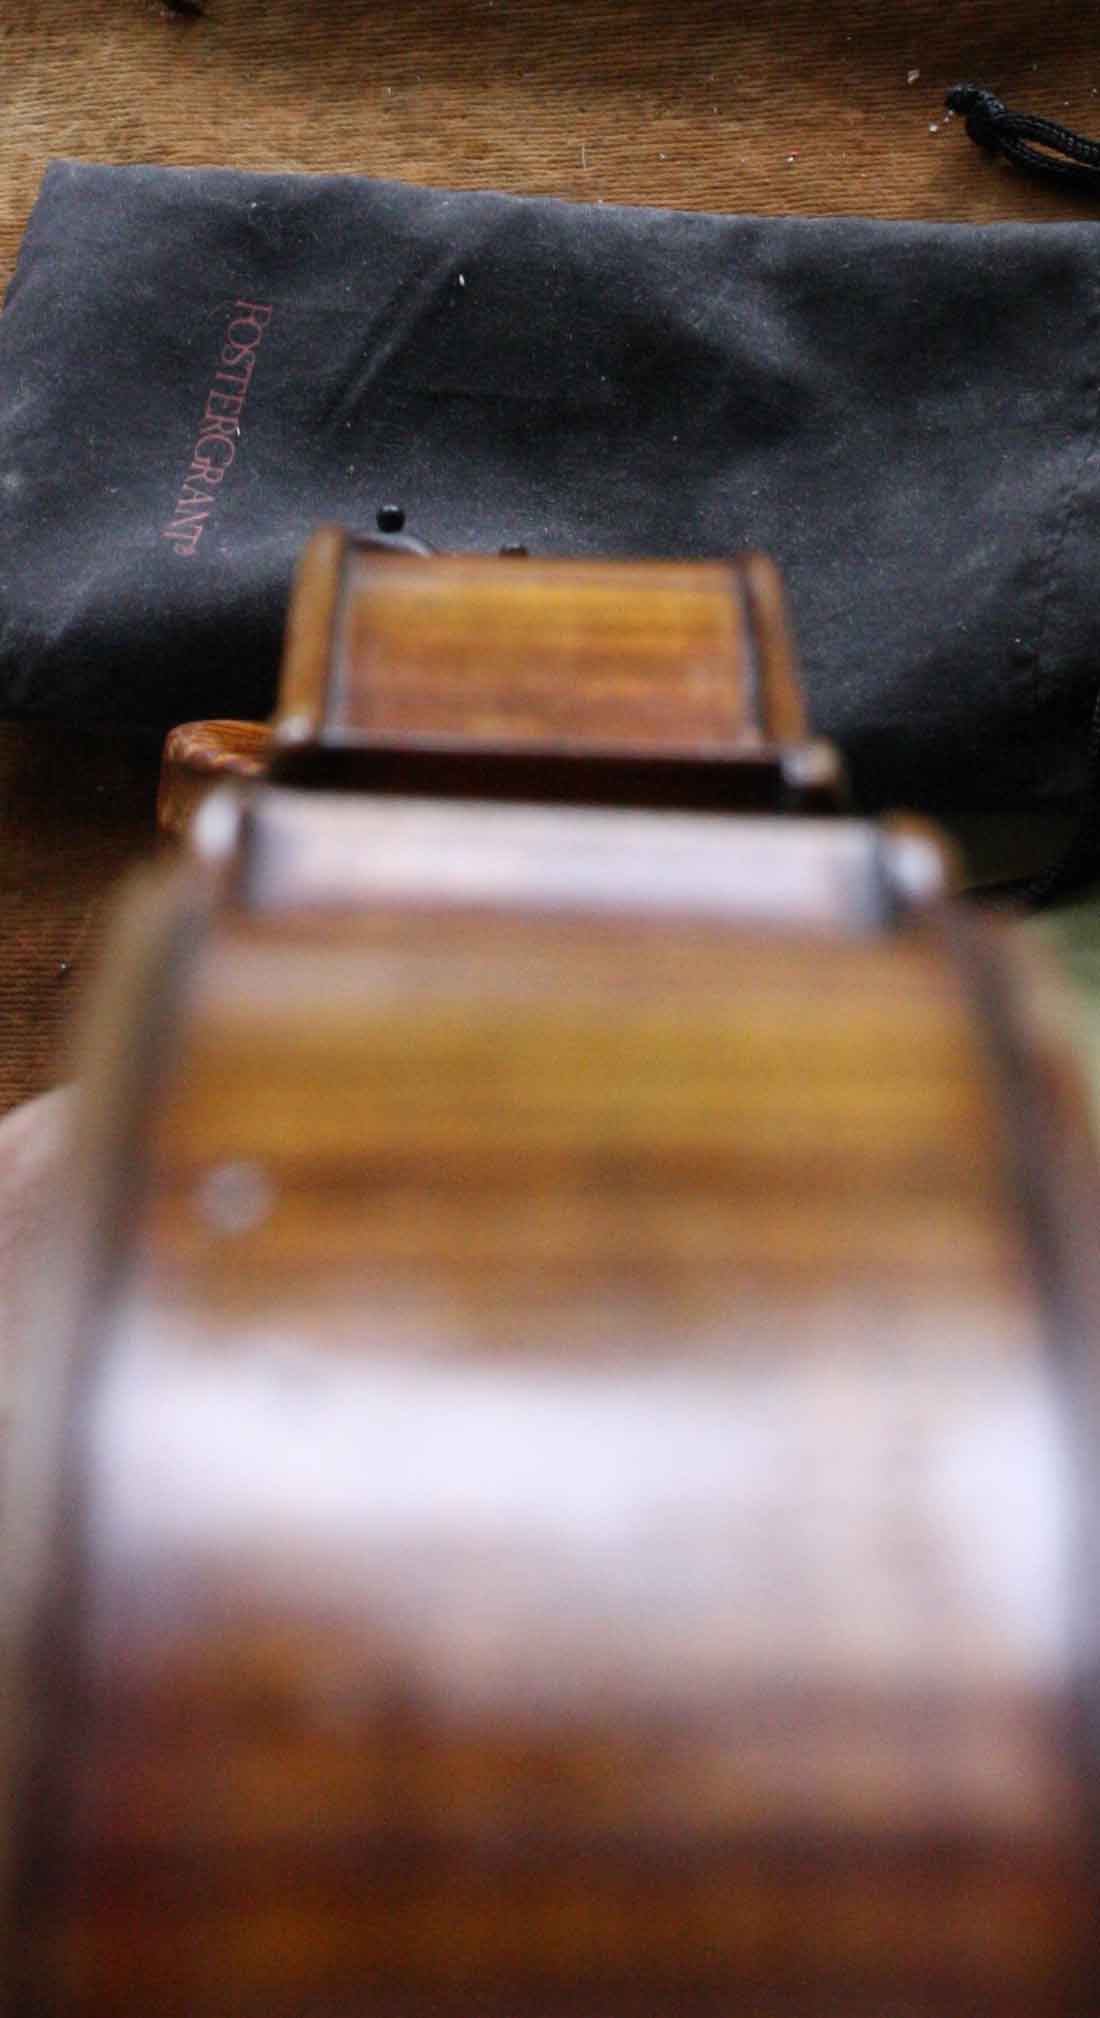
In cutting his blocks, it is hard to imagine that Andrea Guarneri used a square, and perhaps especially in this case, he was either in a hurry or the work was done by an apprentice. Whatever the truth, he was sufficiently unconcerned about the result to continue to use the blocks, knowing that the subsequent method of securing the ribs would not be compromised by the angle of the blocks. For most of us nowadays who use a single clamp and a wooden block to push the ends of the c ribs, this would be a problem because without the blocks being square and parallel, an annoying amount of fiddling and planing of rib ends is required to get the ribs to fit to the blocks. When securing the rib to the block with wooden pins and string, however, as Stradivari’s moulds indicate, the lack of squareness is no problem. When first presented with the idea of using string to tie on the ribs, it does seem like a very fiddly and approximate process, but like most potentially worrying procedures, developing a working method or seeing it done changes that perception. In fact, after demonstrating my technique to a student last year, she tried it and described it as ‘the most relaxed gluing she had done.’
From the video, you can see that by doing a dry run and keeping one end of the rib tied, the other end can be precisely glued in place, though if you decide to remove the rib completely after the dry run and glue one end, you can override the pressure of the string to correct the direction of the rib before gluing the other end. Alternatively, if you do end up with the rib not being parallel to the mould, you can just bend it into position at the other block. This makes one side of the rib lie away from the mould, giving a different outline between back and belly, another possible cause of asymmetry. No matter how precisely you bend and secure the rib, but especially when you have blocks that are not square, it is sensible to leave the ribs wider at this stage to ensure the block is covered even if the rib is at a slight angle.
With the upper and lower bouts, using modern clamps rather than pegs and string has fewer disadvantages, in that the clamp exerts pressure in the right direction, and they can clamp a rib when the blocks are not square. But when using string, once again the worrying thing is having no fixed point of reference, such as the bench top to push the bottom of the ribs against as you tighten the clamp. To add an element of certainty, I tie the ribs in place dry, then if I am using a one-piece top rib, release it at one end and at the top block, leaving the rib still tied to the other corner block. Then the top block can be glued, followed by the other corner block, before the dry block is released and glued. When using a two-piece bottom rib, I use a different procedure; I first do a dry run, mark the position of the centre line on the bottom block, and leave both ribs still tied to the corner blocks. After removing the clamping block and string from the bottom block, I put glue on one of the ribs and half the block, making sure there is no excess glue on the other half of the block. Then I loosely put on the clamping block making sure the rib I am not gluing is loose and the end is a few millimetres away from the centre line, then push the other rib tight round the mould and up to the centre line before tightening the clamping block with the string. After half an hour the string can be removed before it is properly set to check the rib’s position and then the other rib can be glued, slid against the first and the corner blocks glued in place.
For securing the linings I use wooden clamps, a bit like the old-fashioned clothes pegs, which look like a likely candidate and which I subsequently found a picture of in a book from 1925; not 1625 unfortunately, but at least they have some pedigree. Another advantage of the half-depth mould and an indication that speed was the primary reason for using this type of mould is that you can quickly and easily cut back the linings because they are still supported by the mould, using long bold knife strokes and the position of your first finger on the knife as a fence.
The Body
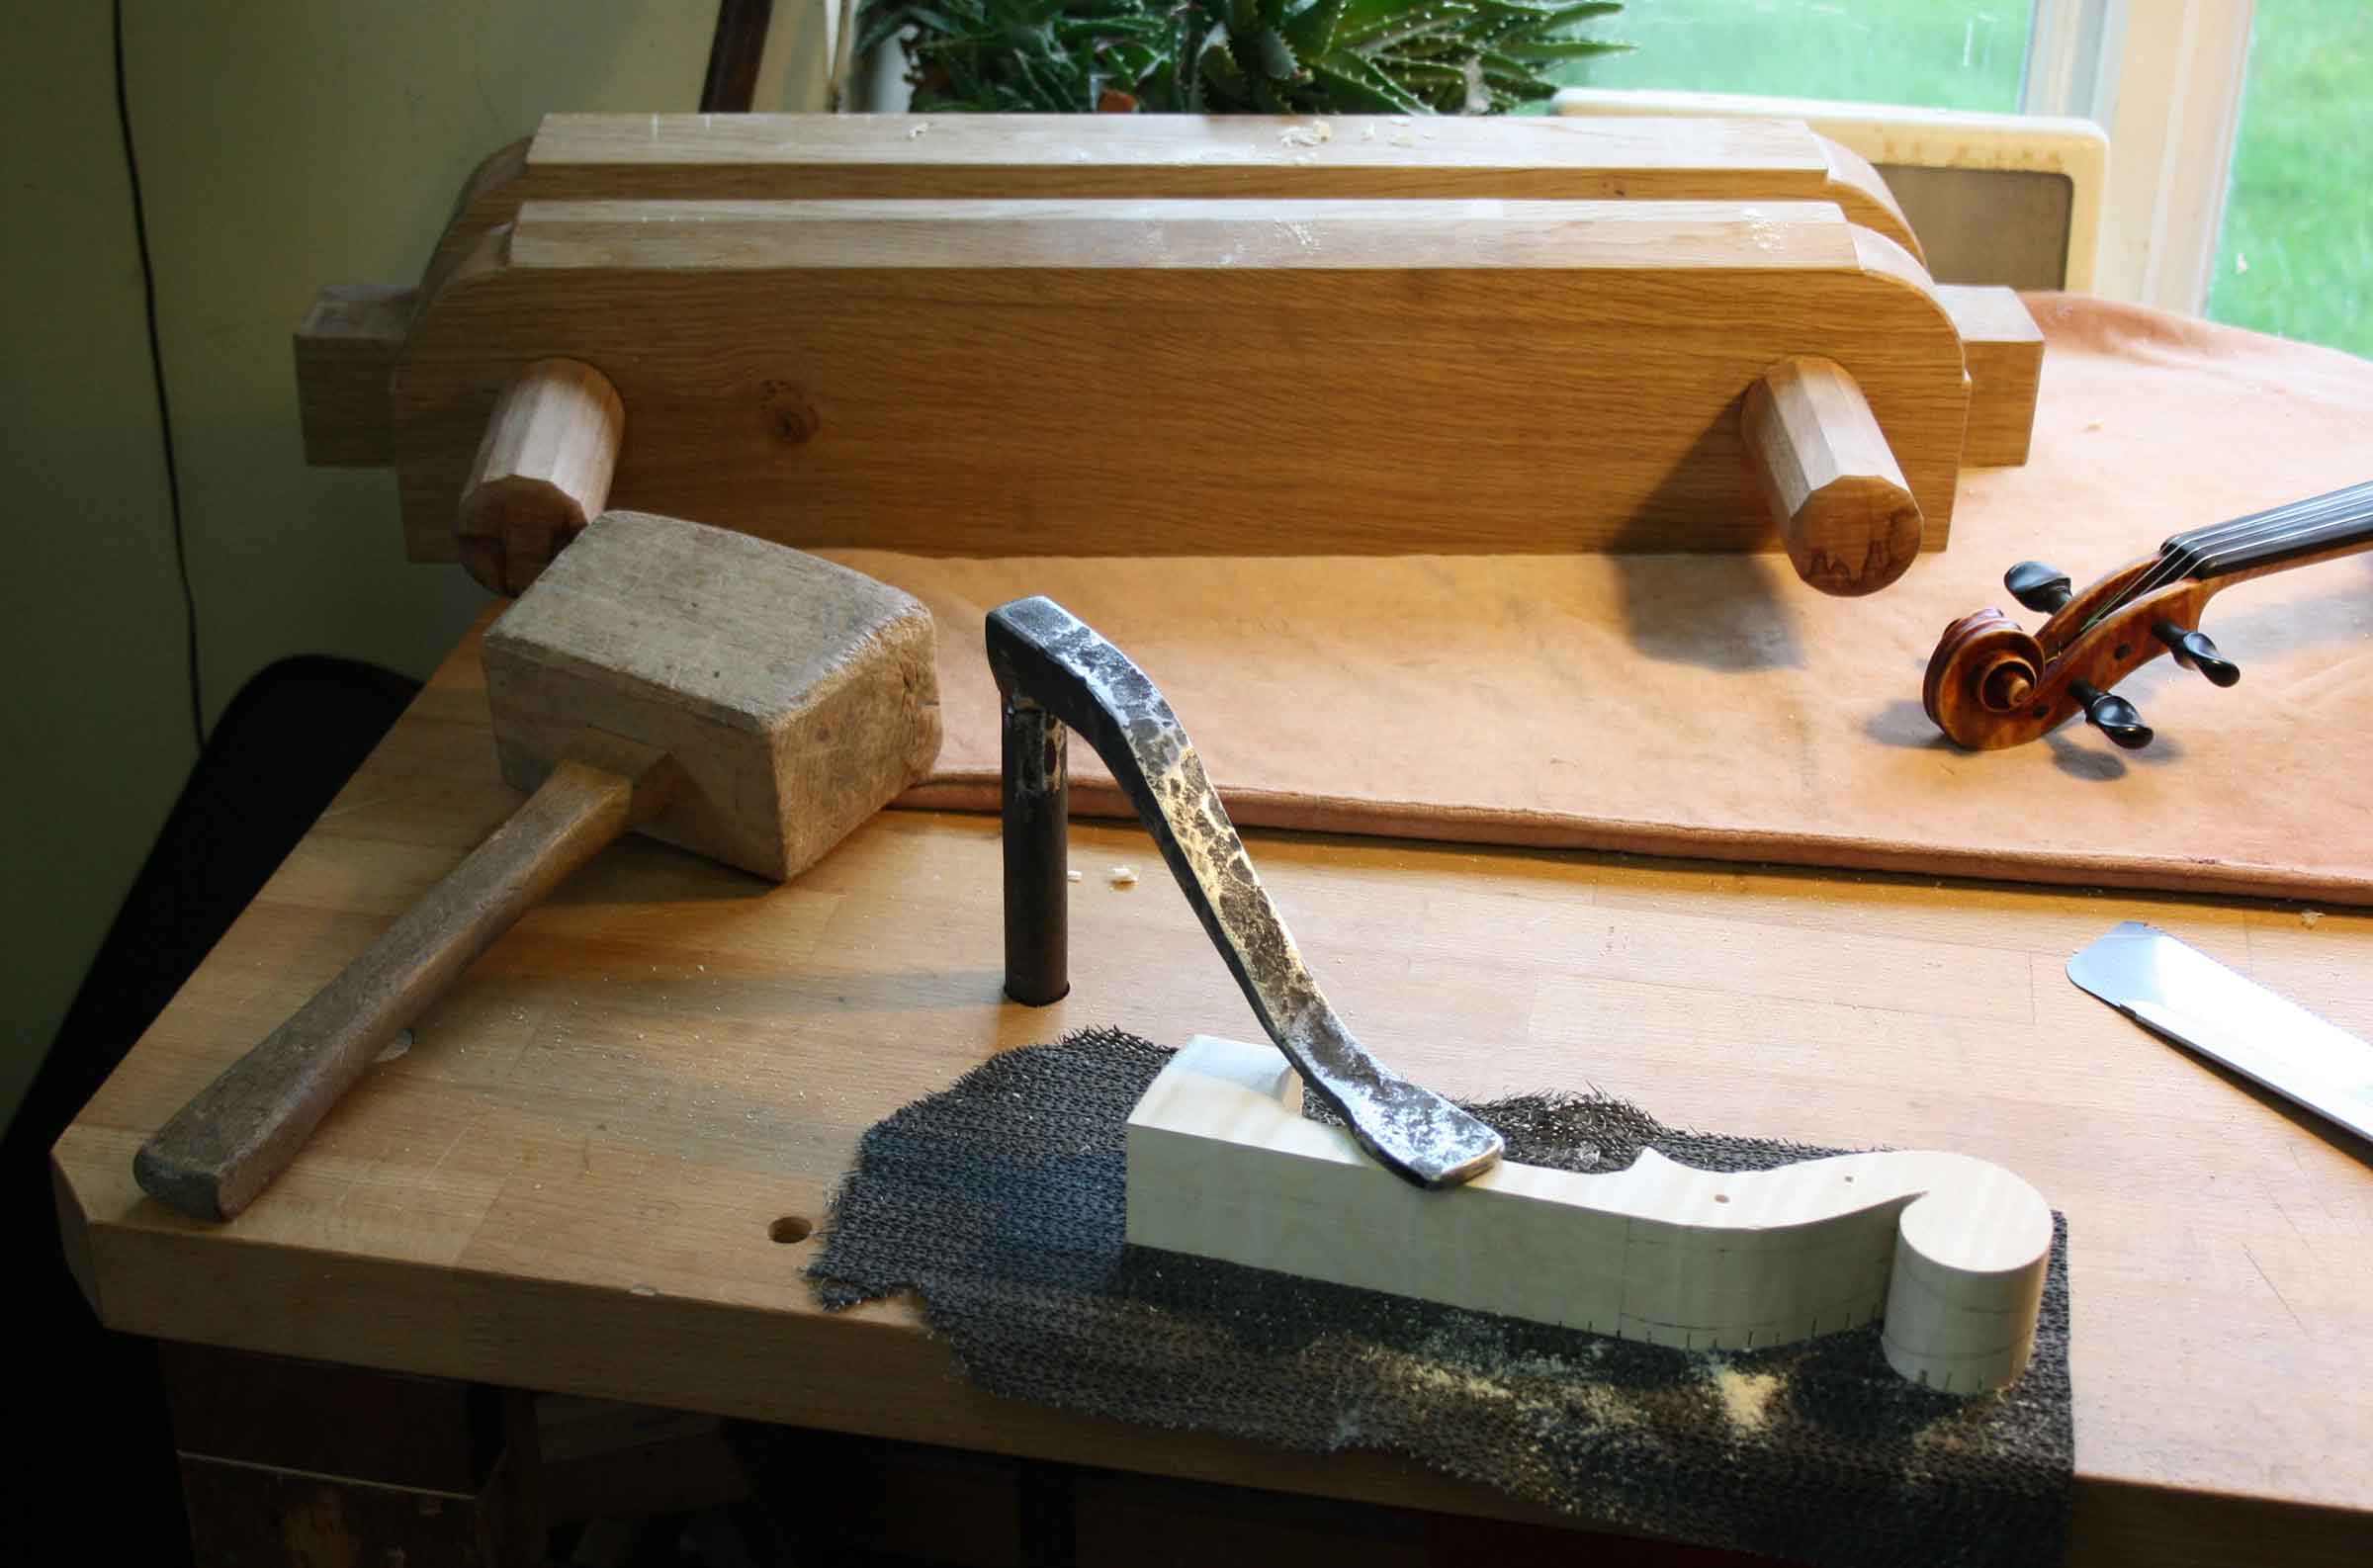
One of the tools I decided to make, partially because my previous off-the-peg continental style bench left quite a bit to be desired, was this solid oak bench I made in early 2020, nowadays often called a ‘Roubo’ bench. The main change from the 18th century French bench is the incorporation of a wagon vice, complete with a wooden screw, which essentially functions in the same way as the one in the Loeffelholz Codex from Nuernberg dated to 1505. Whether this type of vice was then a new invention or in common use, whether it was peculiar to Bavaria or widespread, we just don’t know. Otherwise, violin makers would have used pegs placed in holes in the bench and wedges, or a bench stop and deersfoot to hold their wood to flatten it, either method being fine for holding flat boards, though for jointed plates with a ‘roof,’ the wagon vice is easier.
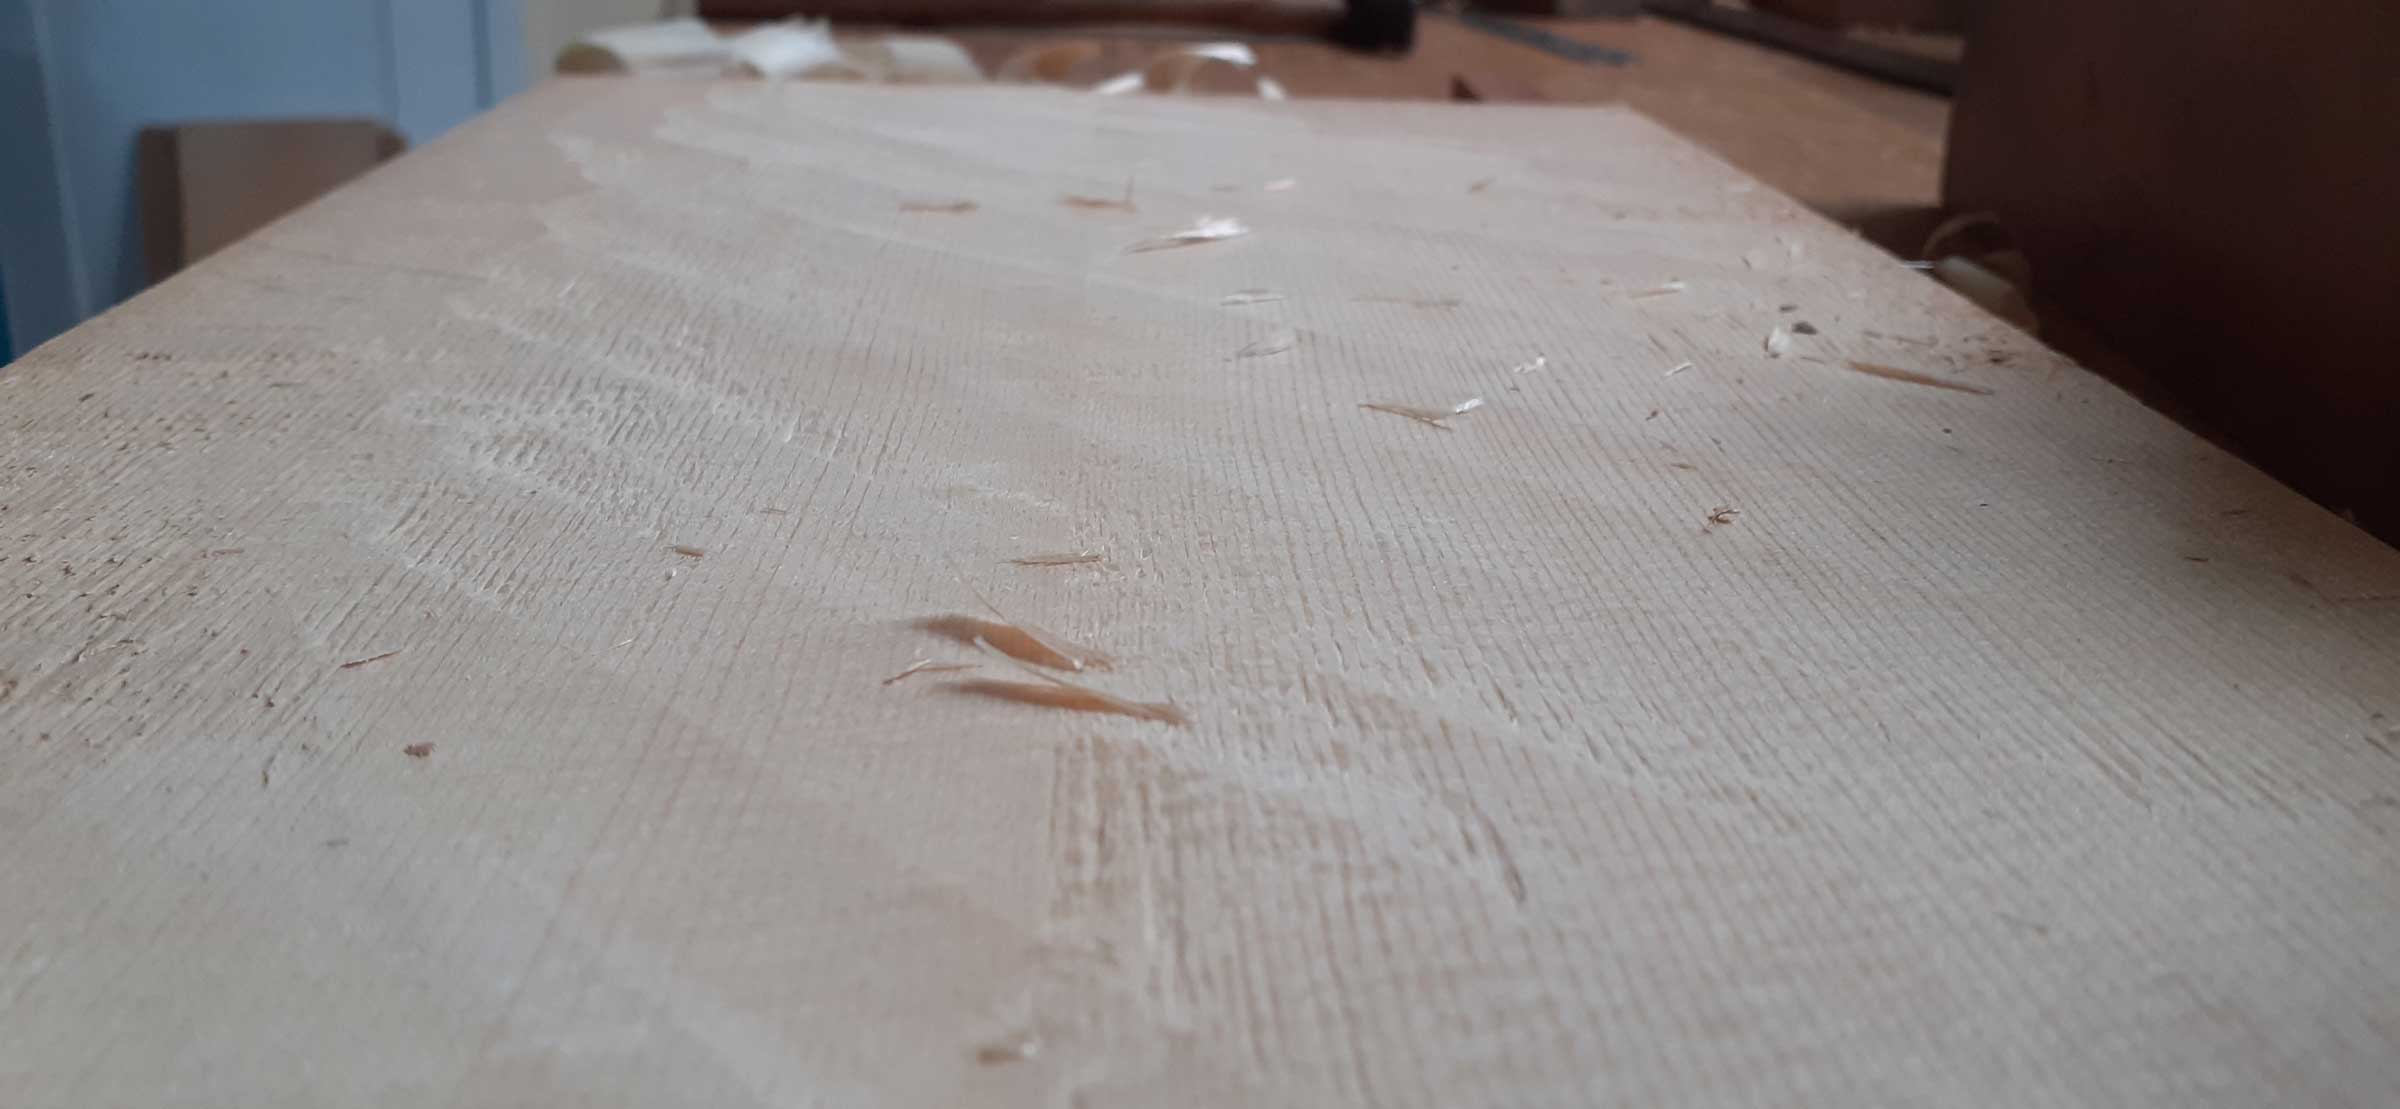
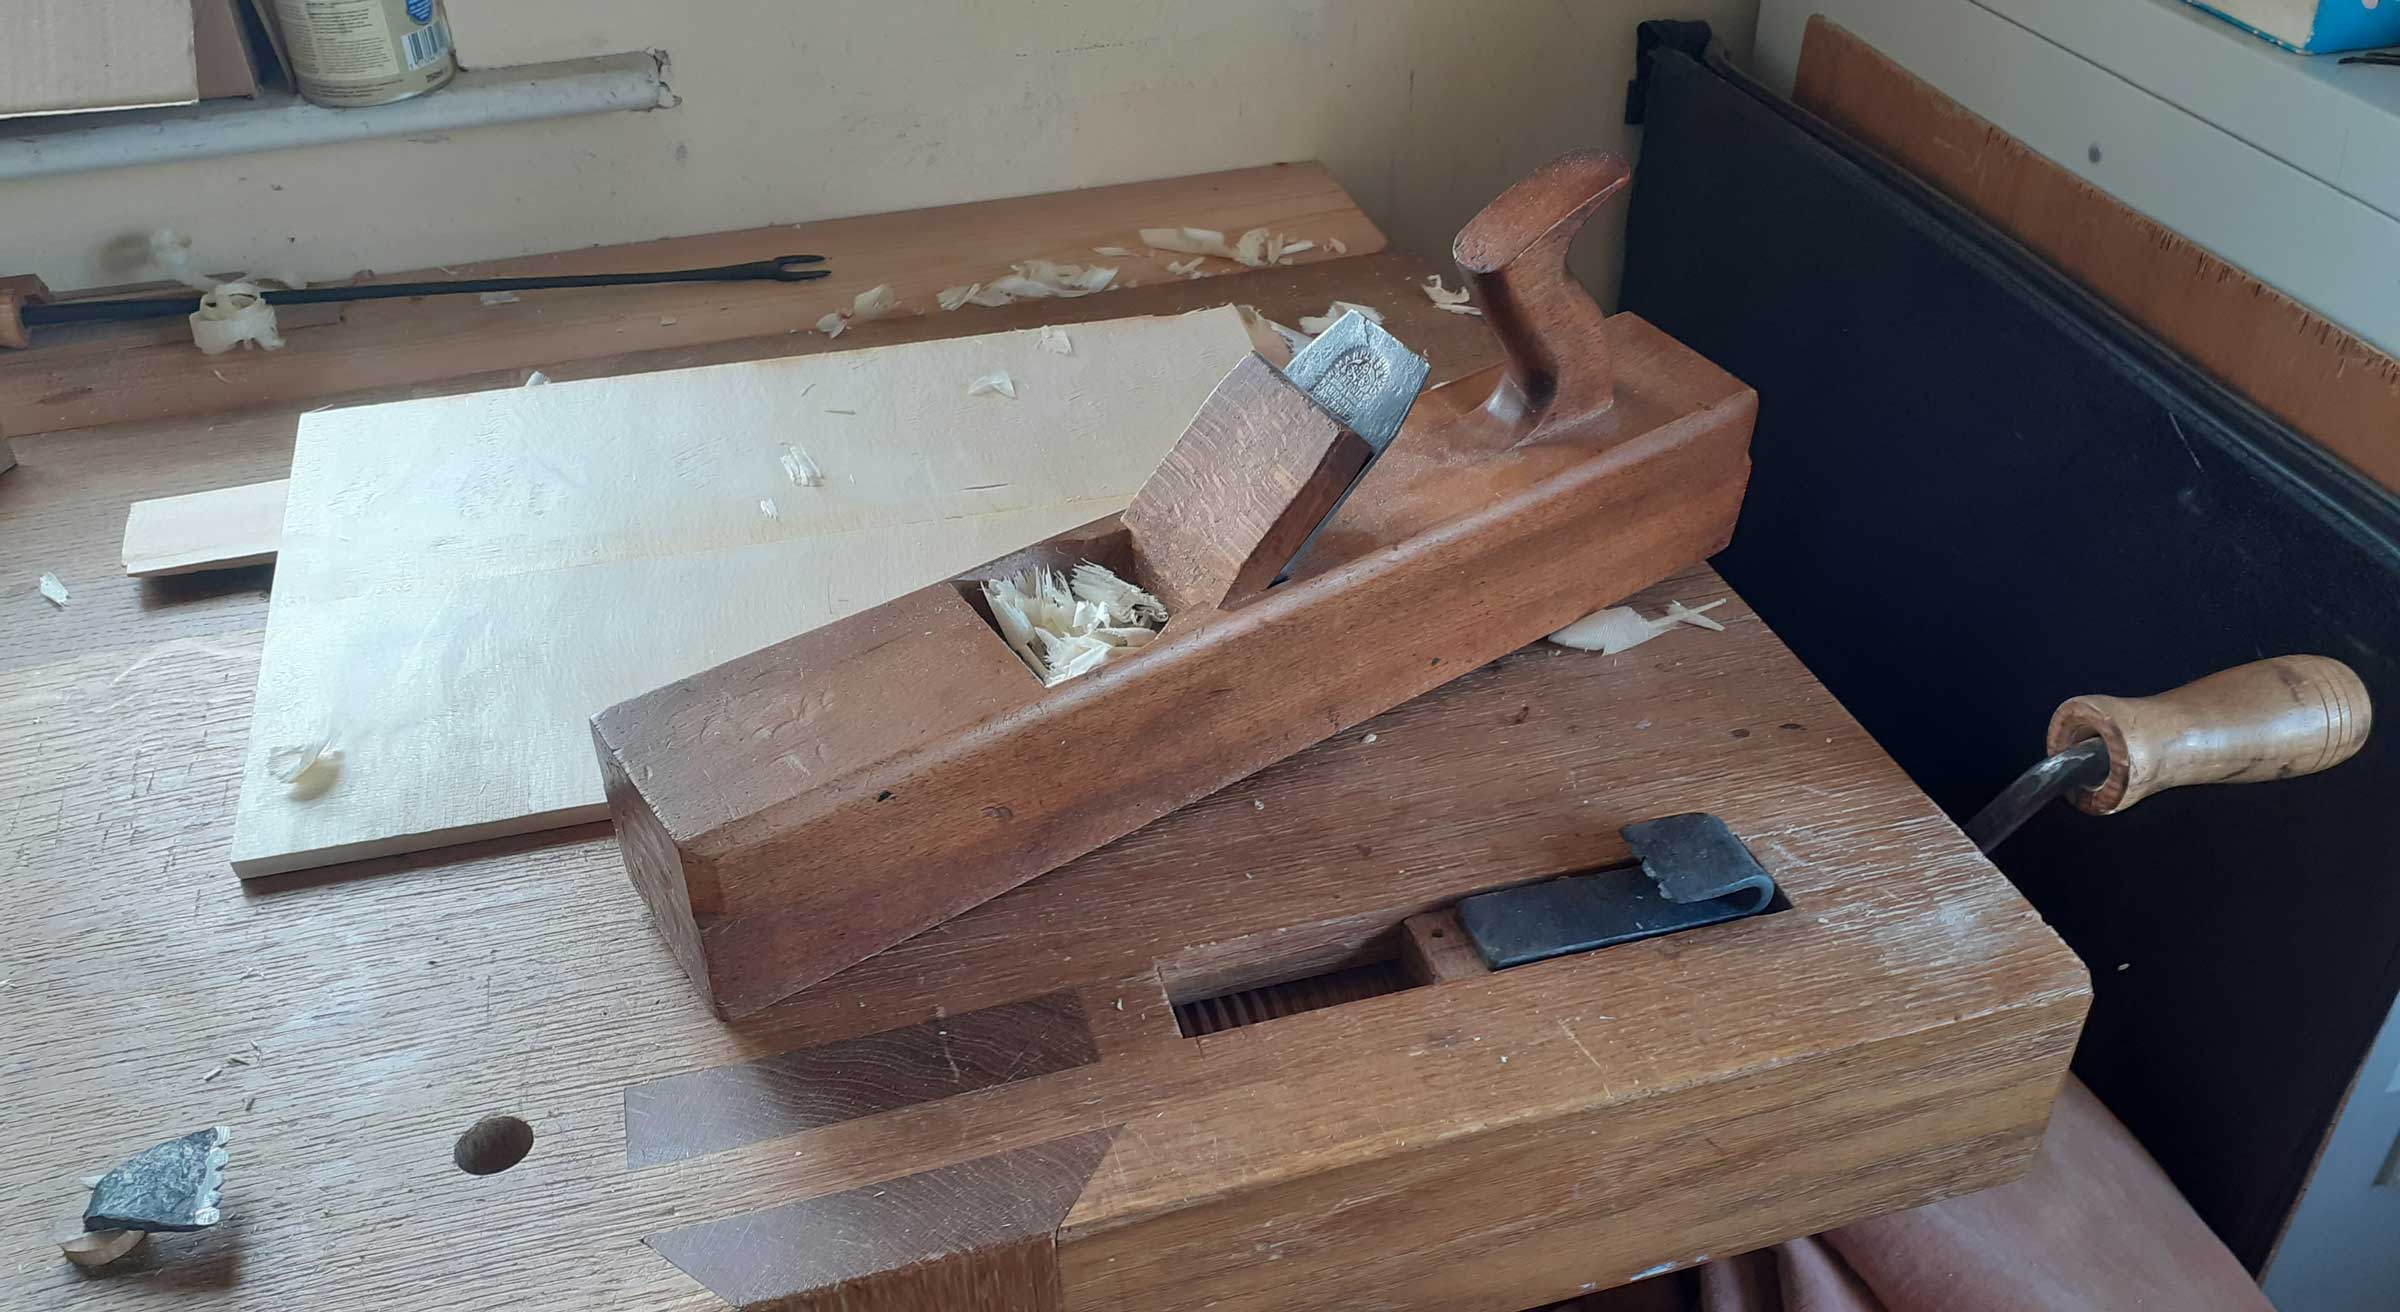
In the next picture you can see that the belly I was flattening has marks left by a rounded plane iron. I am somewhat embarrassed to admit that having been indoctrinated into the violin making orthodoxy at college, I rejected or forgot about having a radiused edge on a jack plane for the initial work when flattening, as I learnt at school, and was only reacquainted with the idea in recent years. Rather than having two irons for my jack plane, I do my preparatory paning with a wooden plane. Since I have got used to it, I really like the feel of it, it is light so easy to push and adjusting it with a hammer is no harder than adjusting a thumb plane. Although this one is inauthentic in that it has a breaking iron, whereas before all planes before 1700 just had a single iron, the radiused edge means that you do not rip out wood at both ends of the iron, so planing is easier and quicker. In fact, for flattening very rough wood, another type of plane which was usually shorter than the jack plane was in common use, with a flat sole and a rounded iron [without a breaker] known as a scrub plane. These were already uncommon when I started woodworking, being usurped by the planer/thicknesser, but more on scrub planes in a minute.
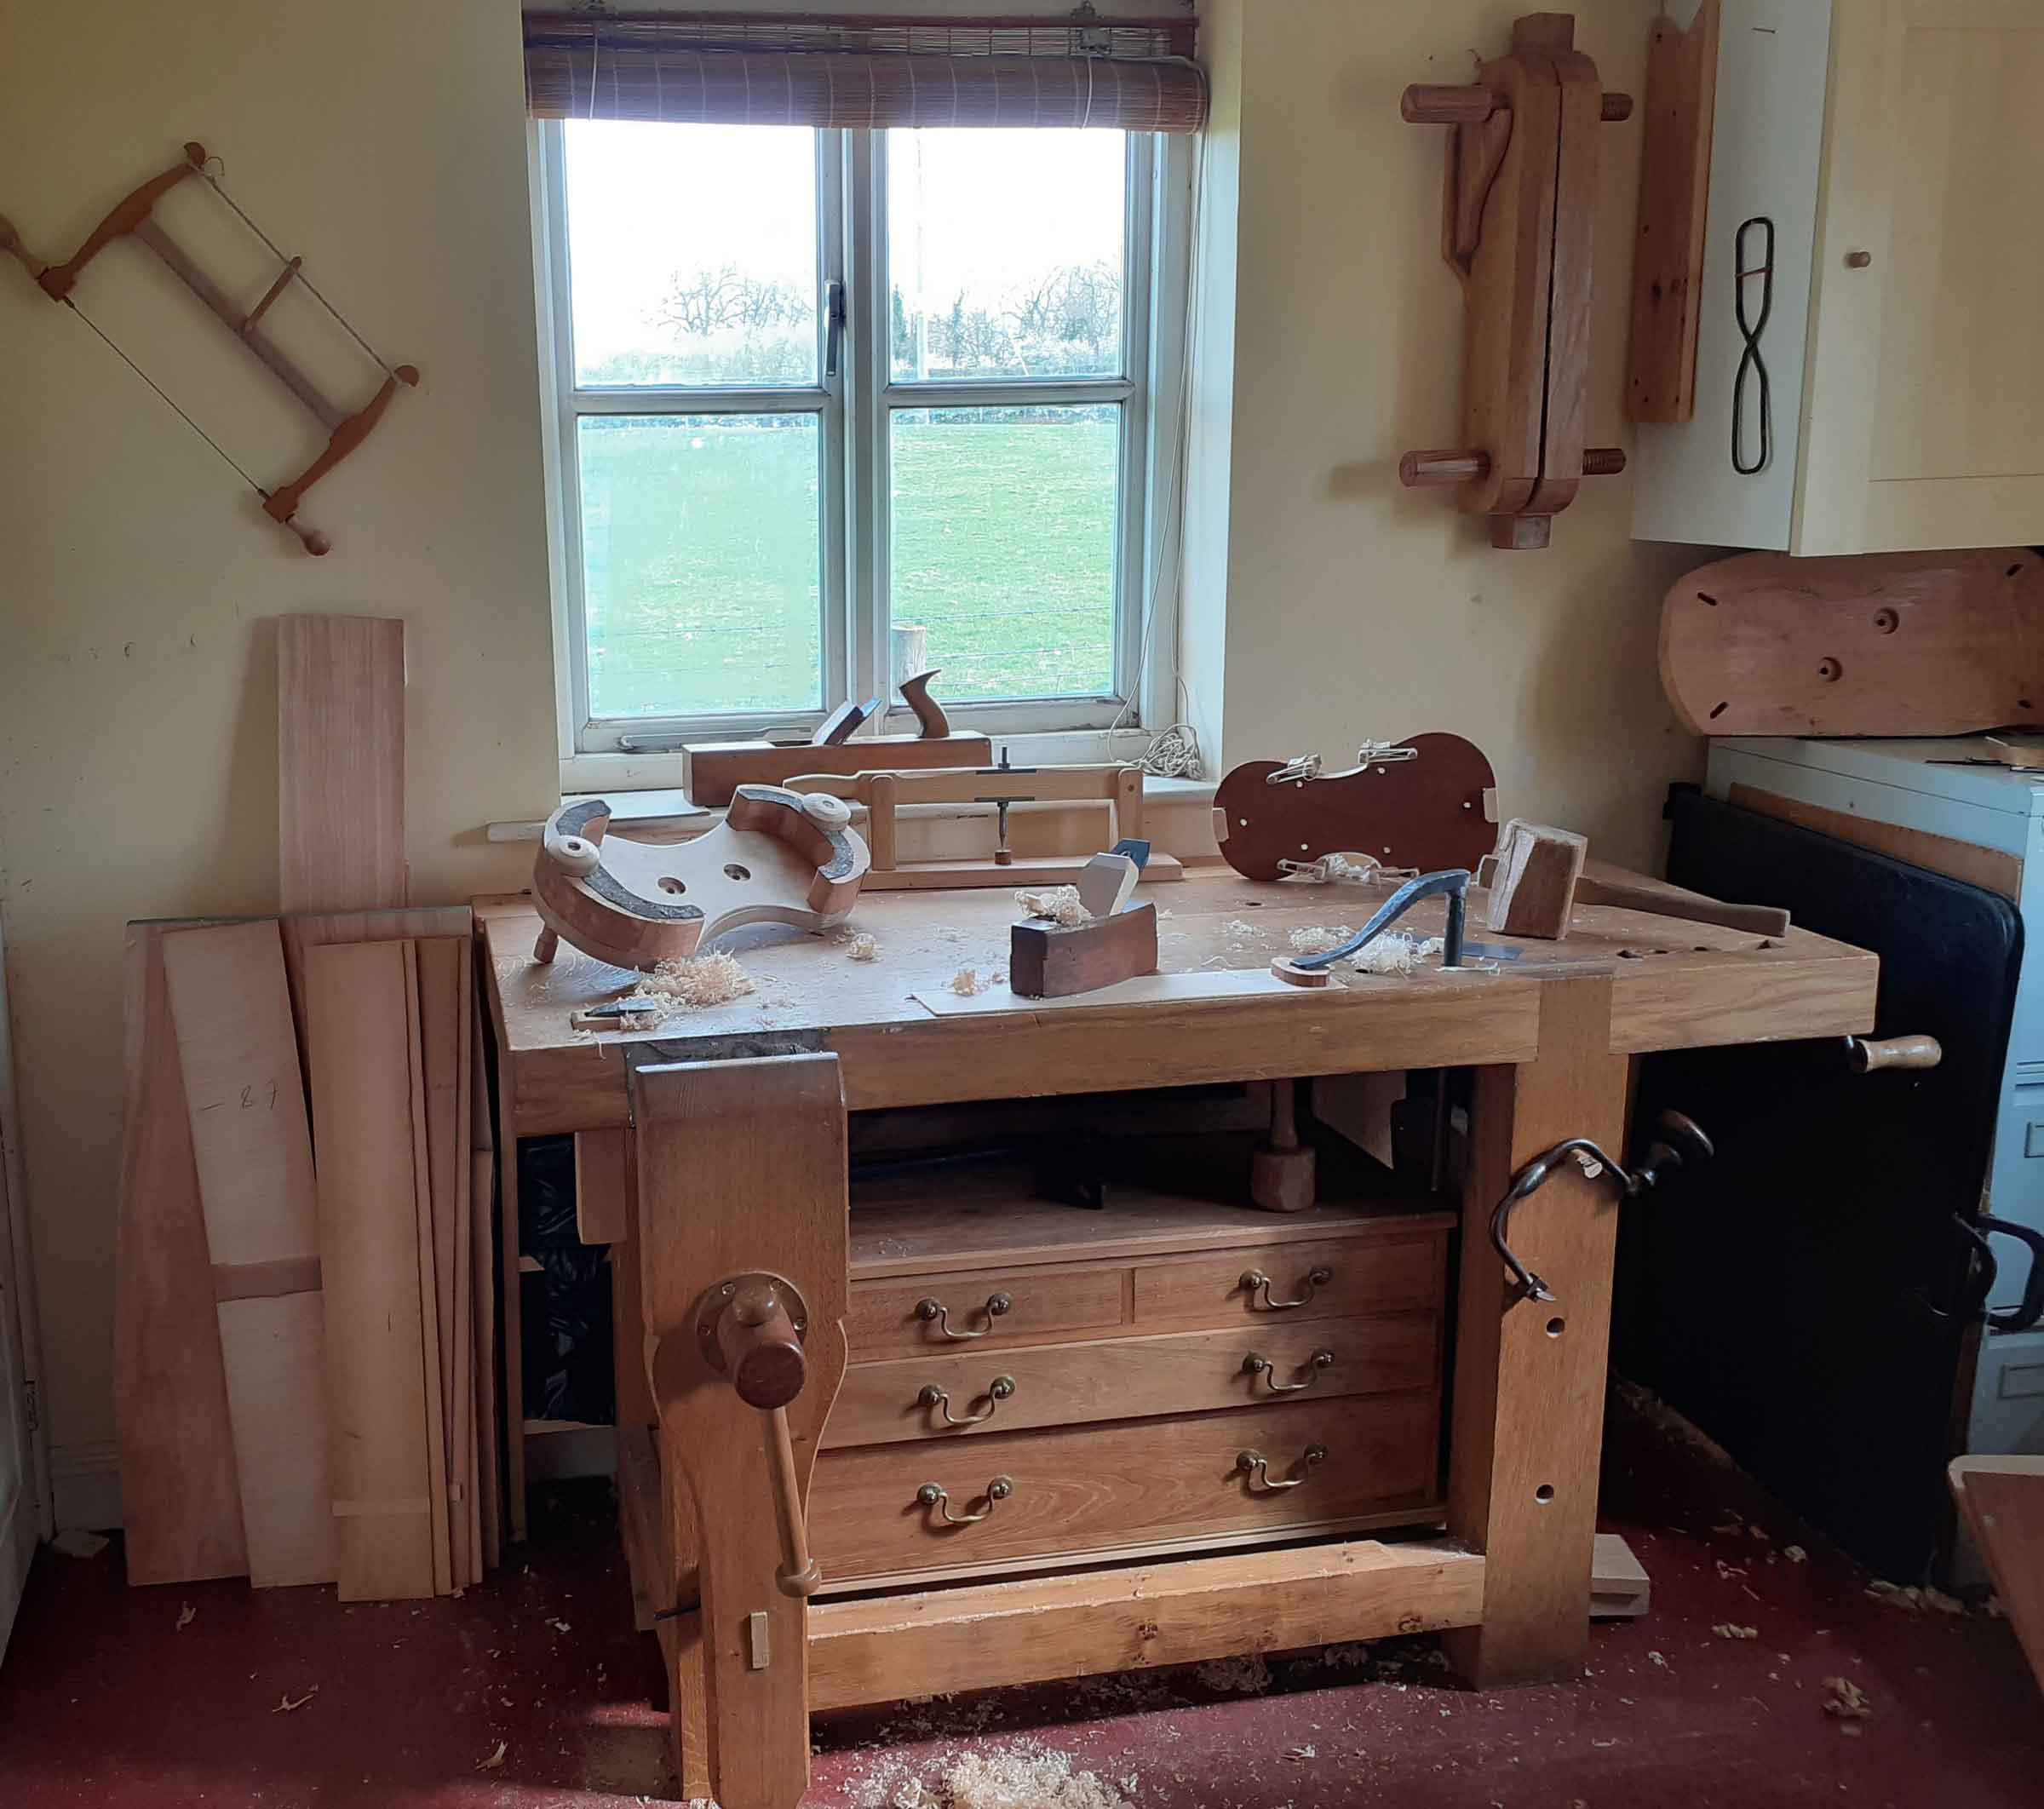
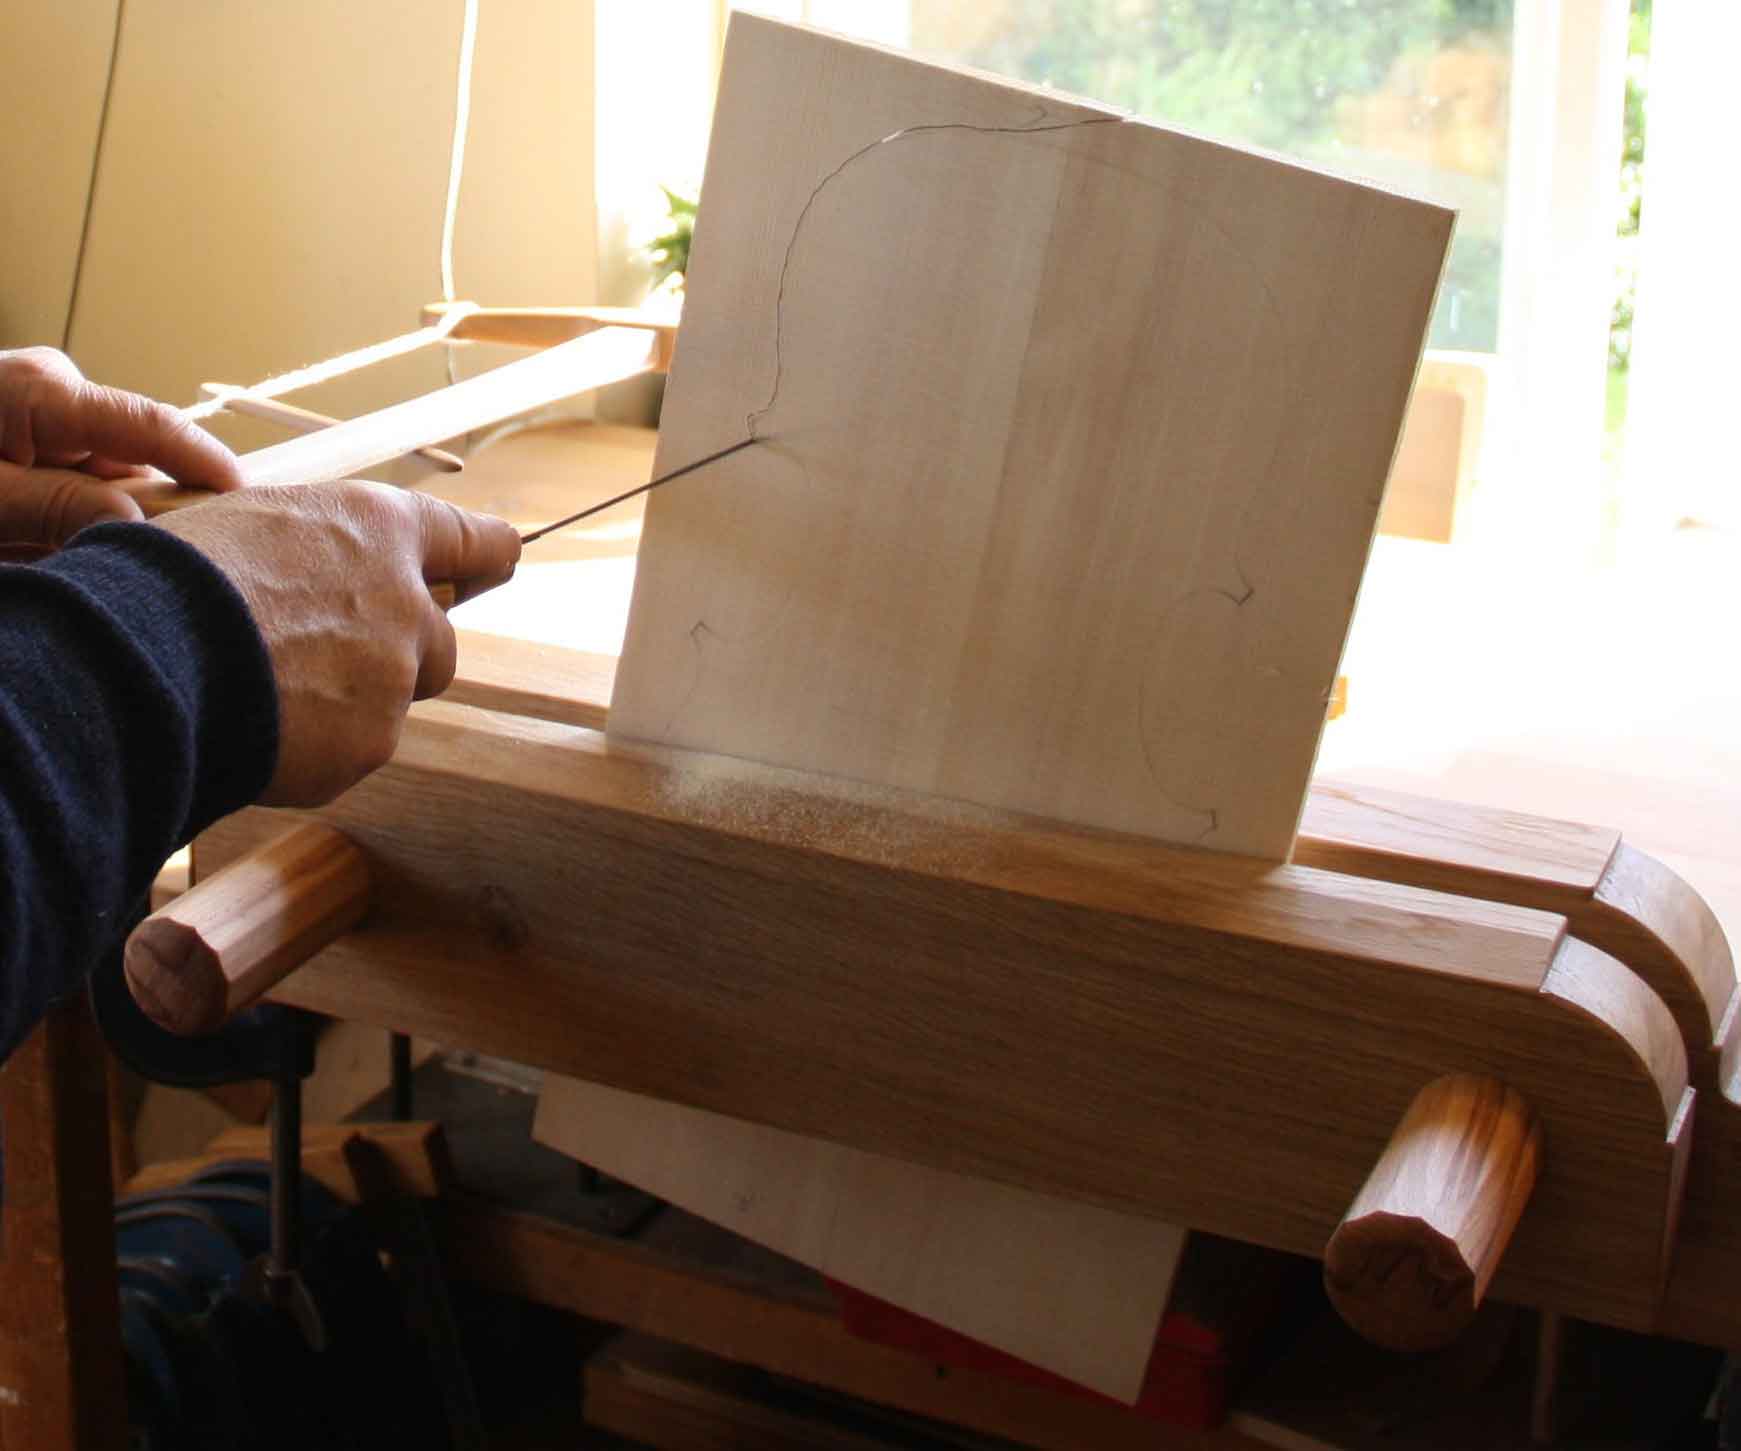
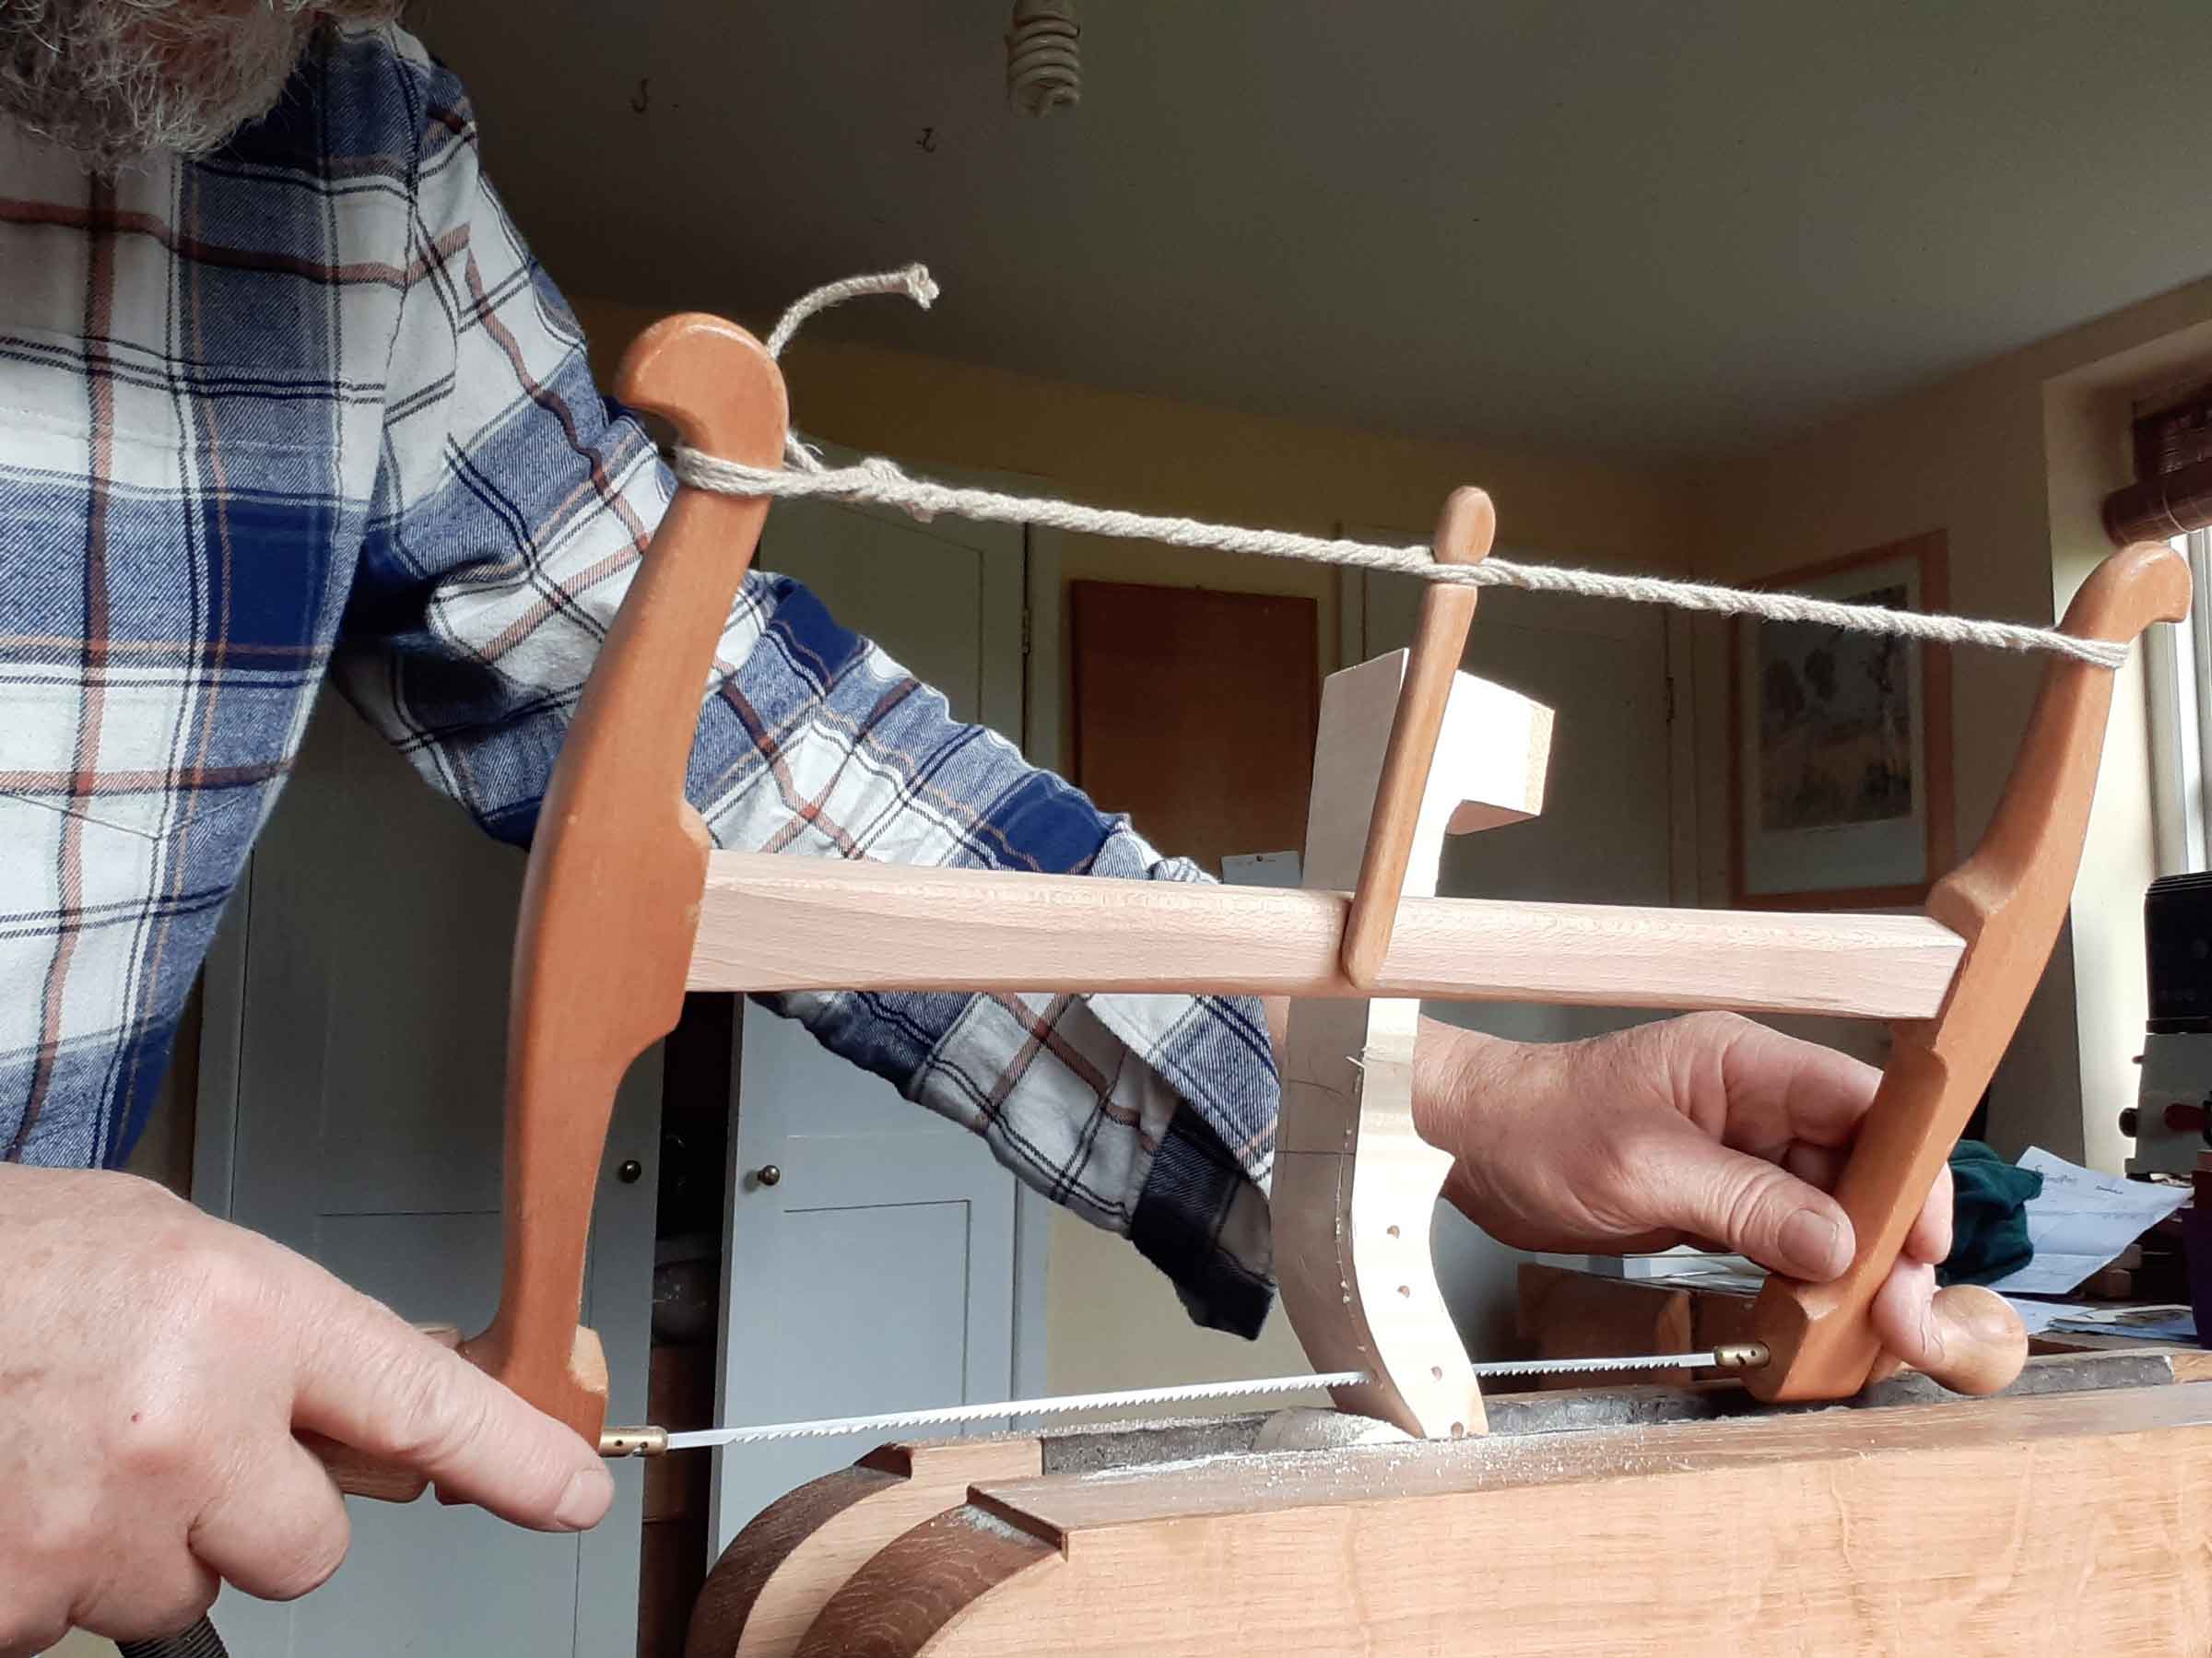
In the woodwork workshop at school, however, there was still a low bench about knee high for sawing wood down to size. In medieval and Renaissance paintings, low benches were common for all work, though higher benches were also used, and when sawing outlines, it may well be the case that the classical violin makers used a holdfast to hold the wood on a low bench and a bowsaw sawing vertically. The other possibility to hold the wood is the twin-screw, or Moxon vice, a method I prefer, as the work is easier to see.
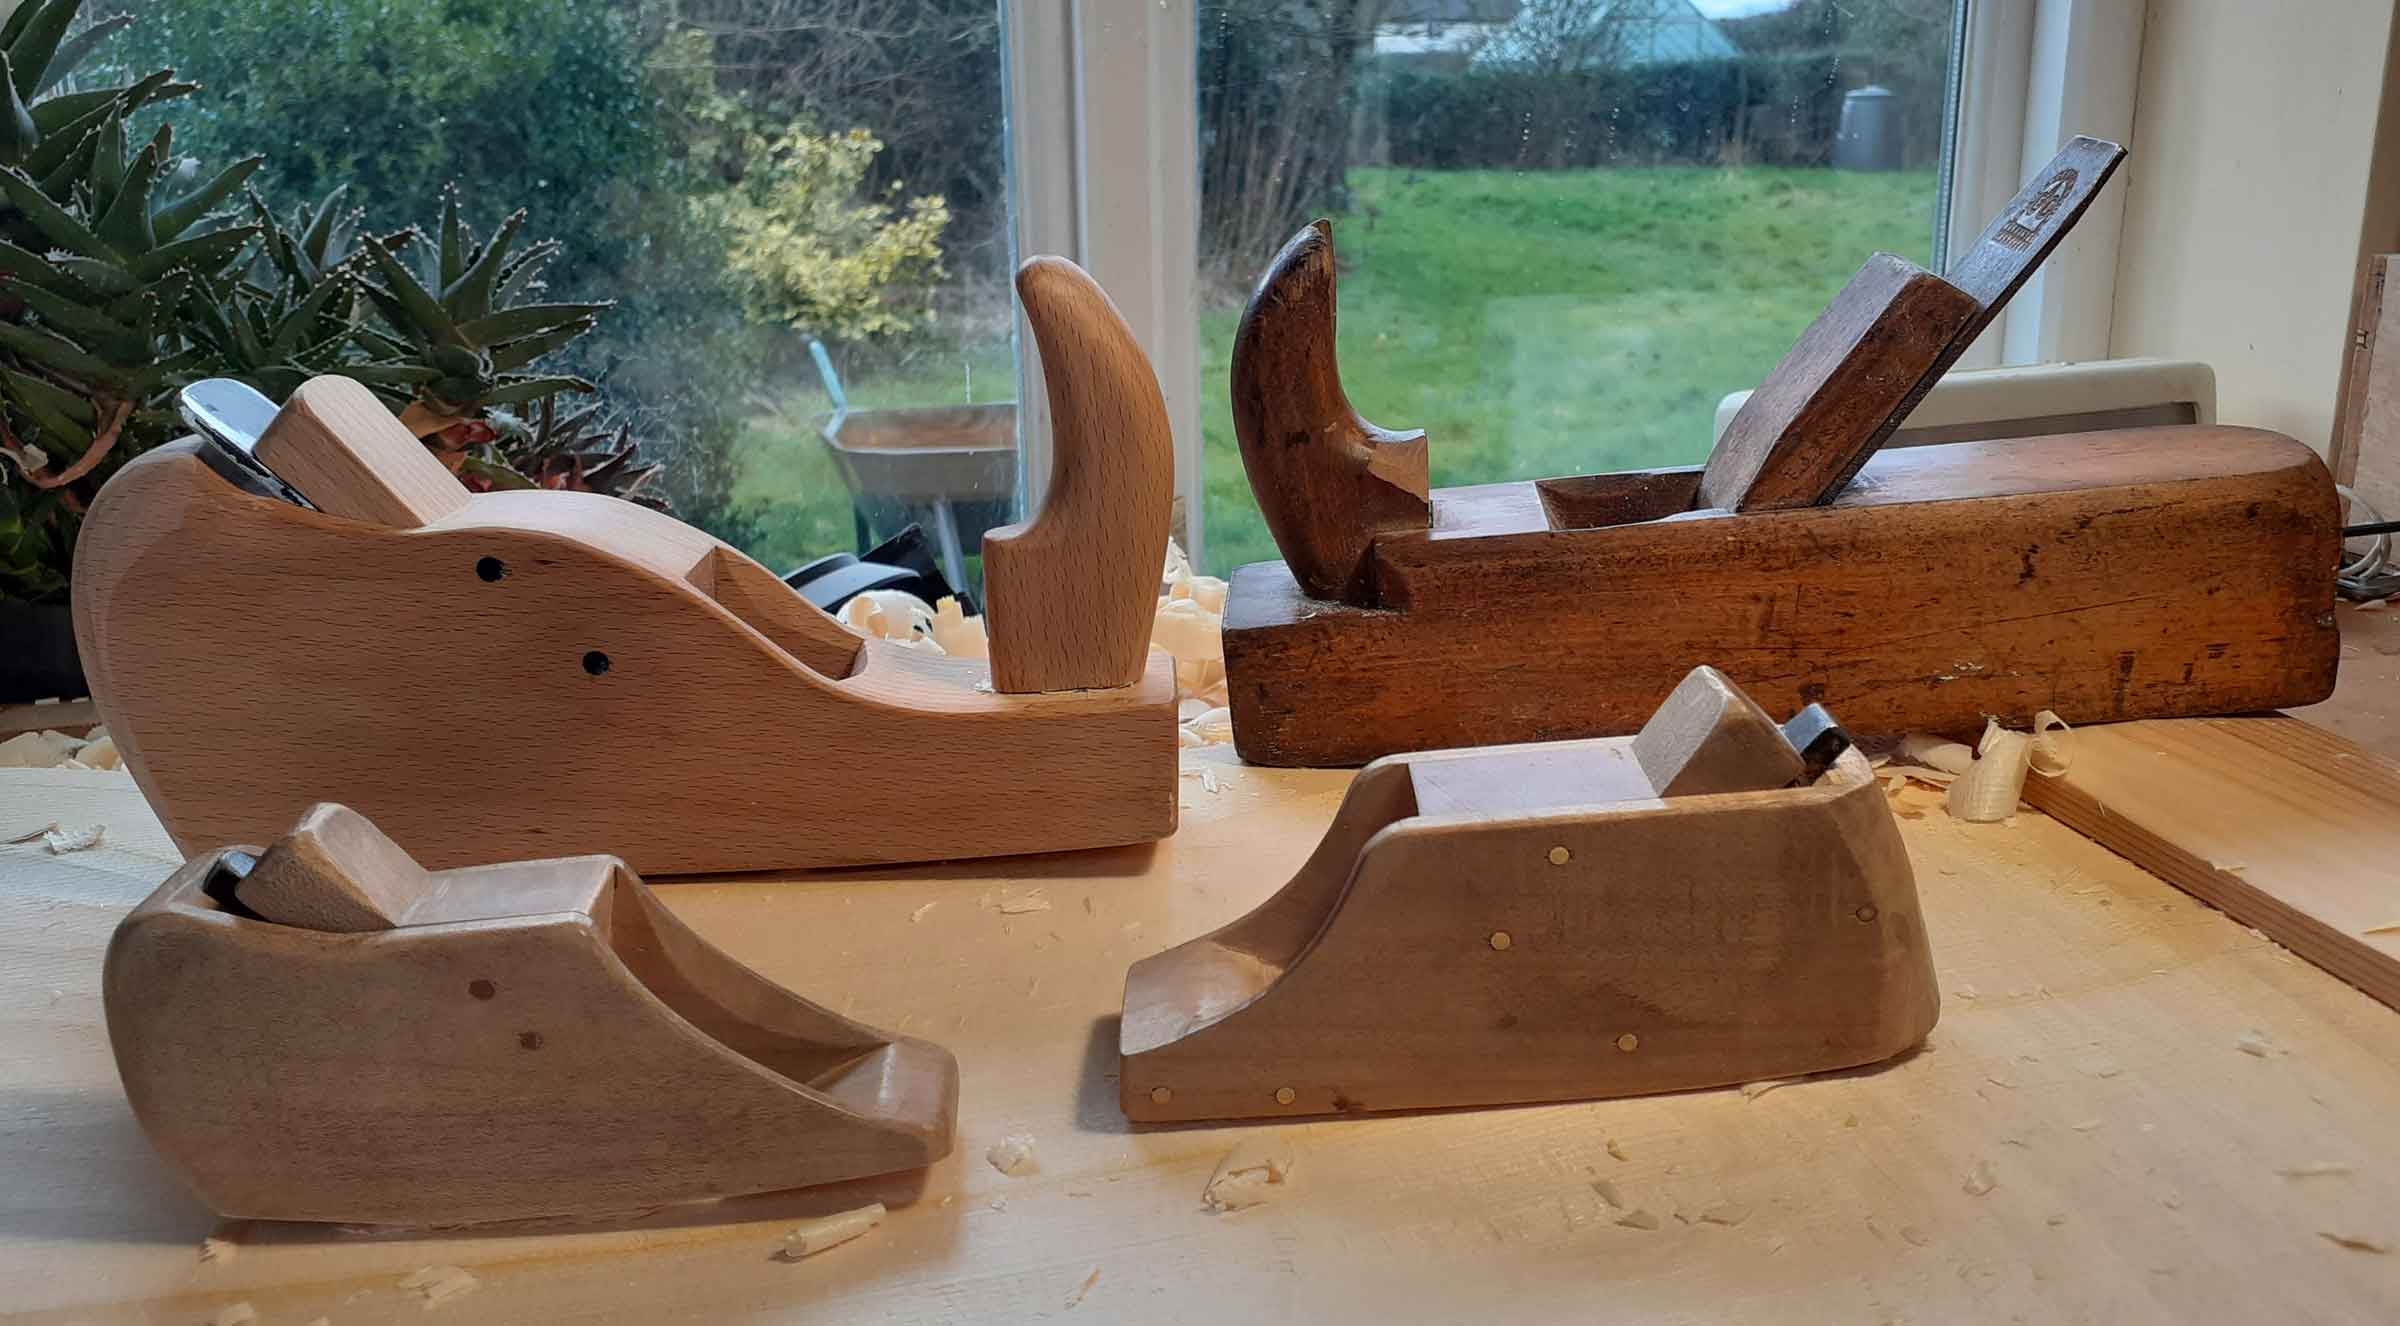
To rough arch the plates I now use scrub planes, but rather than having a flat sole, these are rounded across both the length and width.
The darker plane is a standard scrub plane with a flat sole and a rounded iron for flattening boards, the two smaller planes are mostly used on violins and violas, having differing curves to their soles, both in length and across the width to suit different parts of the arching, the bigger plane with the horn at the front being used for cellos.
Using a scrub plane has probably been the most important change in my making; I never really liked using a rough arching gouge, particularly on the back, where it is too slow, it makes your hands, arms, shoulders and back hurt and it is too imprecise. The scrub plane, by contrast, can be set so the shaving is the right thickness to match your strength and stamina, you don’t waste energy by coming to a halt because it cannot dig in and bring you to a halt, and you can see the arching shape develop at an earlier stage because it is not full of grooves. Because the scrub plane is more precise than a gouge, you can also continue to use it where otherwise you would have had to change to using a thumb plane. As you can see in the video, the plane can be adjusted easily and the process is quick, the rough arching of the belly I did after arching this back taking less than fourteen minutes.
After rough arching, with the edge perhaps a millimetre thicker than final thickness and left from the scrub plane, I mostly use a thumb plane held at an angle for the convex curves of the outline and a knife on the concave surfaces, again cutting at a slant to cut more smoothly and to bridge the grain lines. This is quick, and makes less dust than a rasp or file, though I do finish the belly with a file to avoid sinking into the soft grain.
Arching
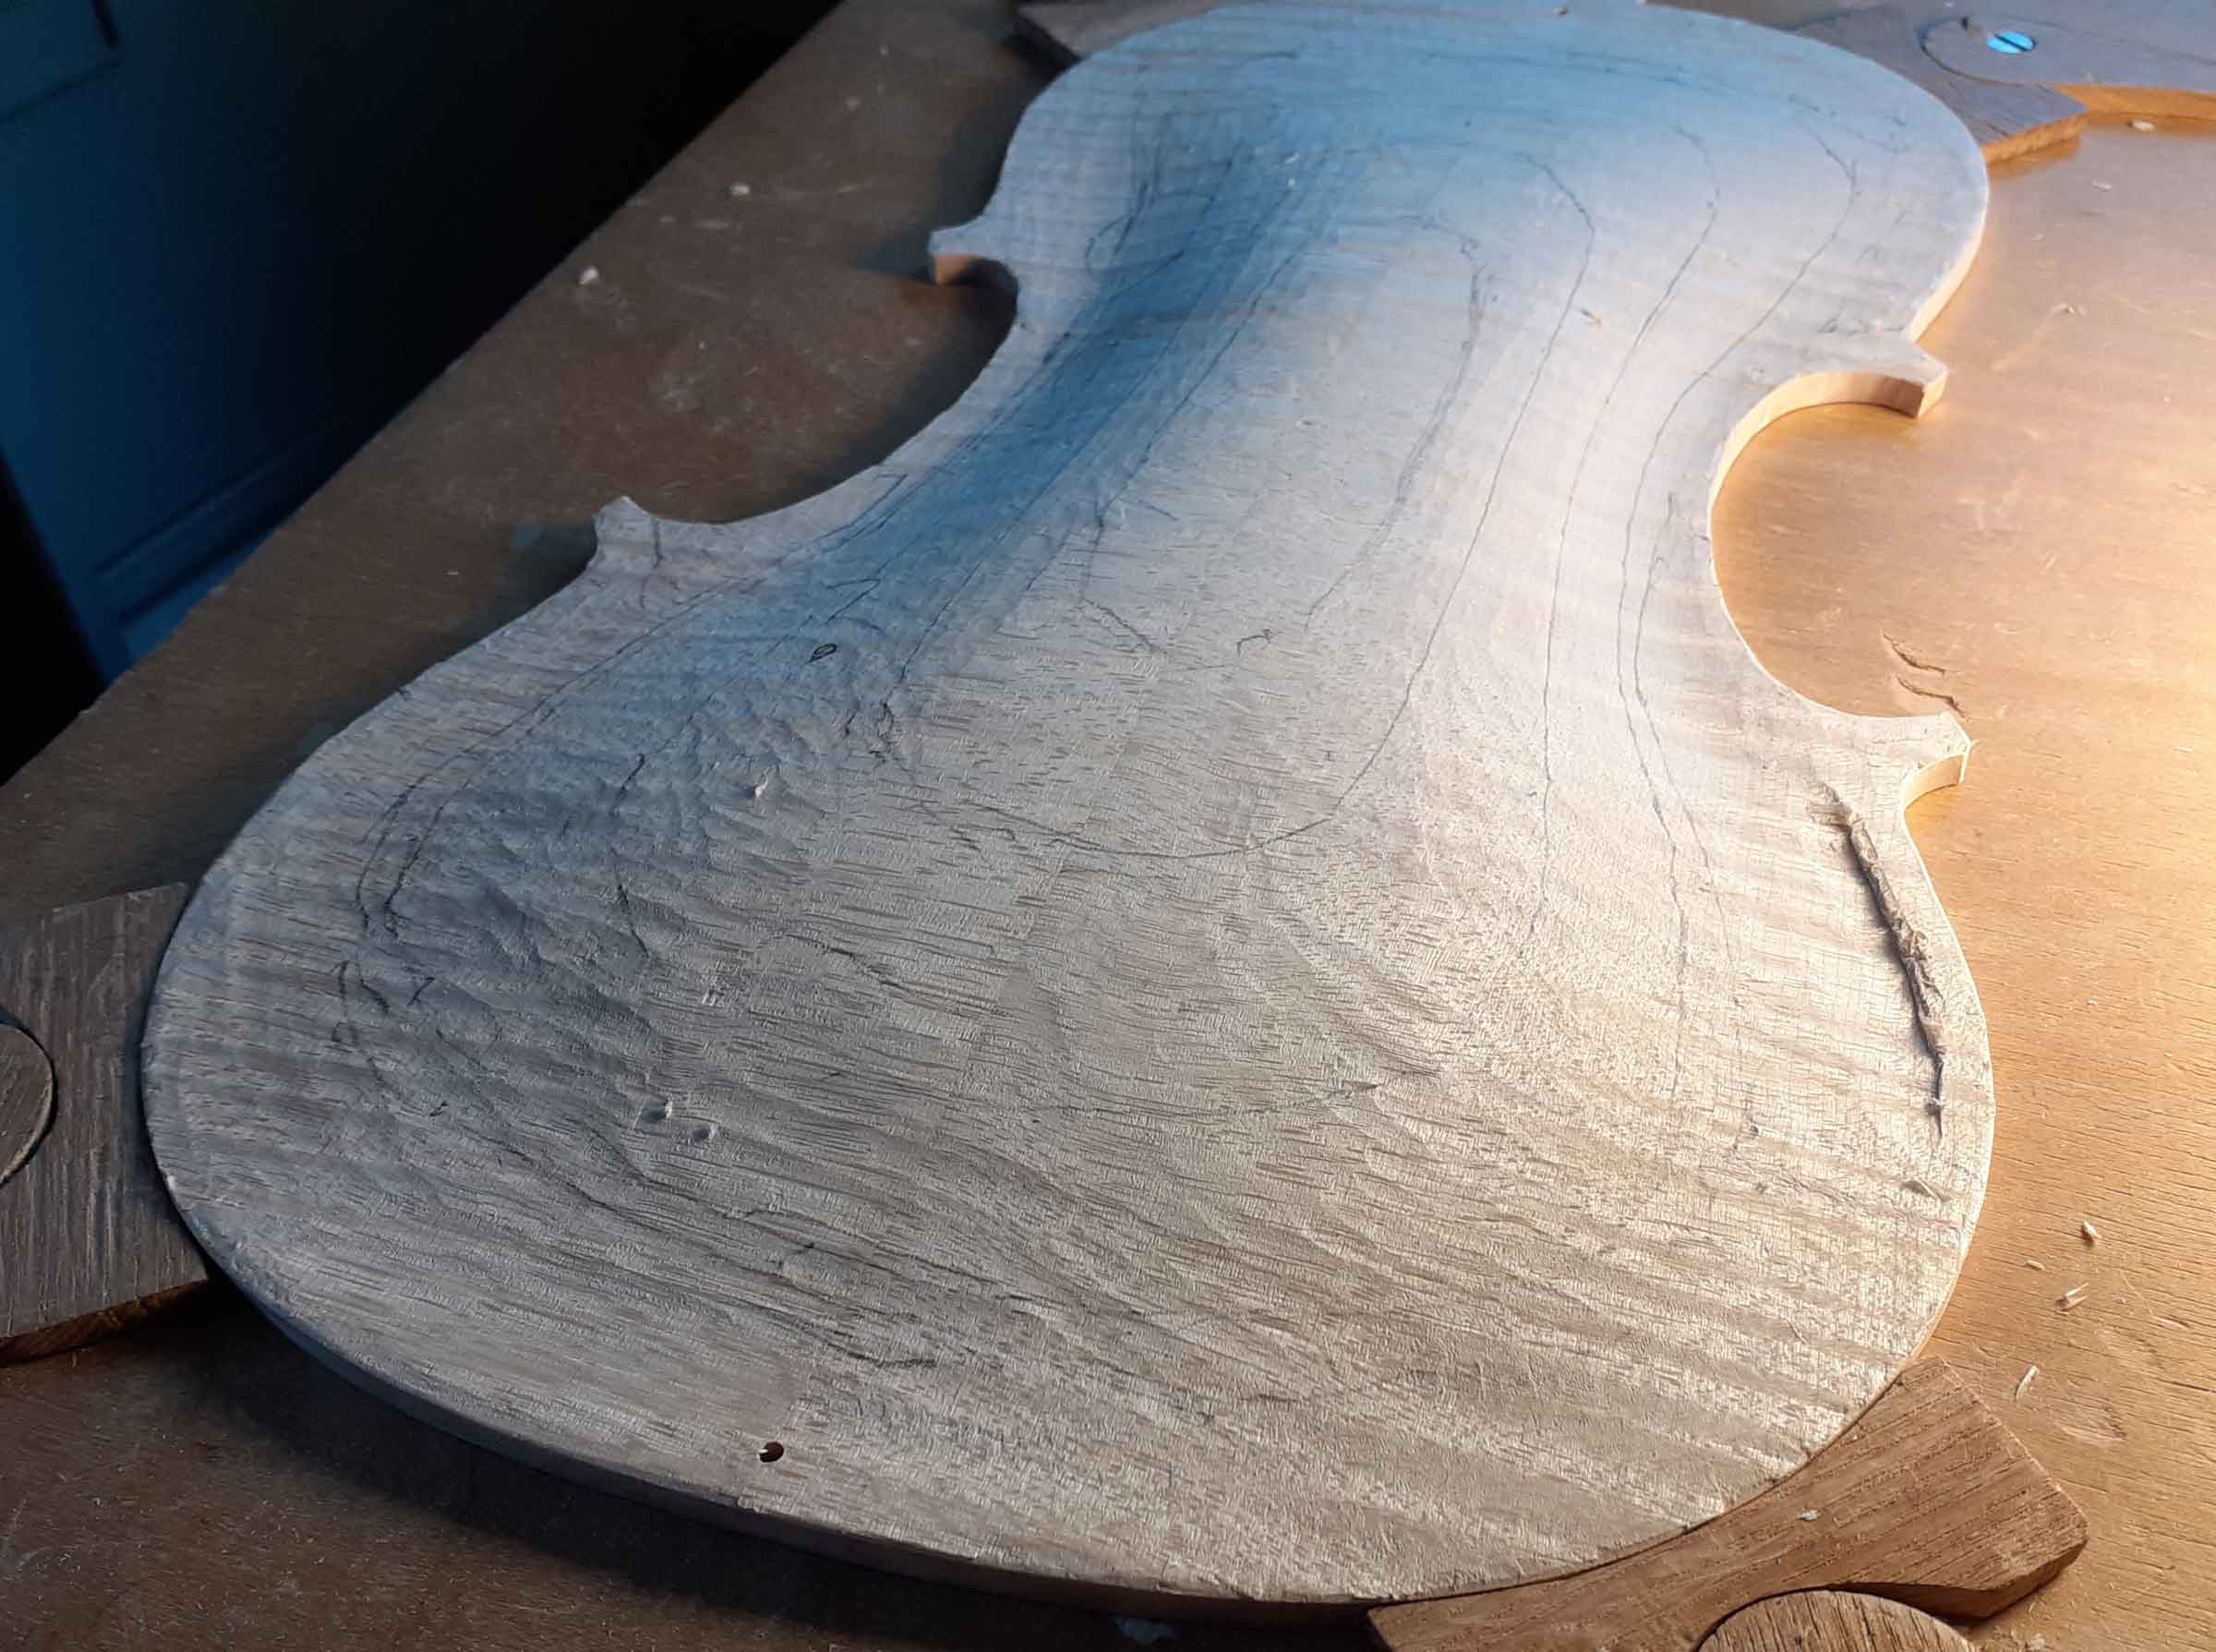
For this 2020 violin I followed Sacconi’s method and did the arching without any fluting, though you can see in this picture that I did cheat a little by fluting one small section, just to make sure that I had taken enough wood away towards the edges. But the question raised in my mind was why go to all the effort of conceiving the arching minus the fluting, plane it all and scrape it, only to revisit the outside few centimetres, at least a quarter of the arched surface, after the box is together and the purfling and fluting are done?
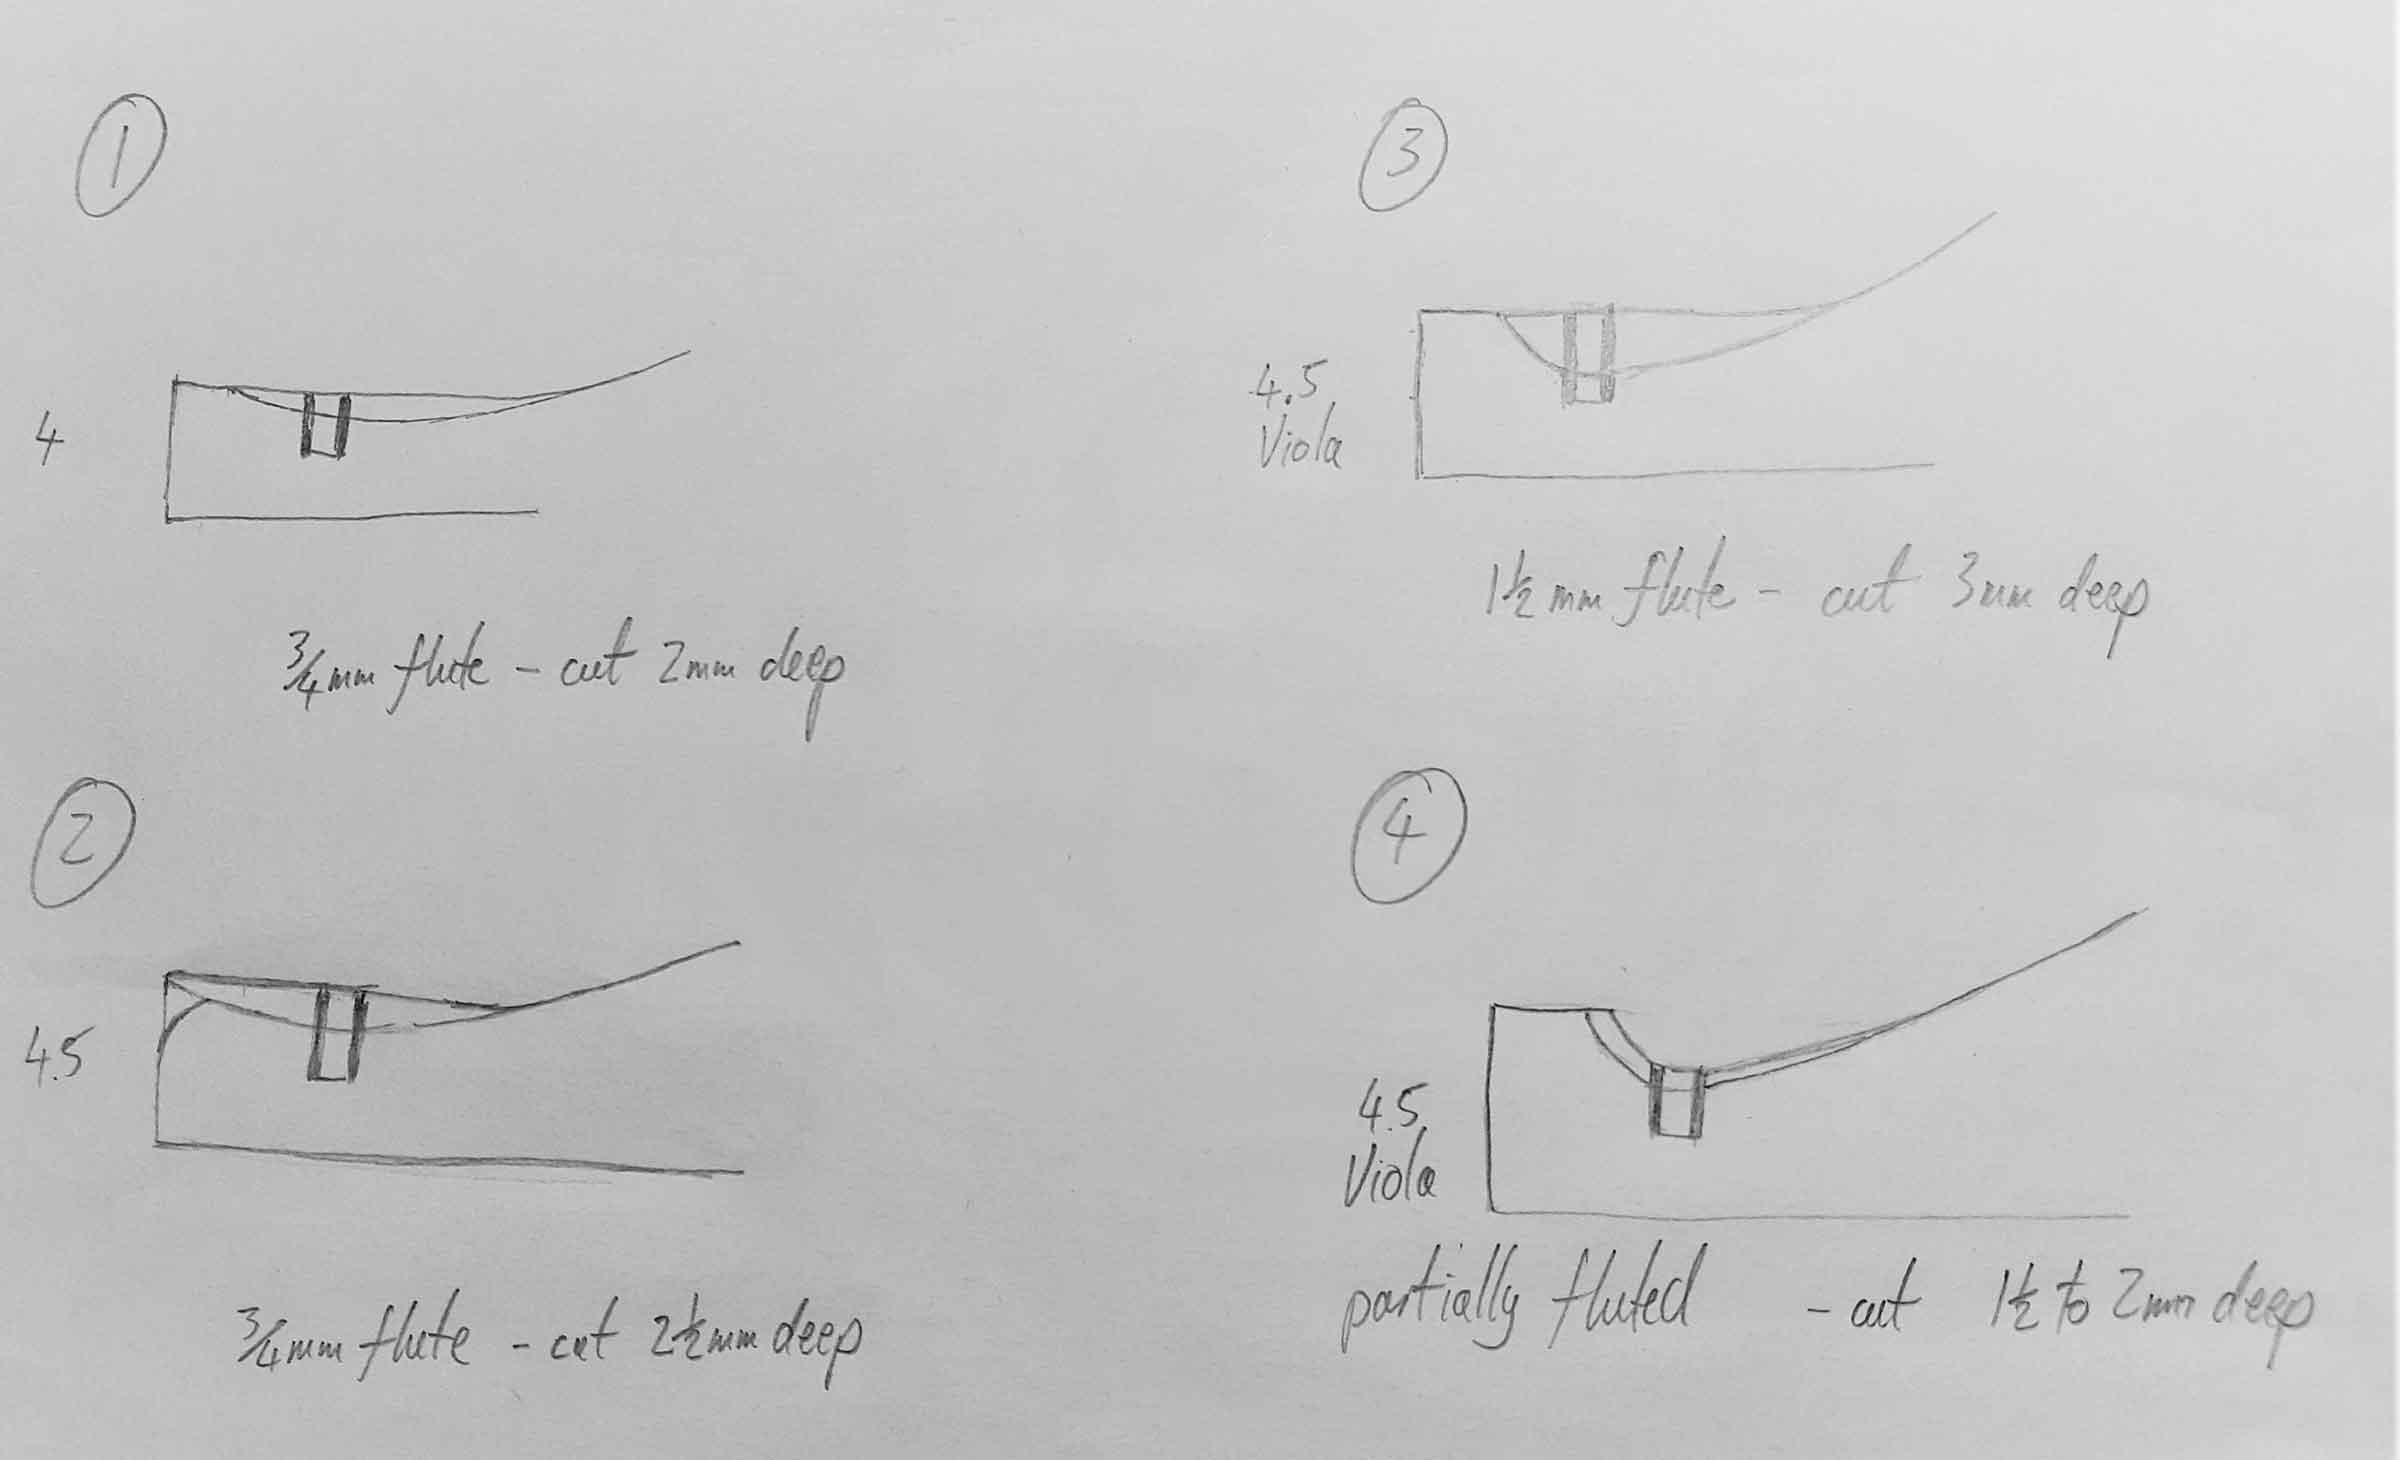
This doubled work seemed as un-workmanlike as you could get. Another problem with this method is the thickness of wood you need to cut through when making the purfling channel, though that does vary according to the method adopted to finish the edgework.
As you can see from these drawings, the first example with the as yet unfluted edge at 4mm thick and the fluting 3/4mm deep, if you want the finished purfling to be 1 1/4mm into the plate, you have to cut the channel 2 mm deep to start with. If you want to finish your work by rounding the edging into the fluting [drawing no 2] you need to leave the edge at 4.5mm so you have to cut the purfling channel 2 1/2mm deep. If, however you are making a viola with 4.5mm edges, using the same construction as picture 1, and if you want a more dynamic fluting of 1 1/2mm depth, the purfling channel then has to be cut 3mm deep, not just more work, but also increasing the possibility of splitting off the edge. Why not then, partially flute as in the last picture, cutting only through 1 ½ to 2mm of wood, and tidy up the fluting later, most of which will be outside the purfling, after the purfling is glued in?
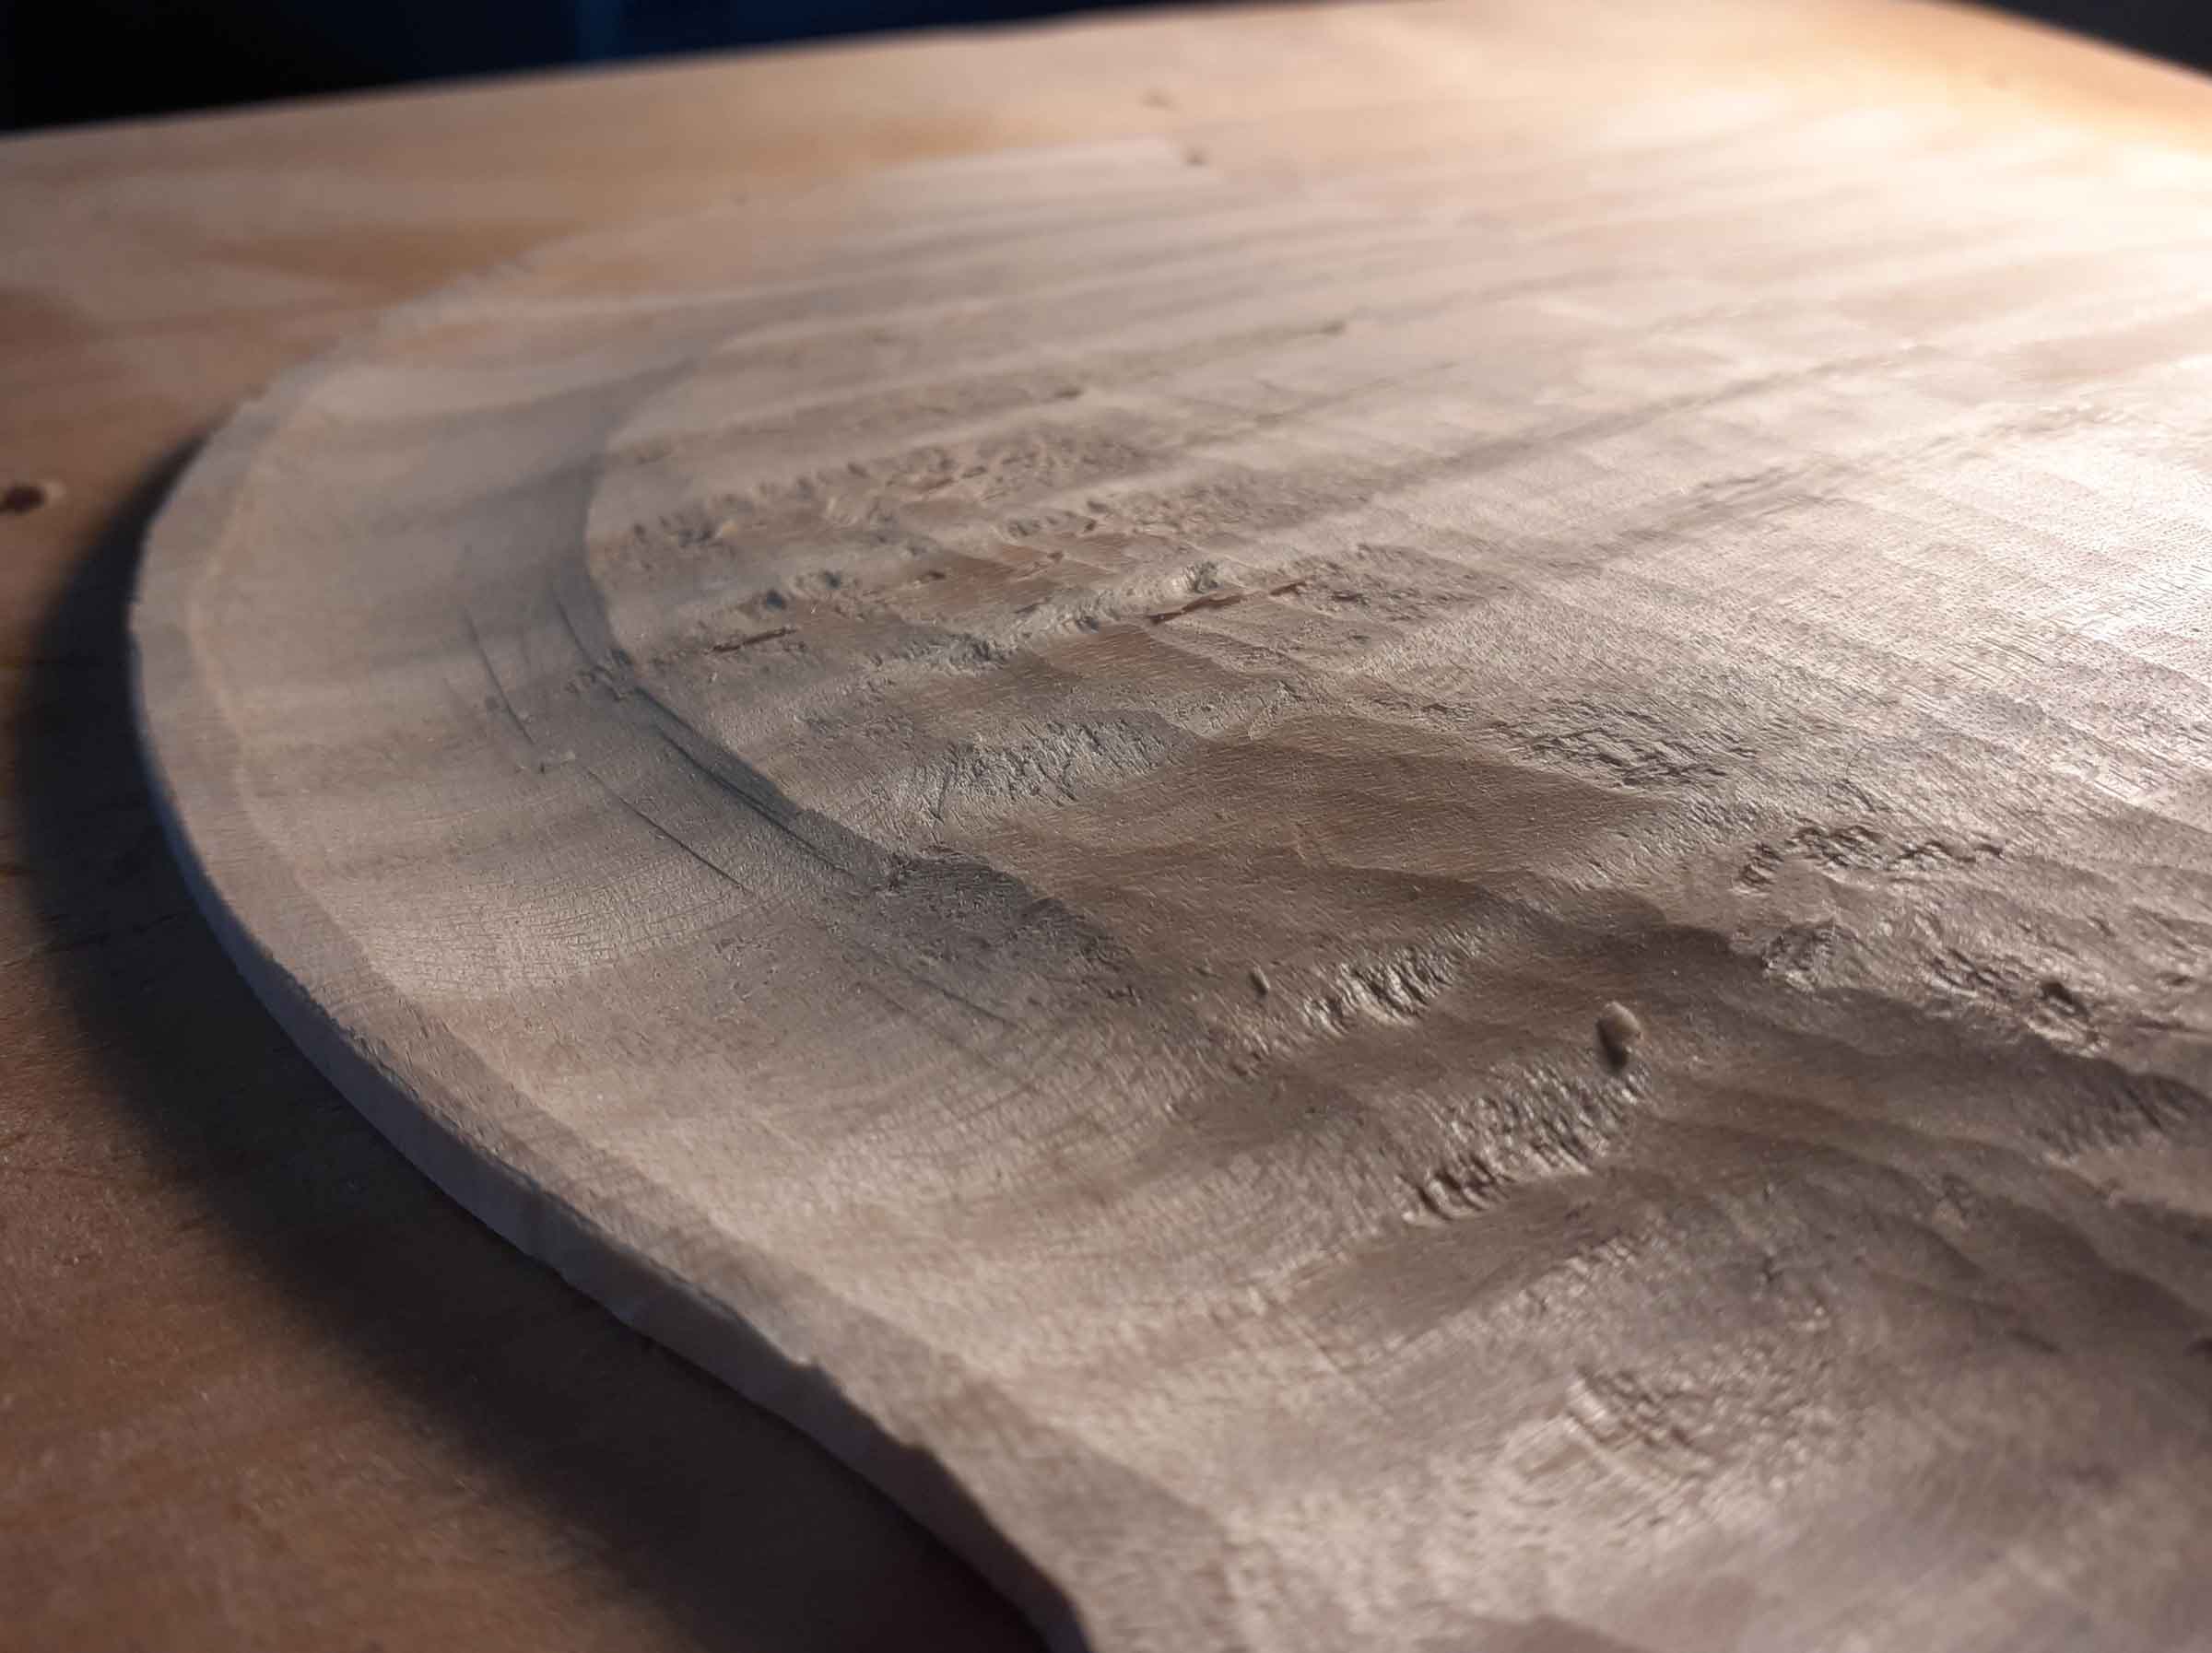
So nowadays, once the arch is looking reasonable from the scrub plane, I now do most of the fluting with a thumb plane, using a line approximating to the outside of the purfling as the edge. As with using a scrub plane rather than a big gouge, using a thumb plane rather than a smaller gouge for the fluting means I don’t need to go so slowly to control the depth, and the making of the plates becomes a process of planing rather than carving, like lute or viol making.
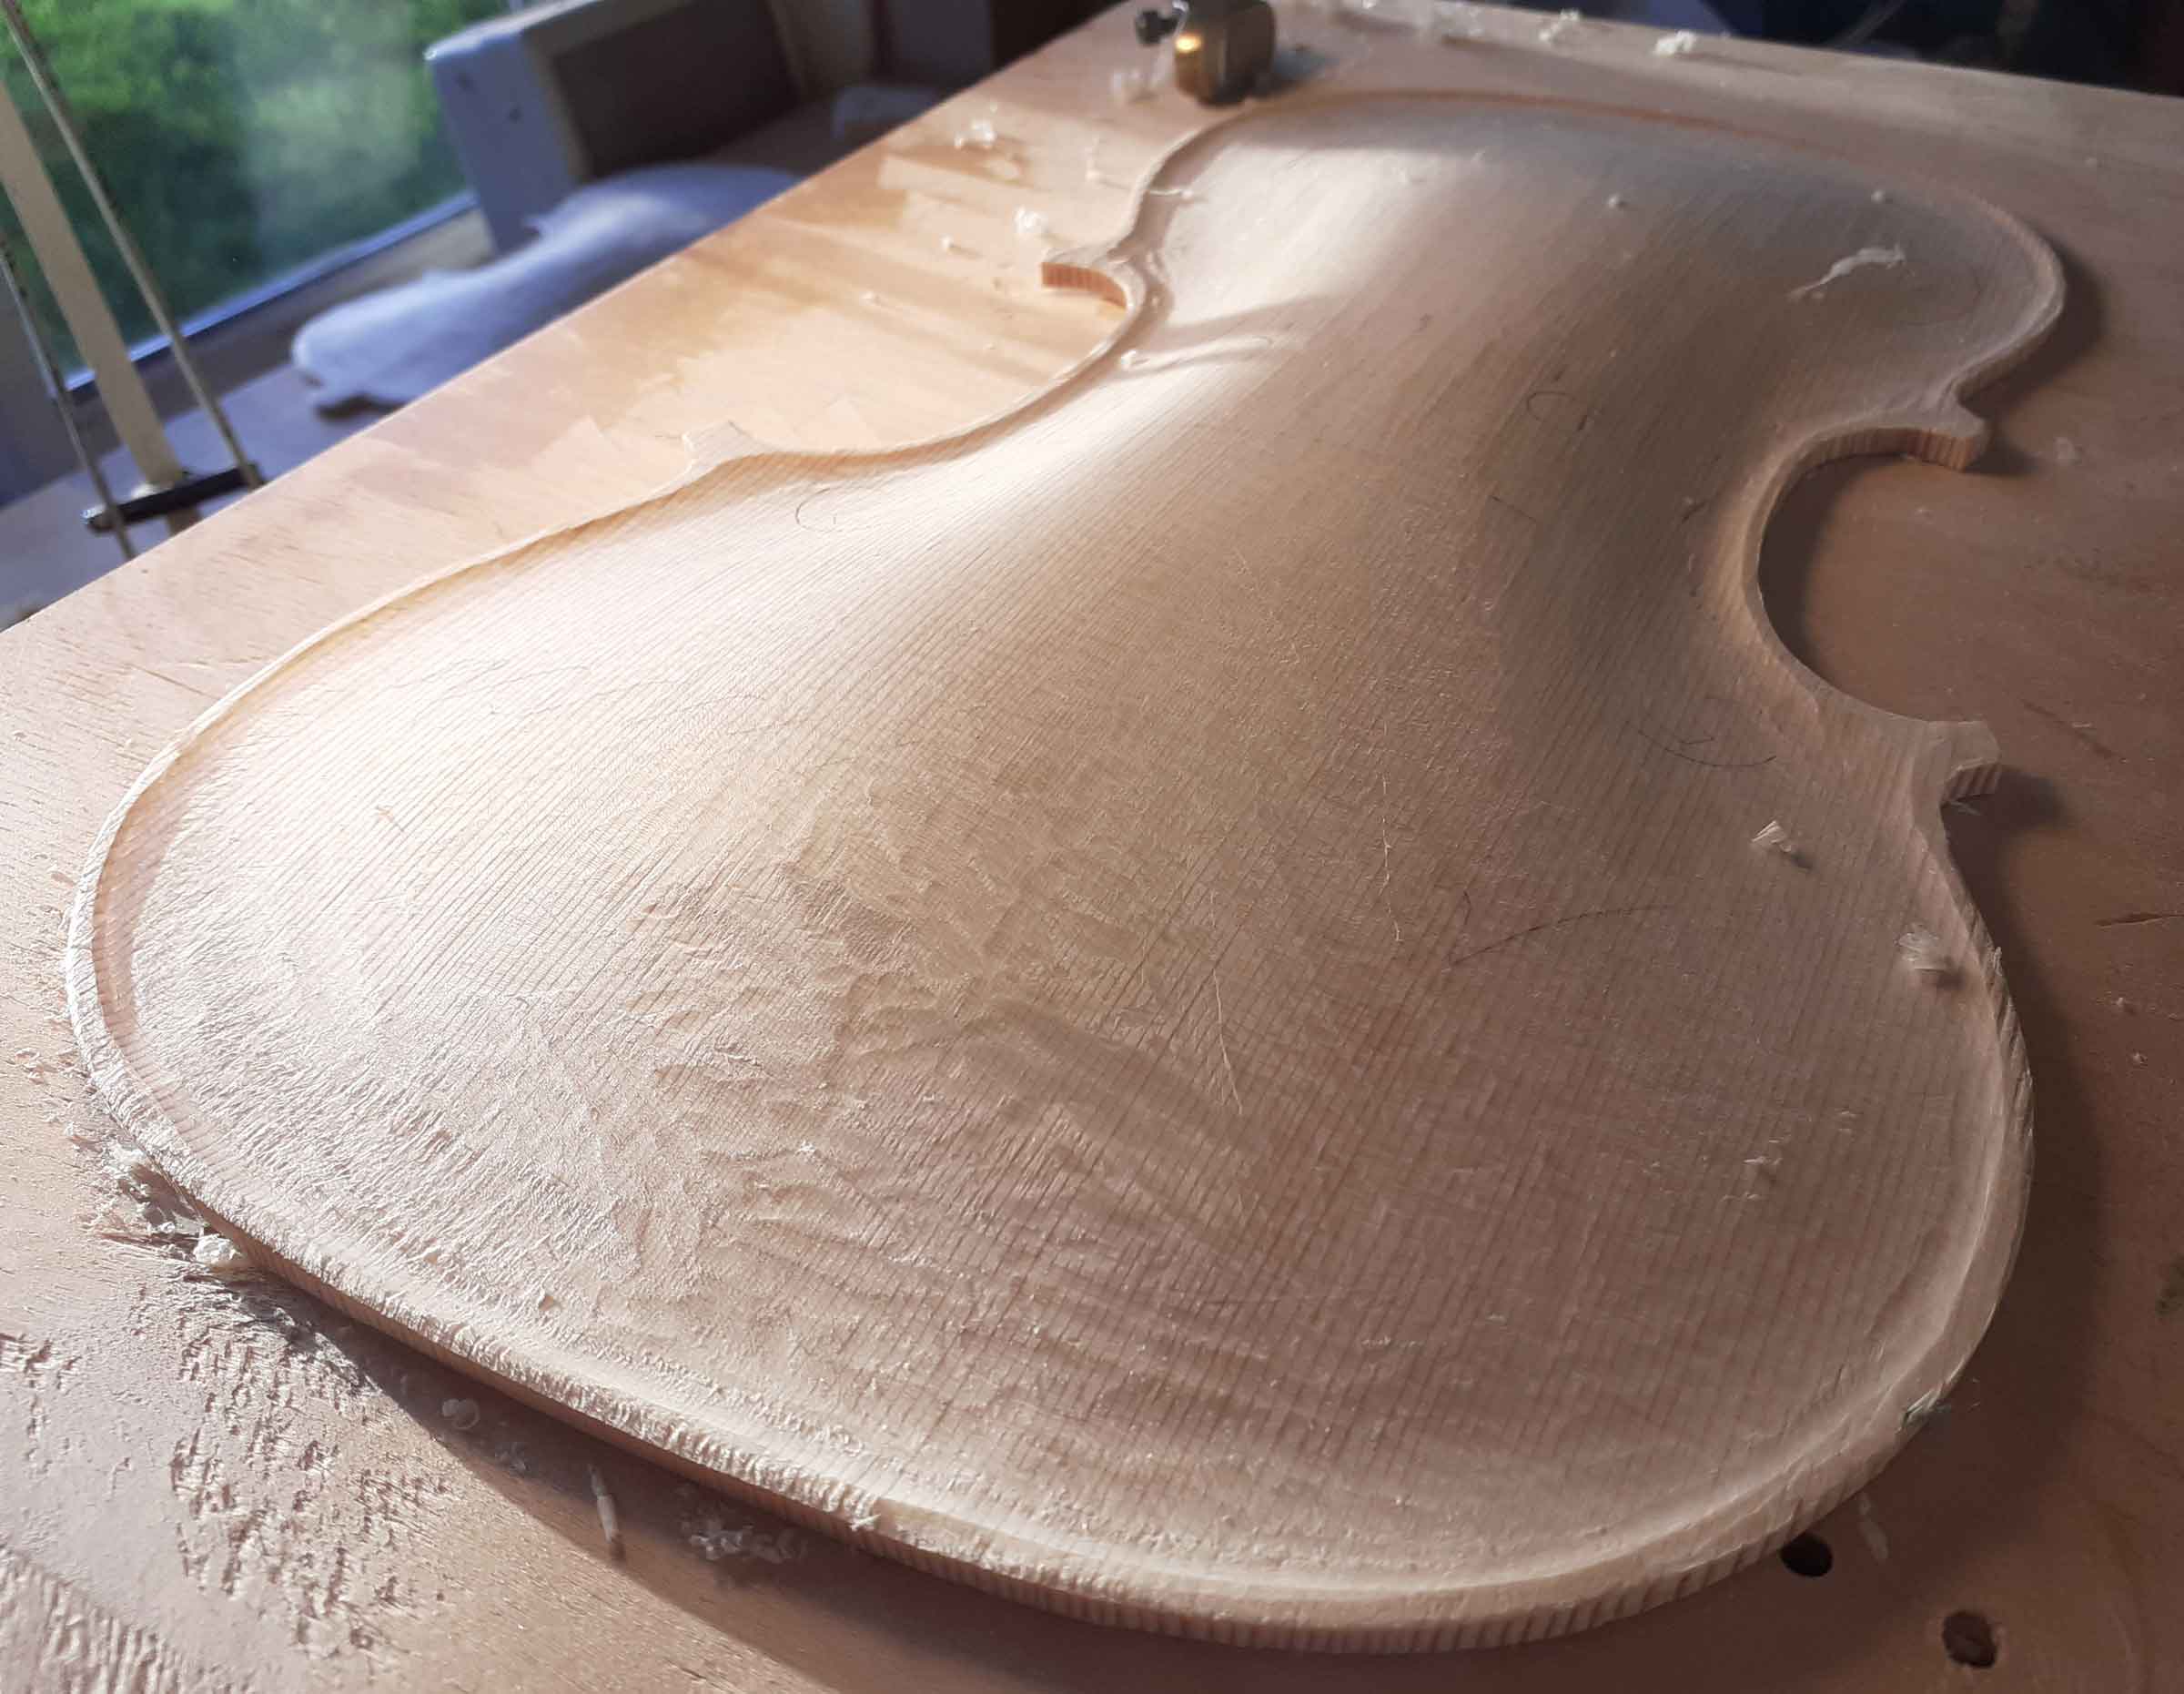
Hollowing the Plates
The scrub plane is also my principal tool for hollowing, the planing mostly being along the grain. A more recent development has been making a hollowing cradle modelled after one shown in Diderot’s Encyclopédie. The main improvement from my previous cradle is that the supporting blocks at each end are U- shaped and go as far as the widest points of the bouts, giving much better support to the plate. The wooden nuts pictured in Diderot initially seemed unlikely to hold the plate very well, but in fact work fine with the leather glued to the supports. The leather was my idea, though I imagine Diderot’s violin makers probably did the same.
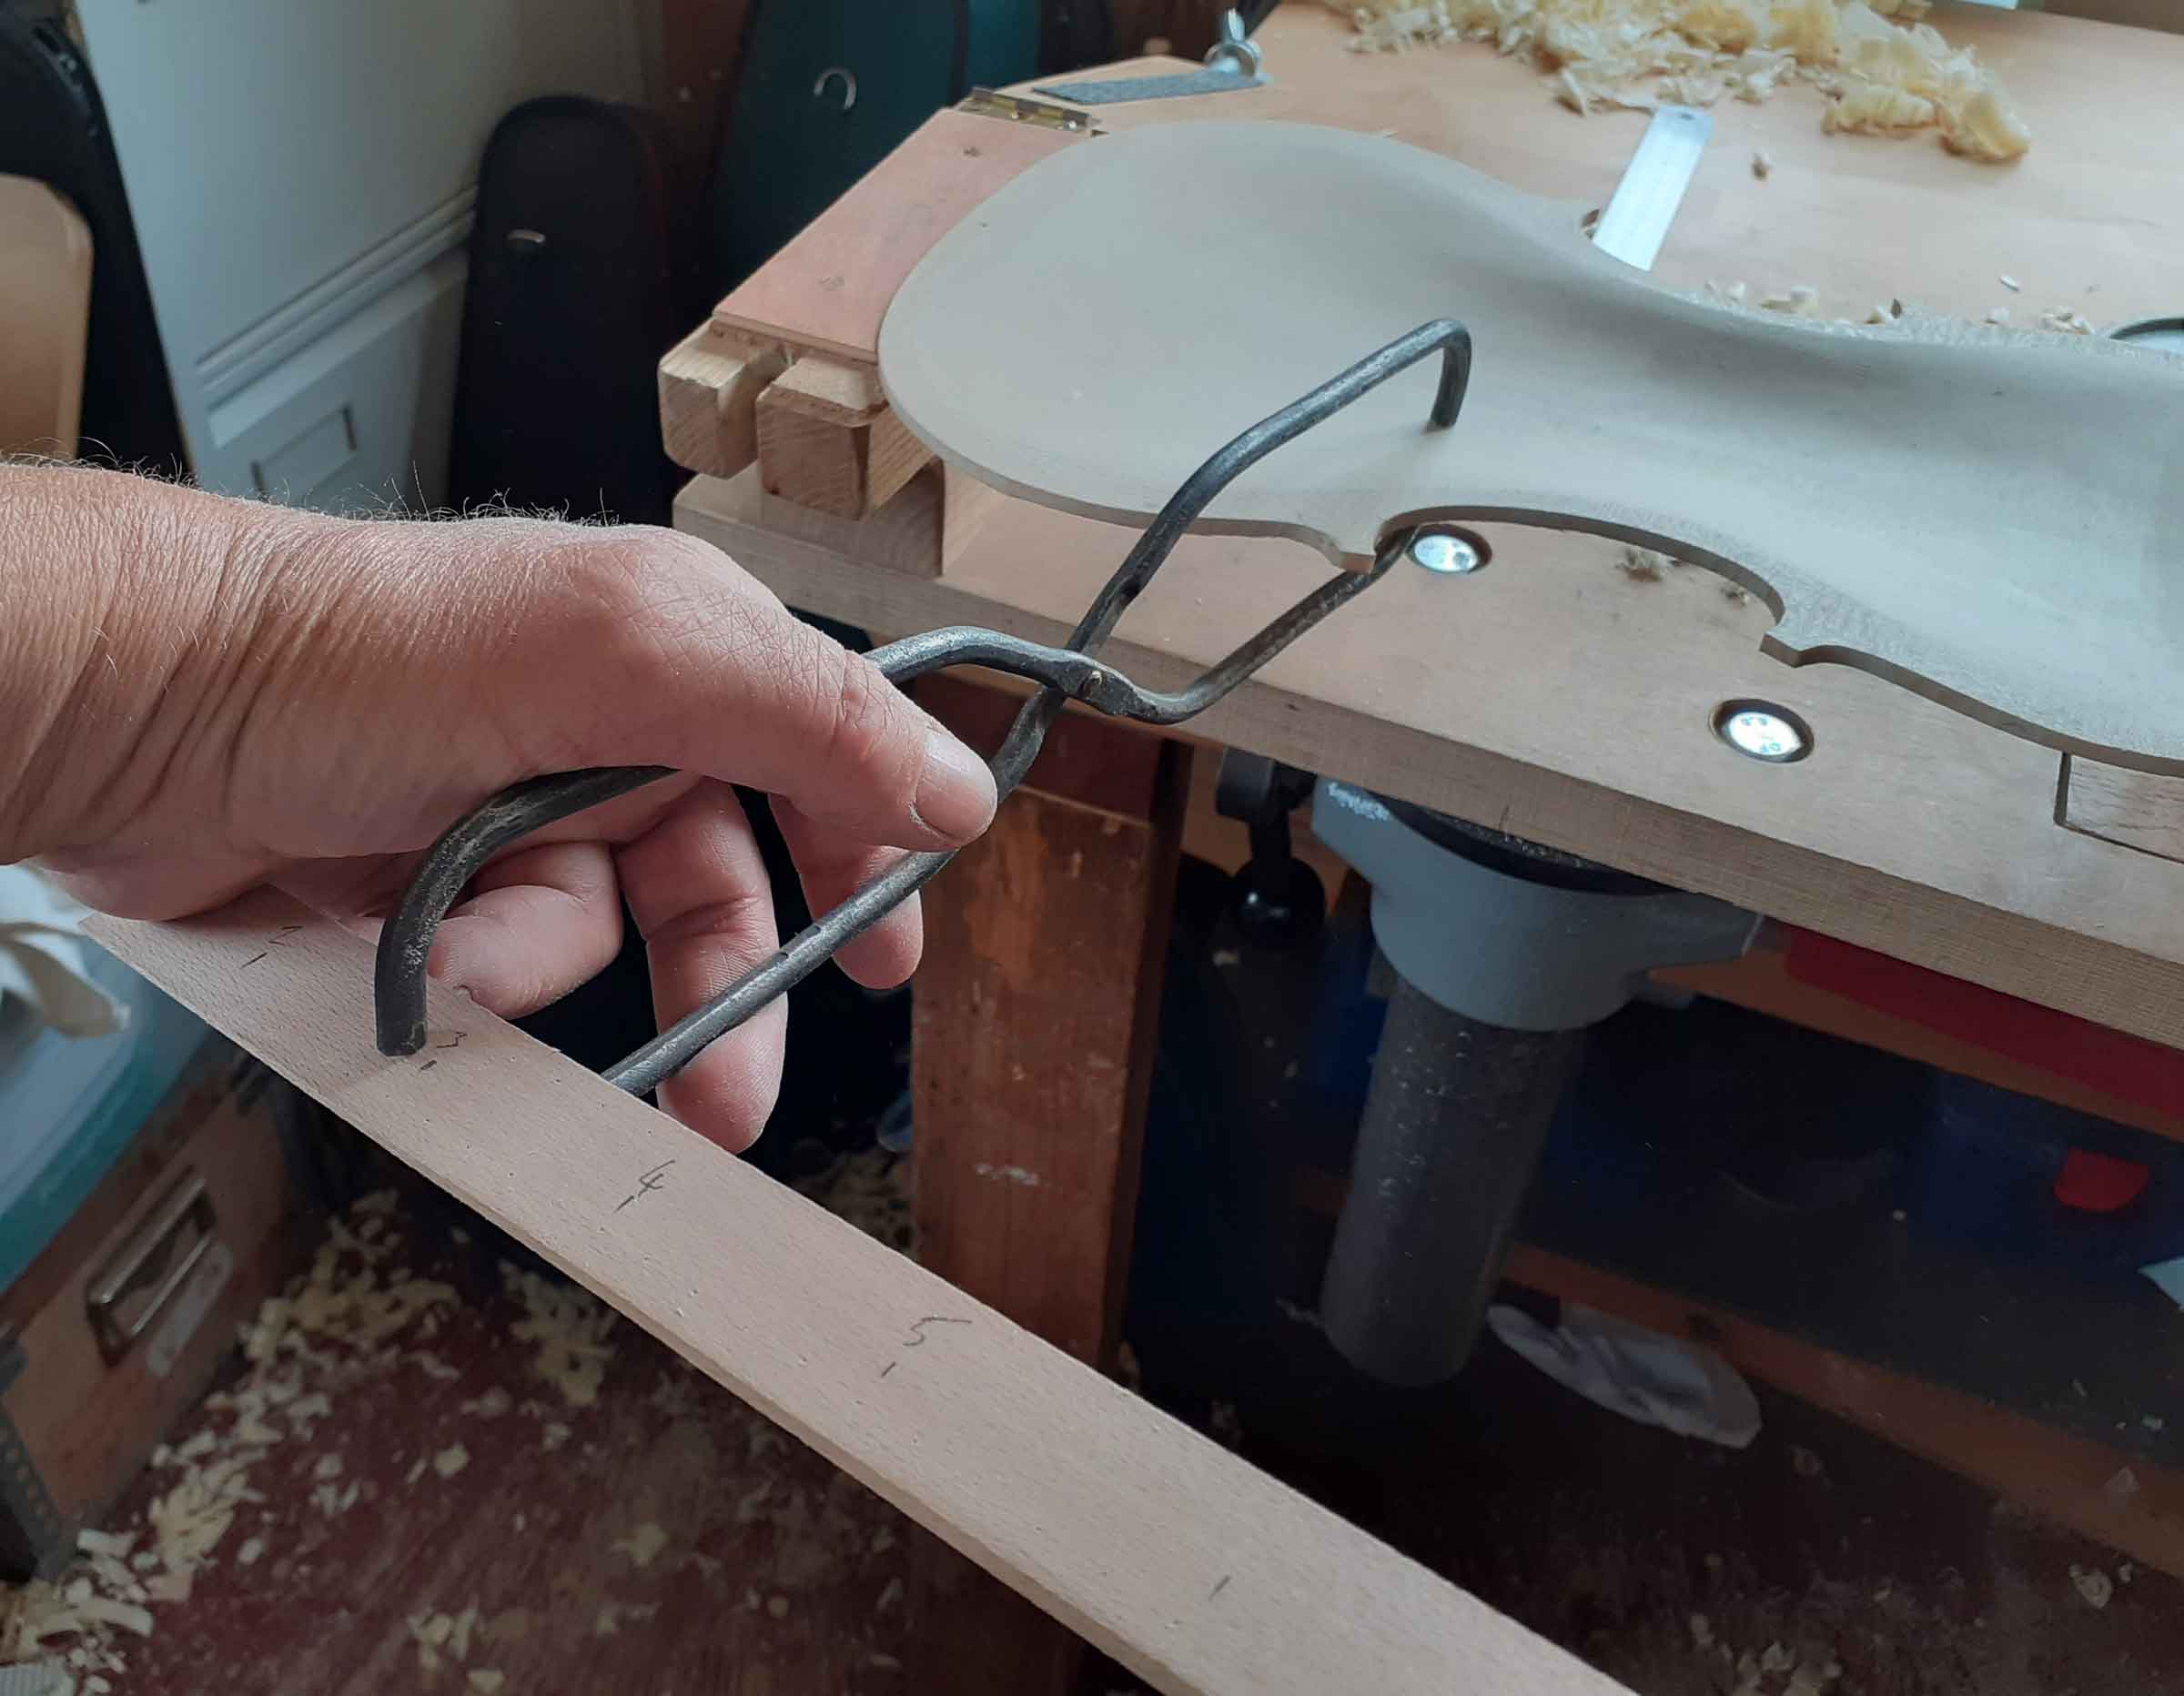
These tools, for holding the work and cutting the wood appear straightforward, but without dial calipers, how did the classical makers measure the thickness of their plates? This is a modern sort of question predicated on our expectation of using measuring tools rather than tools and procedures that regulate the thicknesses and shapes through their use. Luckily, we have the example of what I like to call a ‘pokey scruncher’ in the Cremona museum, more often called a thicknessing gauge, though a thickness marker is a more accurate description. This is a tool I ignored for four decades, because dial calipers do work, although I did make the metalwork for it at college, the bits lying at the bottom of a drawer until 2020. As has so often been the case, using the new tool has been a revelation; as you can see, it is quick to use, and when hollowing you just plane away where you can see the marks.
When hollowing the belly, I remove most of the wood with a scrub plane , I set the scruncher to 5.5mm and scrunch away. In places the wood is usually too thick for the scruncher pin to penetrate to its full depth, so presuming I haven’t yet got to a even thickness, after removing the wood to remove the scruncher marks, I scrunch over the plate again at the same thickness and perhaps again until the plate is all down to 5.5mm. Then I gradually lower the setting, remove the wood, changing over to a thumb plane, and as I am getting nearer the finished thickness, scrunch more carefully and twice at each thickness before moving to the scraper. Only then do I use the scissor-type thicknessing gauge, holding the near end lightly and offering up a wedge of beech wood between the ‘contacts,’ as when testing the points on an old-fashioned car. The wedge has thicknesses marked along its length, but even without noting the measurement you can feel how tight the wedge is and therefore tell where the plate is a little thick, before scraping it in those places.
Even after using the pokey scruncher and the gauge the very first time, the variation in final thickness over the plate was only 0.2 mm, quite within the parameters of the most careful of the classical violin makers. Using the scissor-type callipers also shed light on the hollowed-out willow board with a hole in the middle displayed in the Museo del Violino. It has been suggested that this was used whilst hollowing, but using this thicknessing gauge, or the other two versions in the museum, requires two free hands, one for the wedge, one for the calipers, so the plate must be held with the underside exposed, tending to rule out that board as being a hollowing board.
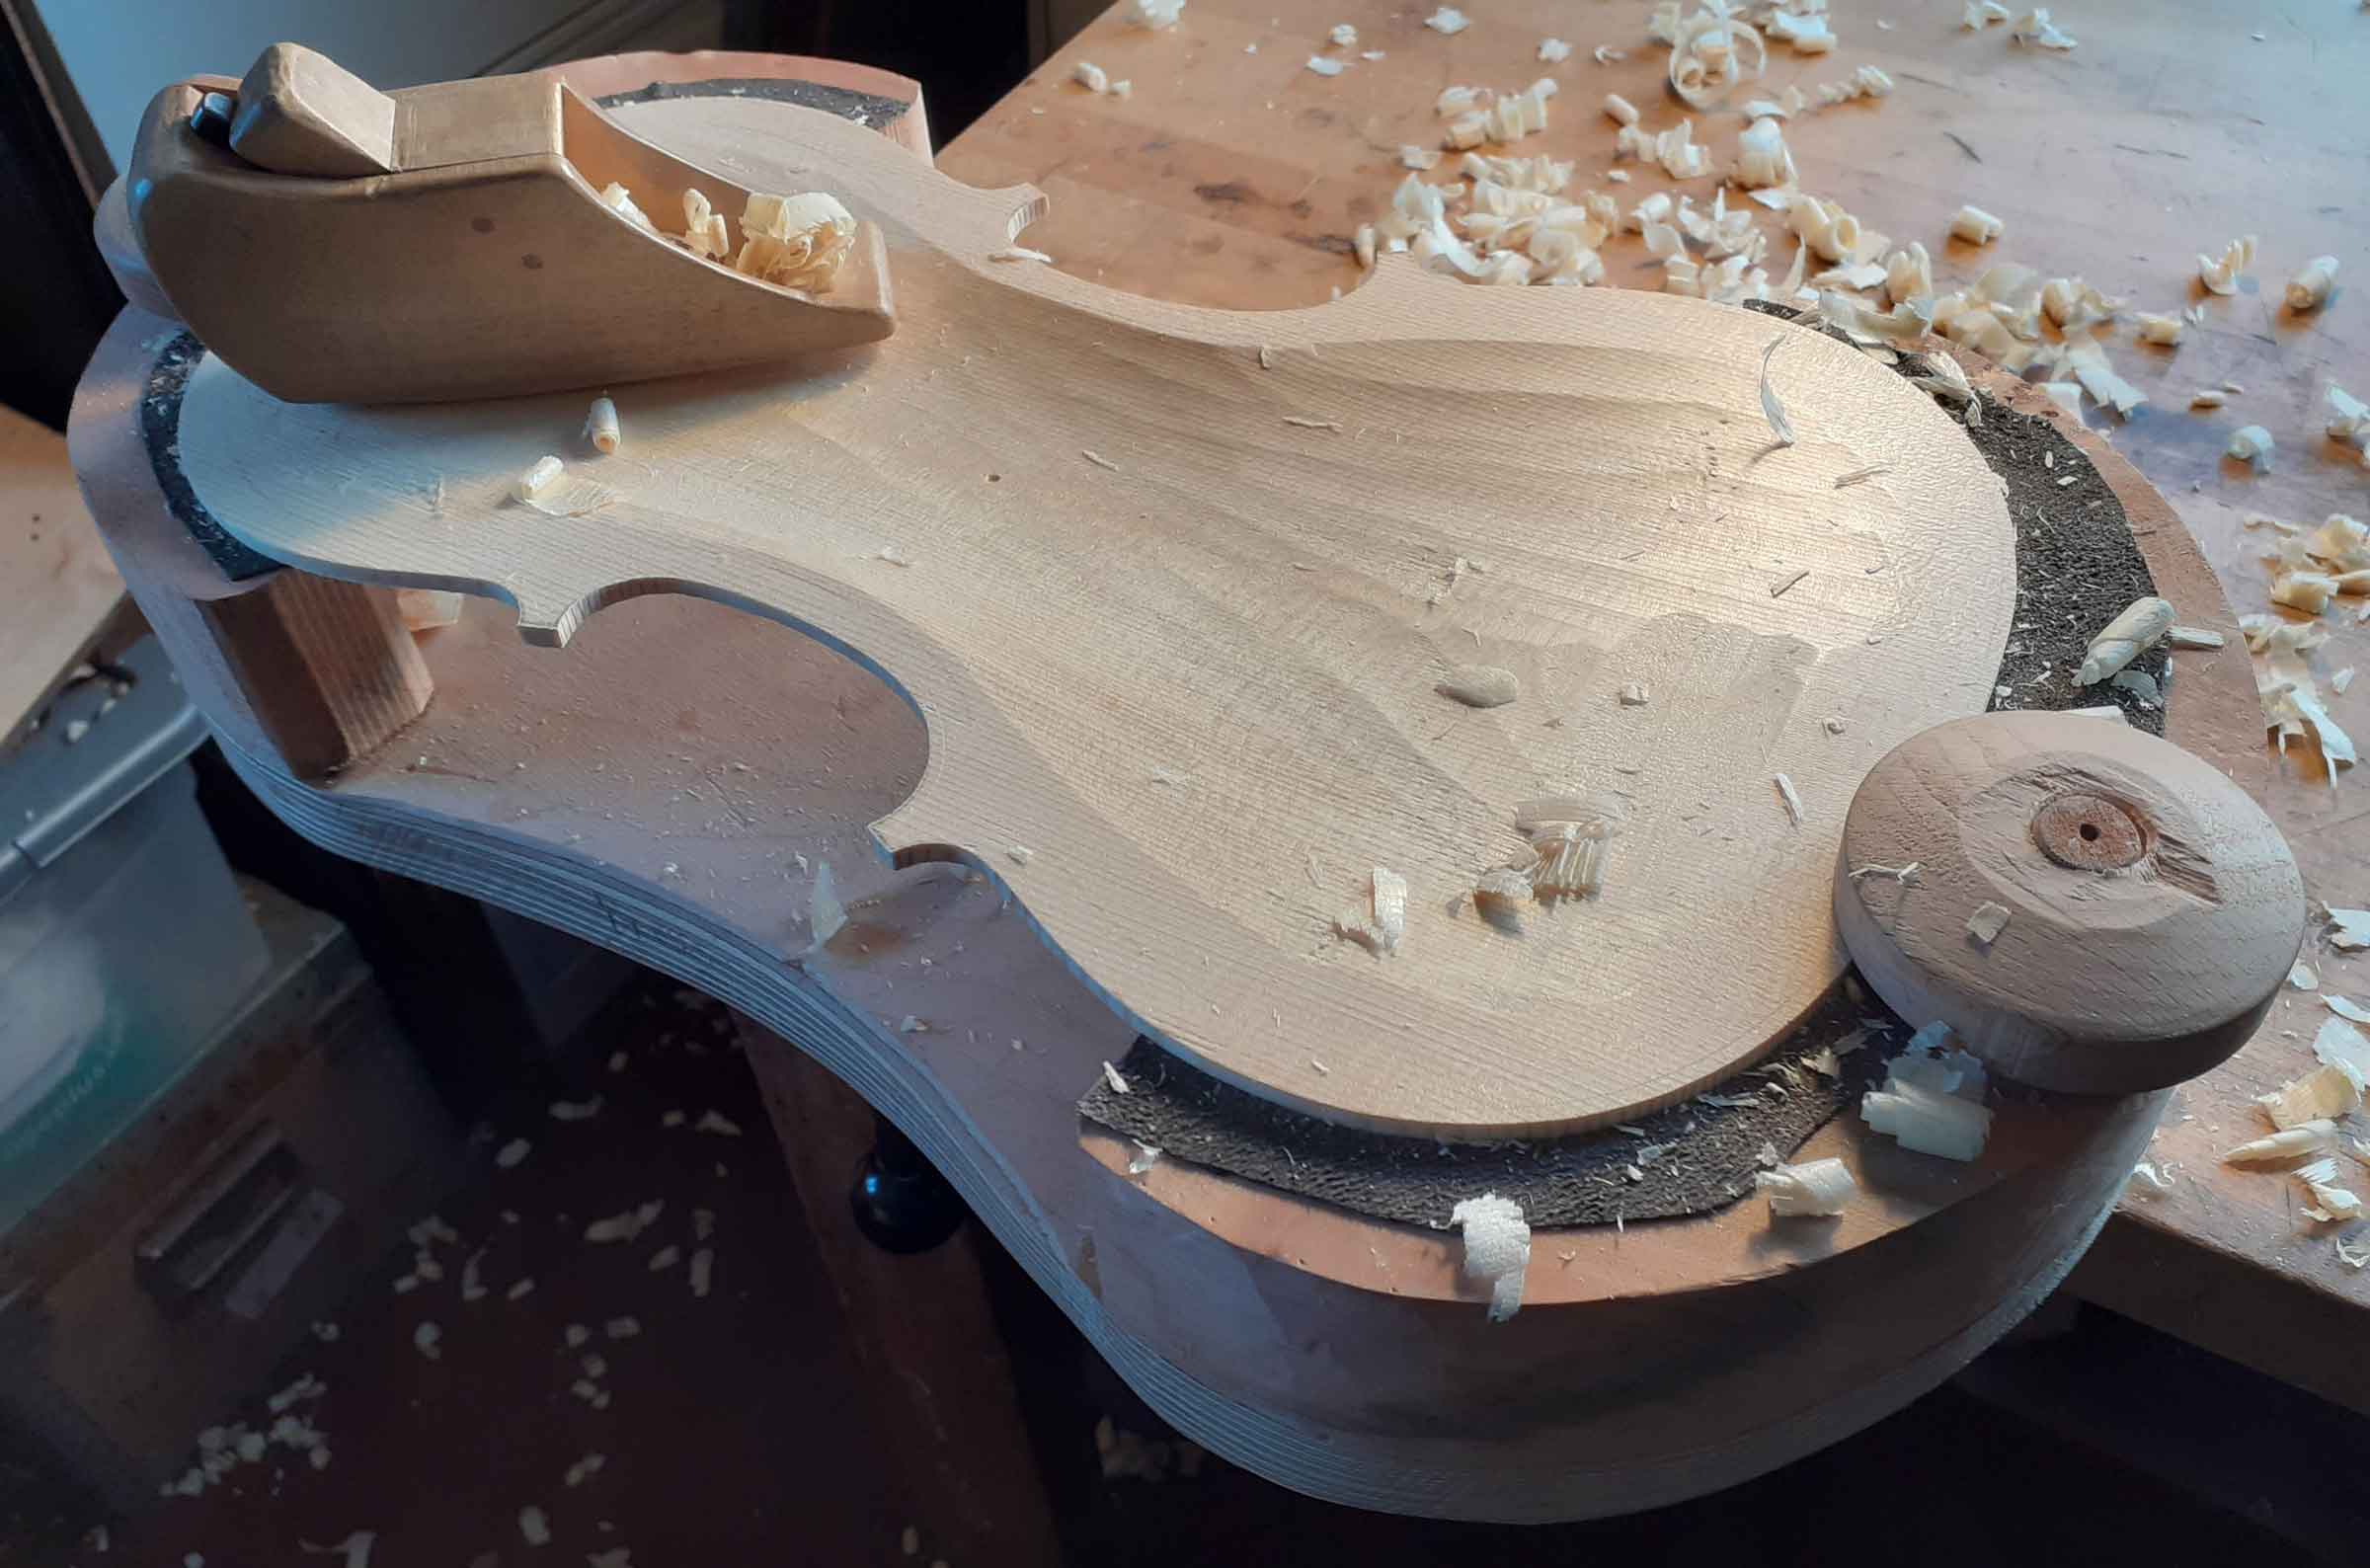
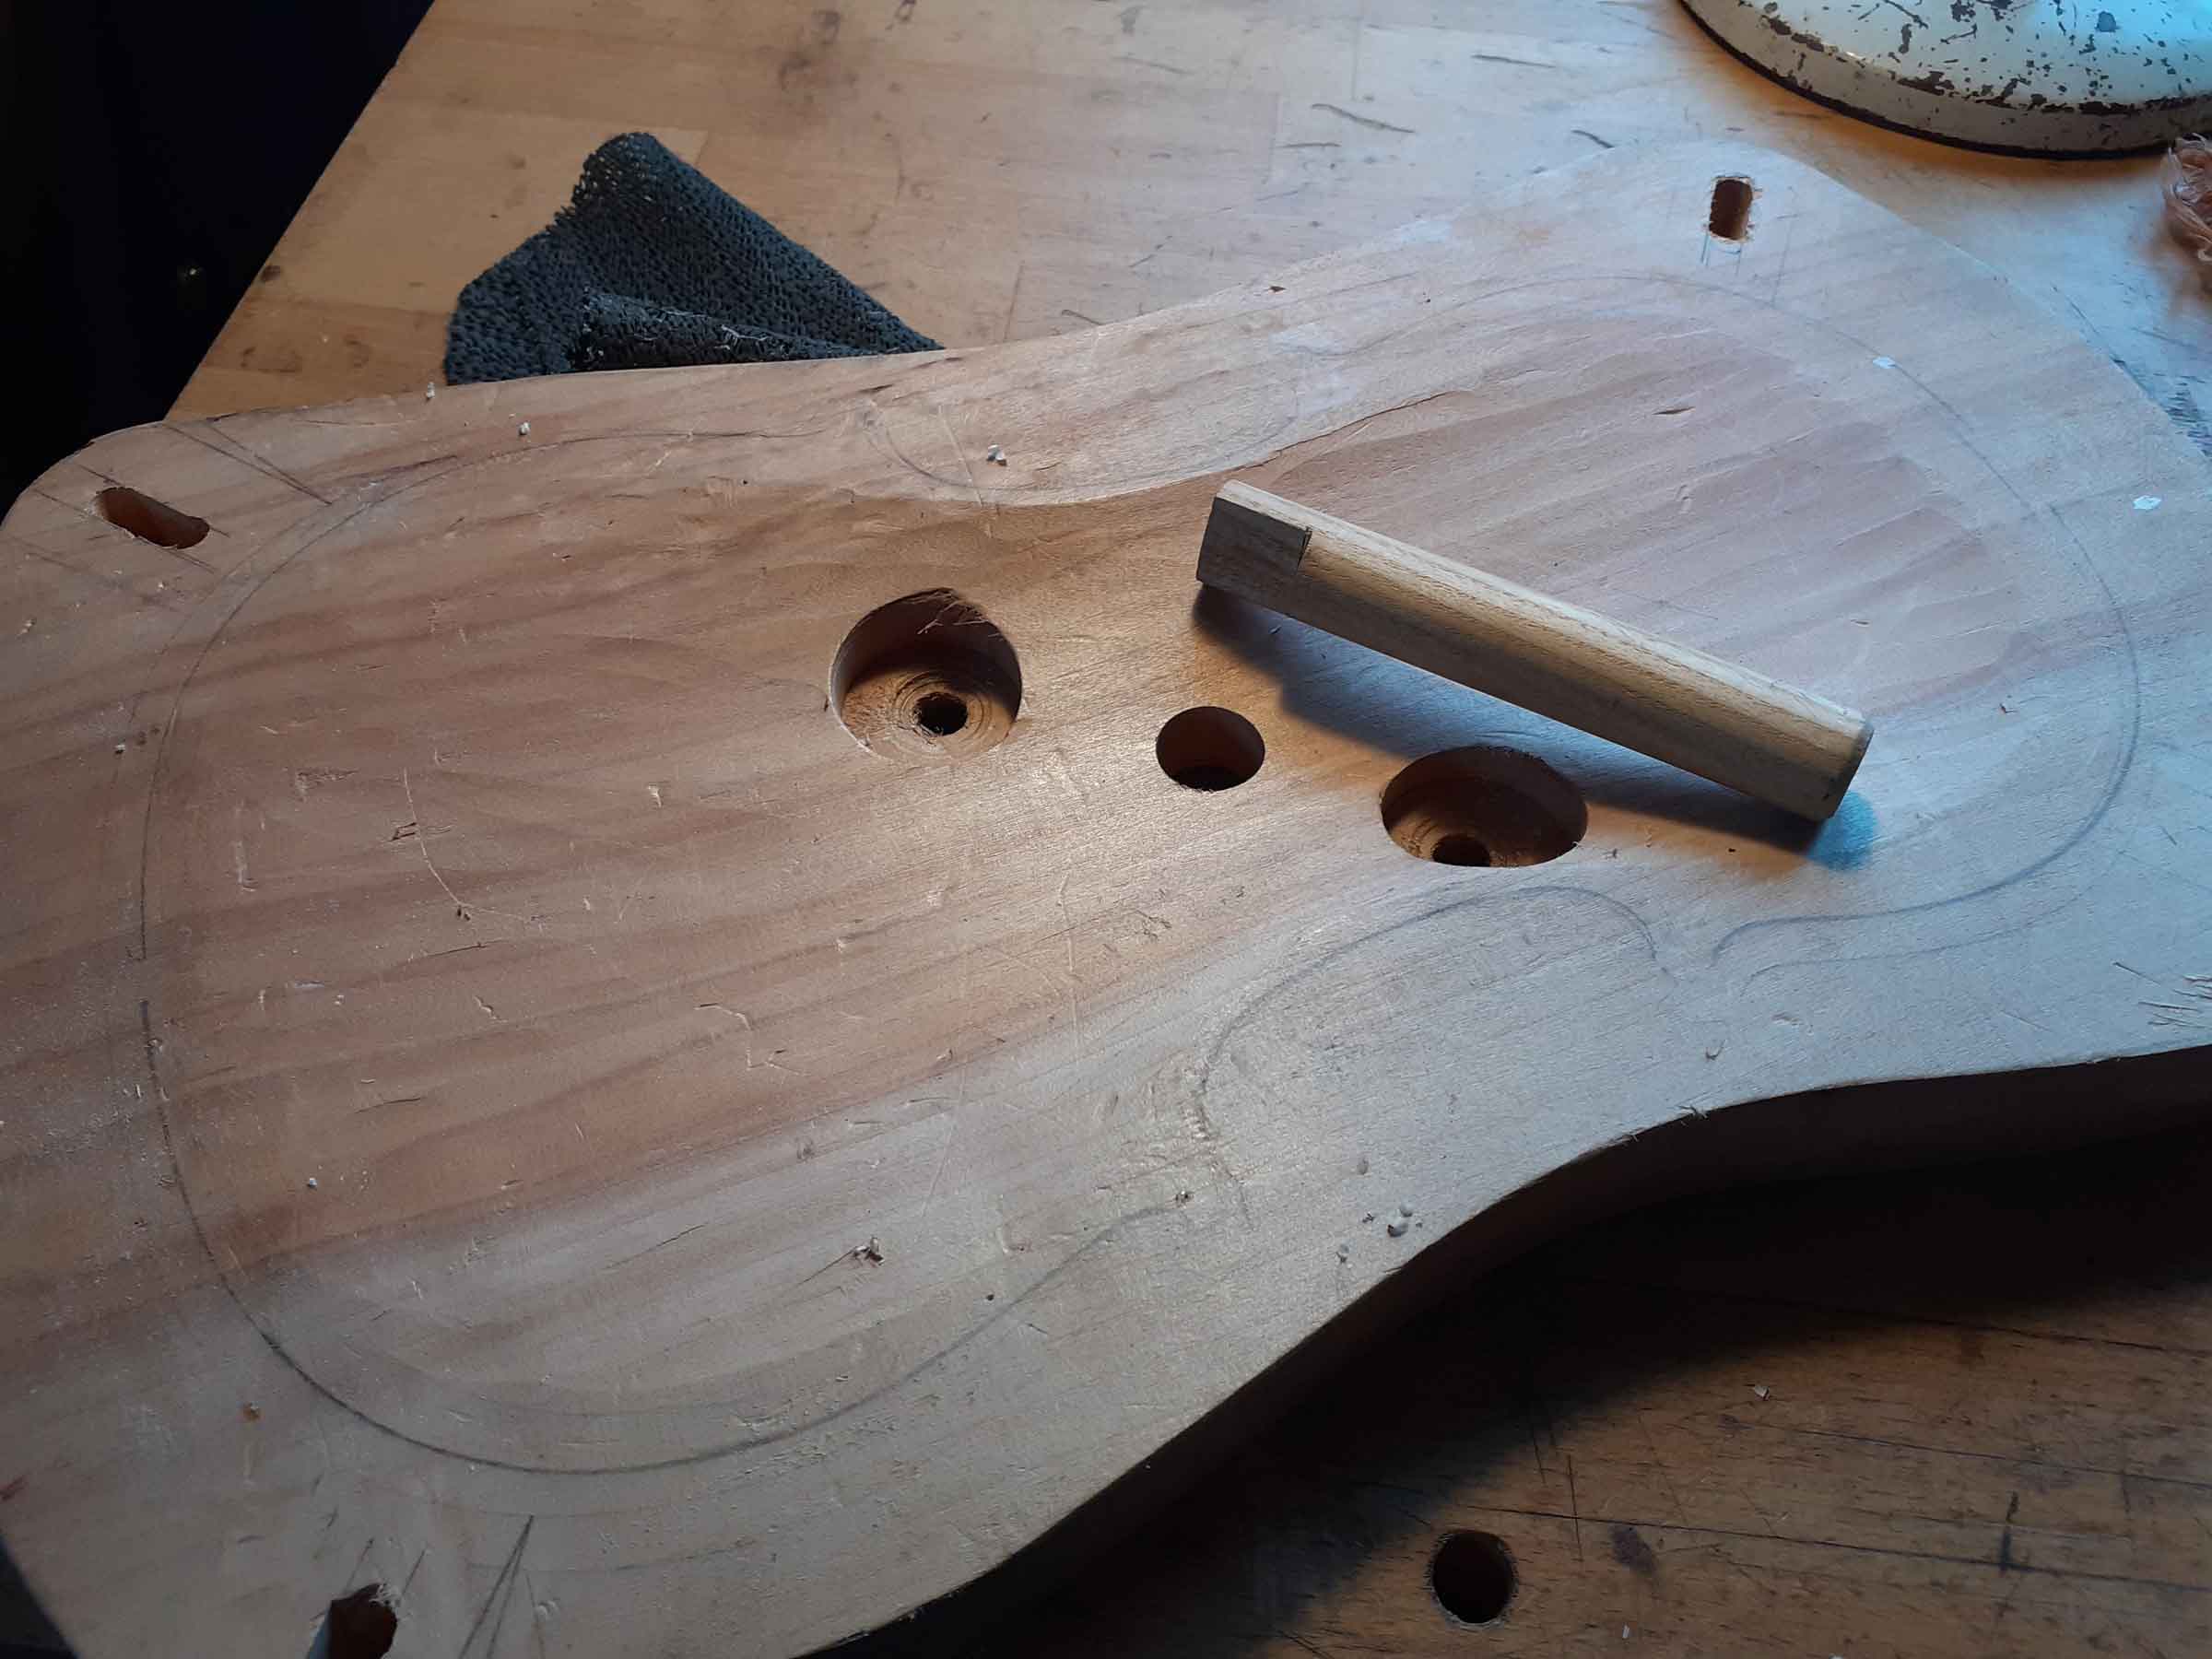
When it comes to hollowing the back, a similar sequence is followed, only with the plate varying in thickness, I first get it all to an approximately even thickness of 5.5mm, then use the scruncher set to the maximum final thickness of the middle of the plate, plus a little, and scrunch over the whole plate. After the whole area has the scrunch marks removed, I set the scruncher to the next ‘contour’ of thickness, and remove the wood from this point, all the way into the bouts, repeating the process at a lower thickness before finishing with thinning the bouts. Working in this manner, dictated by the tool, keeps the bouts thick until the centre is pretty much to the right thickness, providing support while the centre is worked.
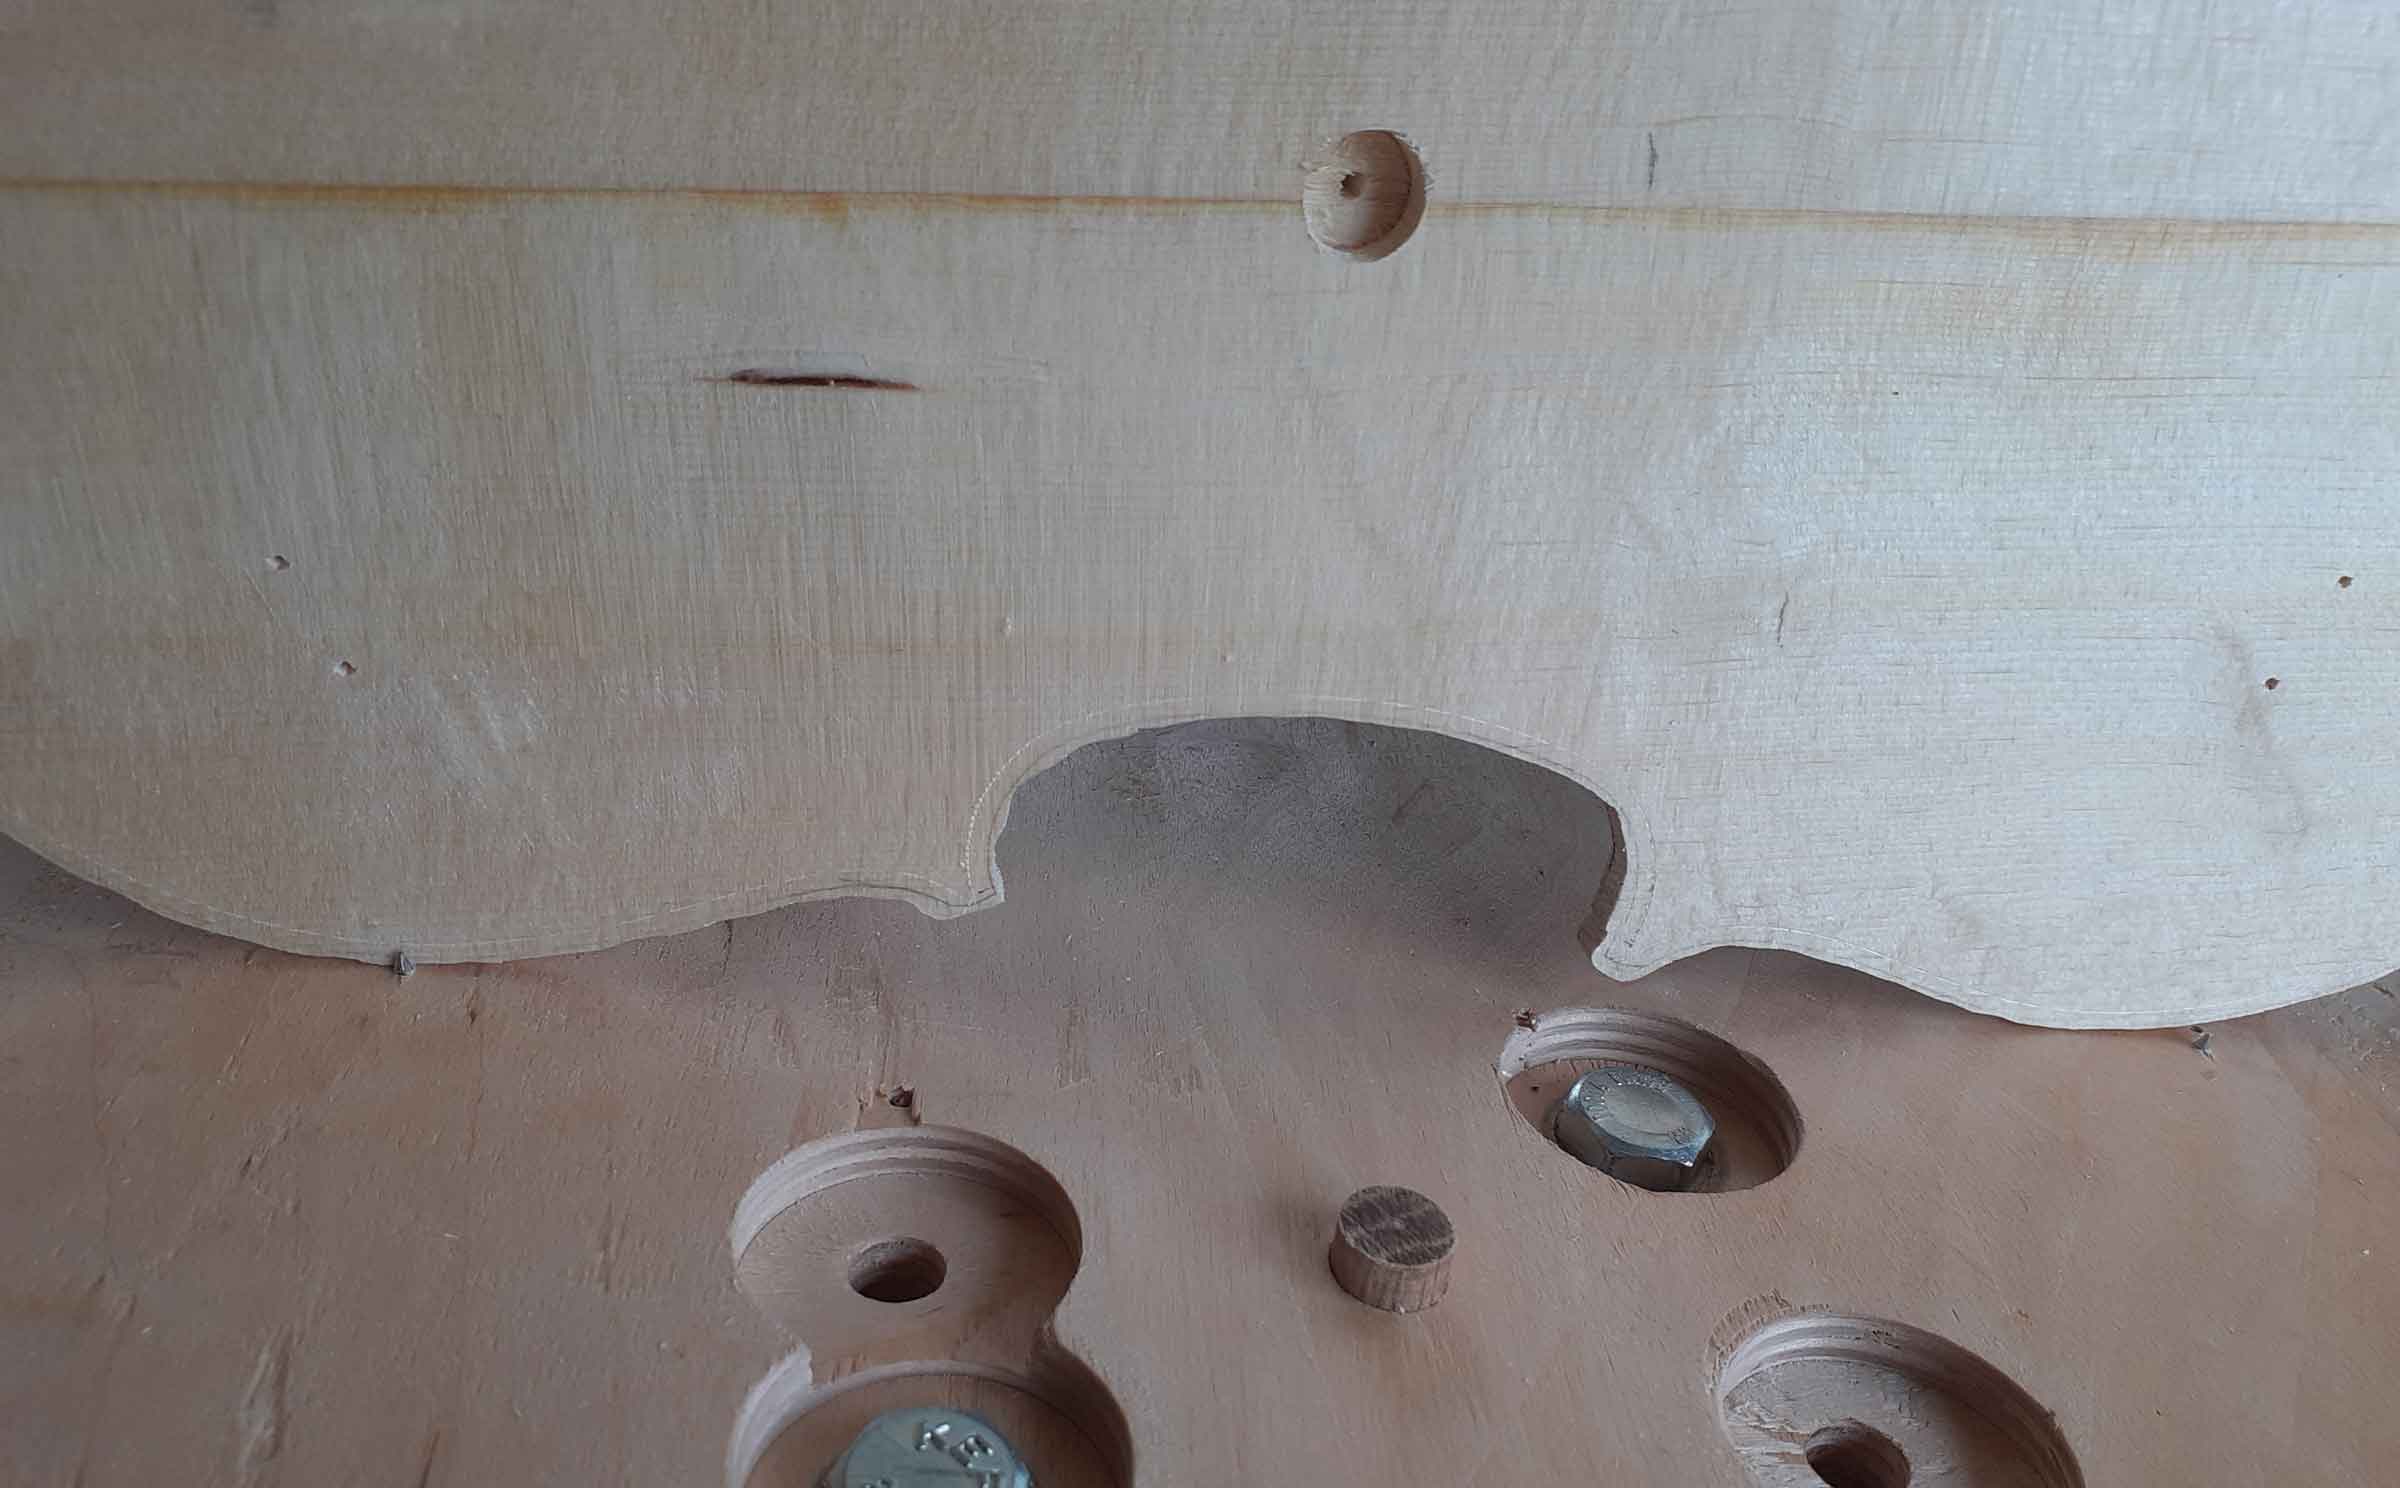
But there is another feature in the backs of many classical instruments that needs to be explained, the ventral hole, filled with a wooden pin, which is conical in shape, a couple of millimetres in diameter on the inside, diminishing to next to nothing on the outside, positioned somewhere near the centre of the back. Various theories have been suggested for its use, but I think it was an aid to thicknessing the back, not an absolutely necessary one because not everyone did it, but useful nonetheless, using the length of the point on a drill bit to indicate the thickness of the back.
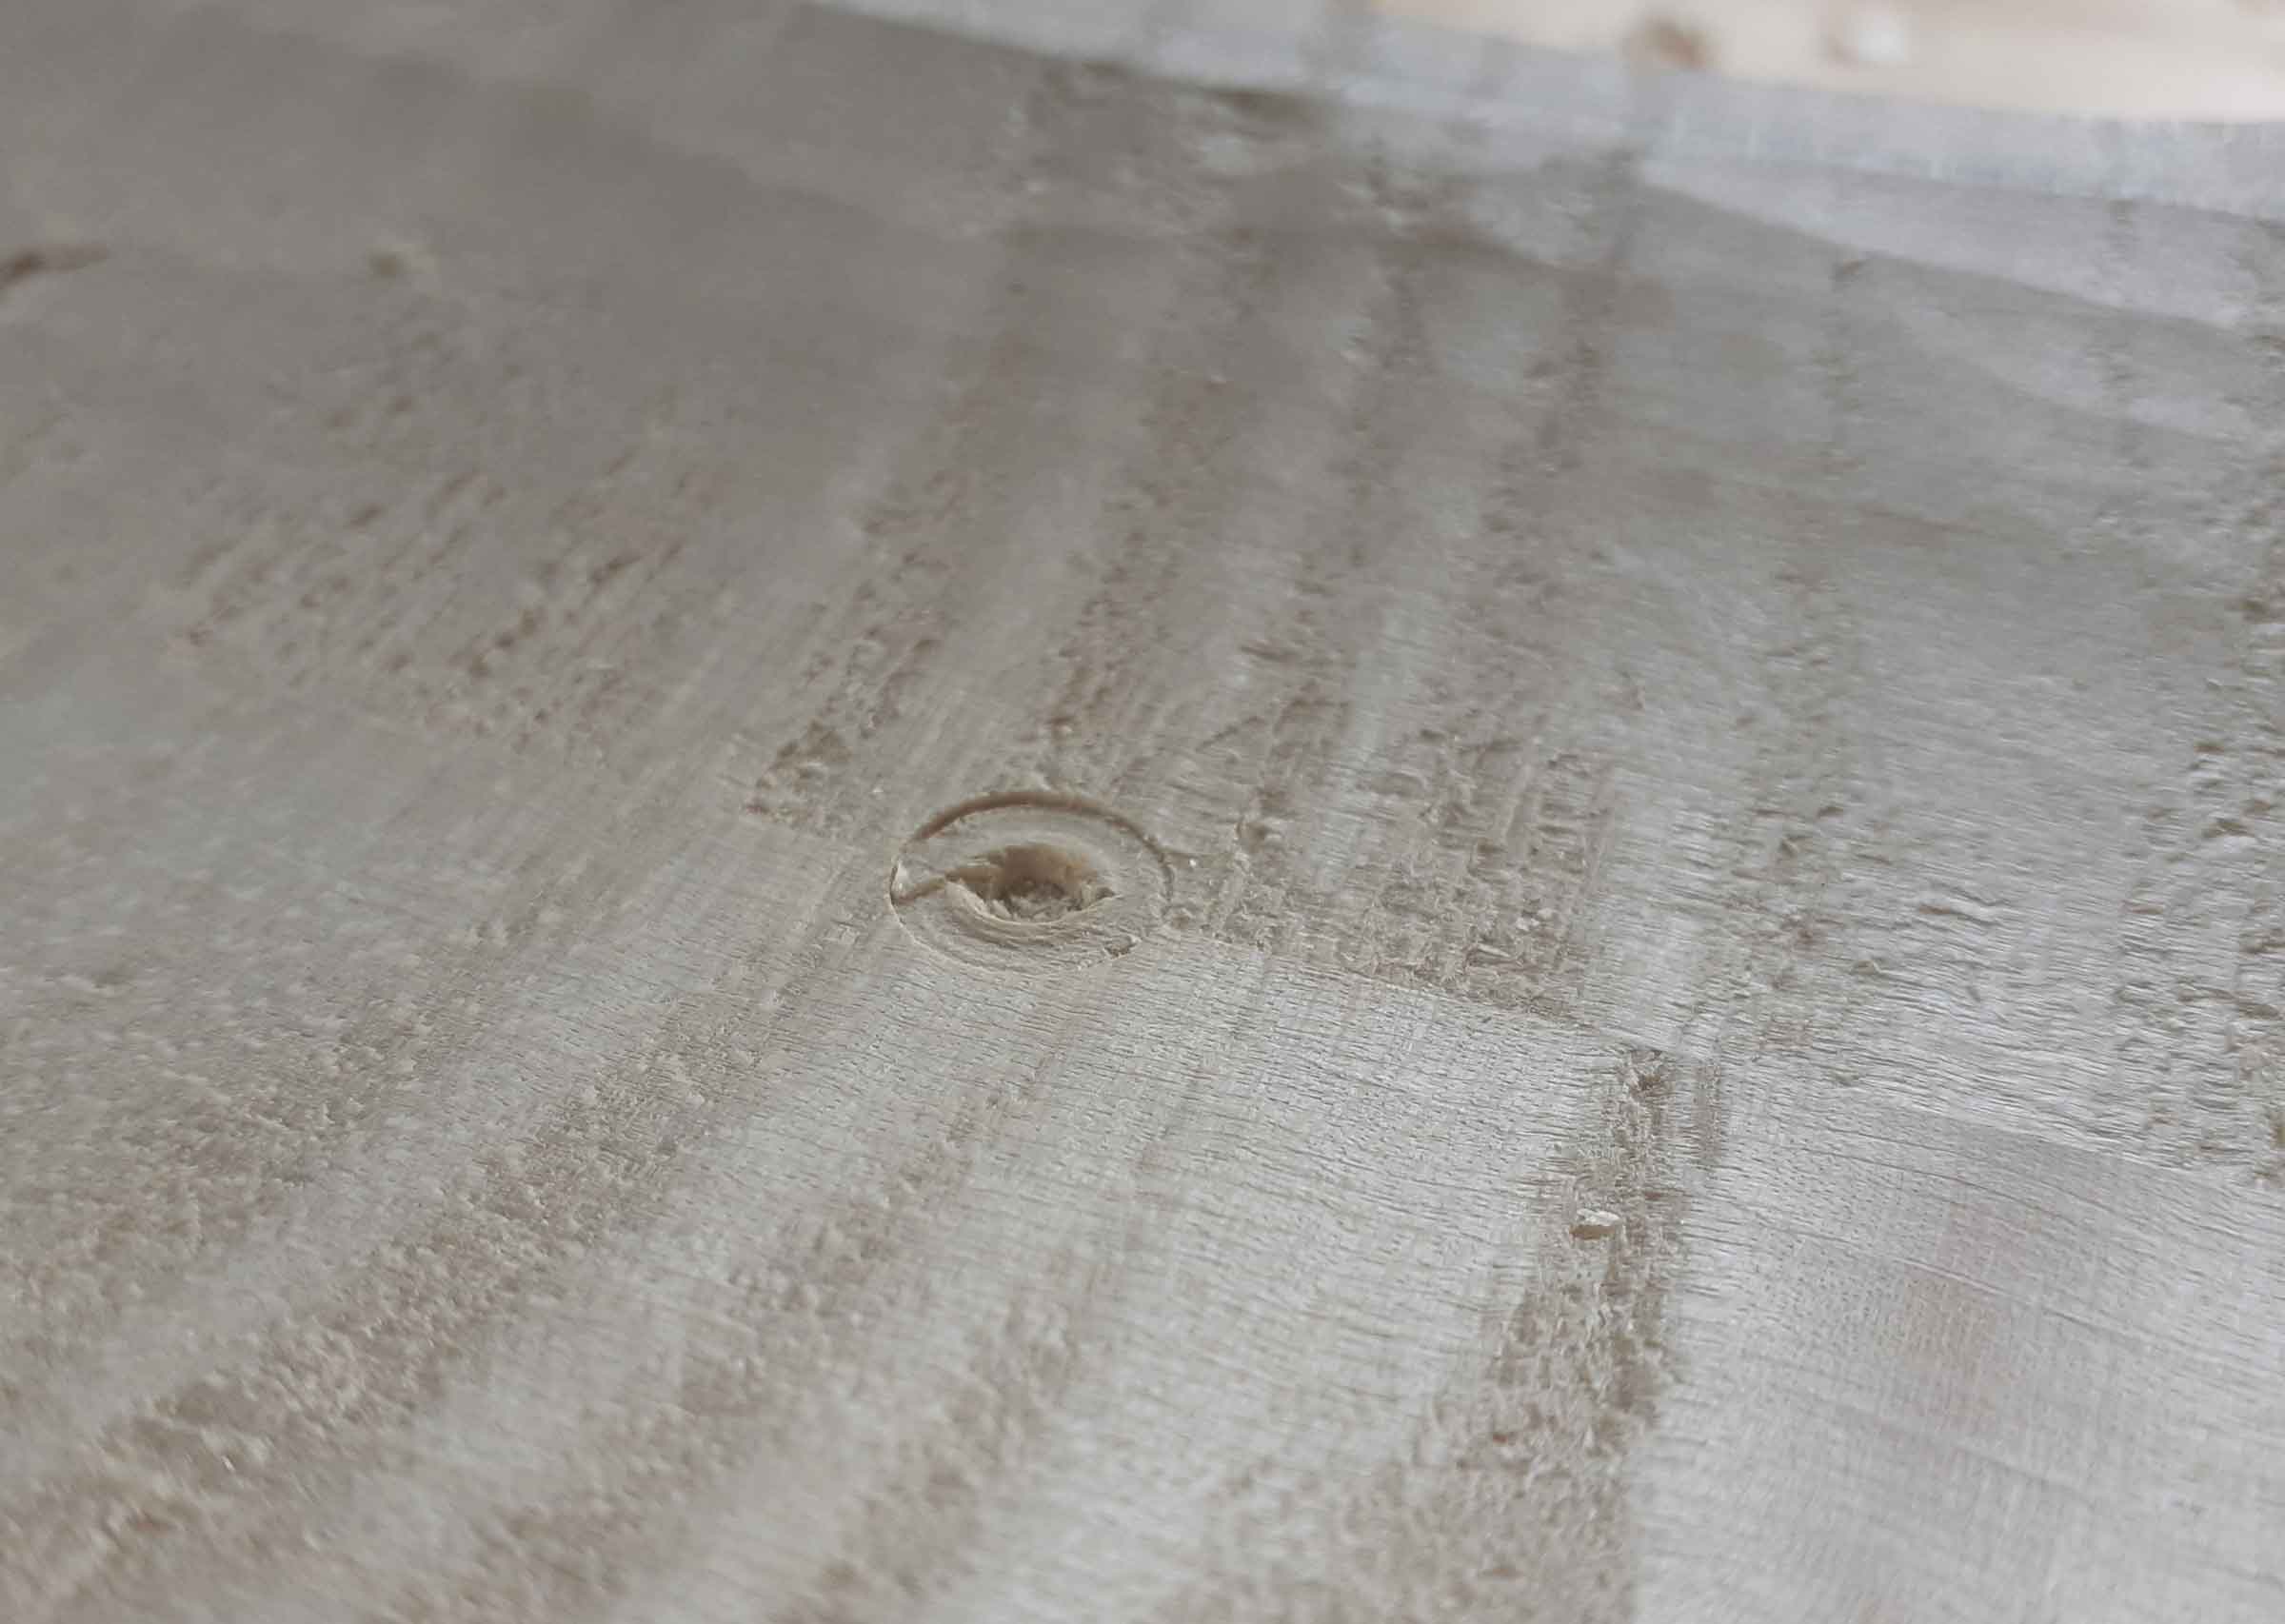
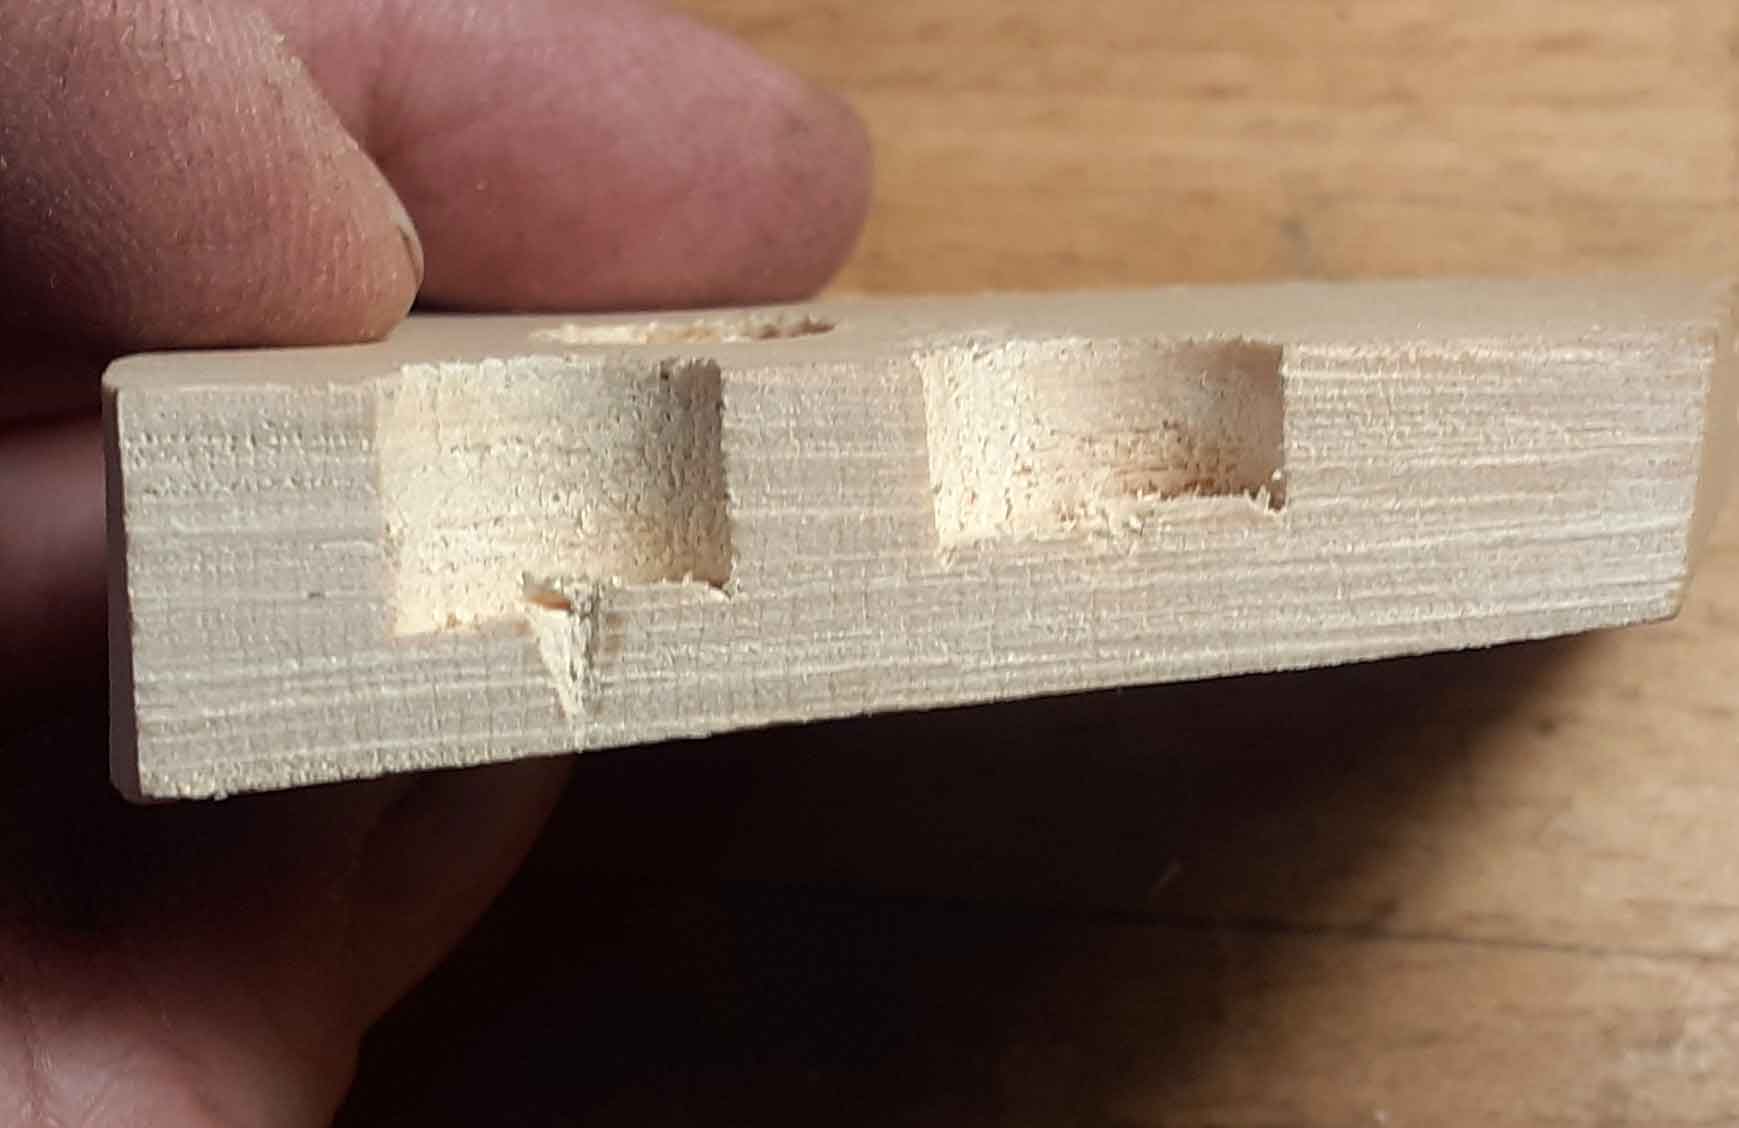
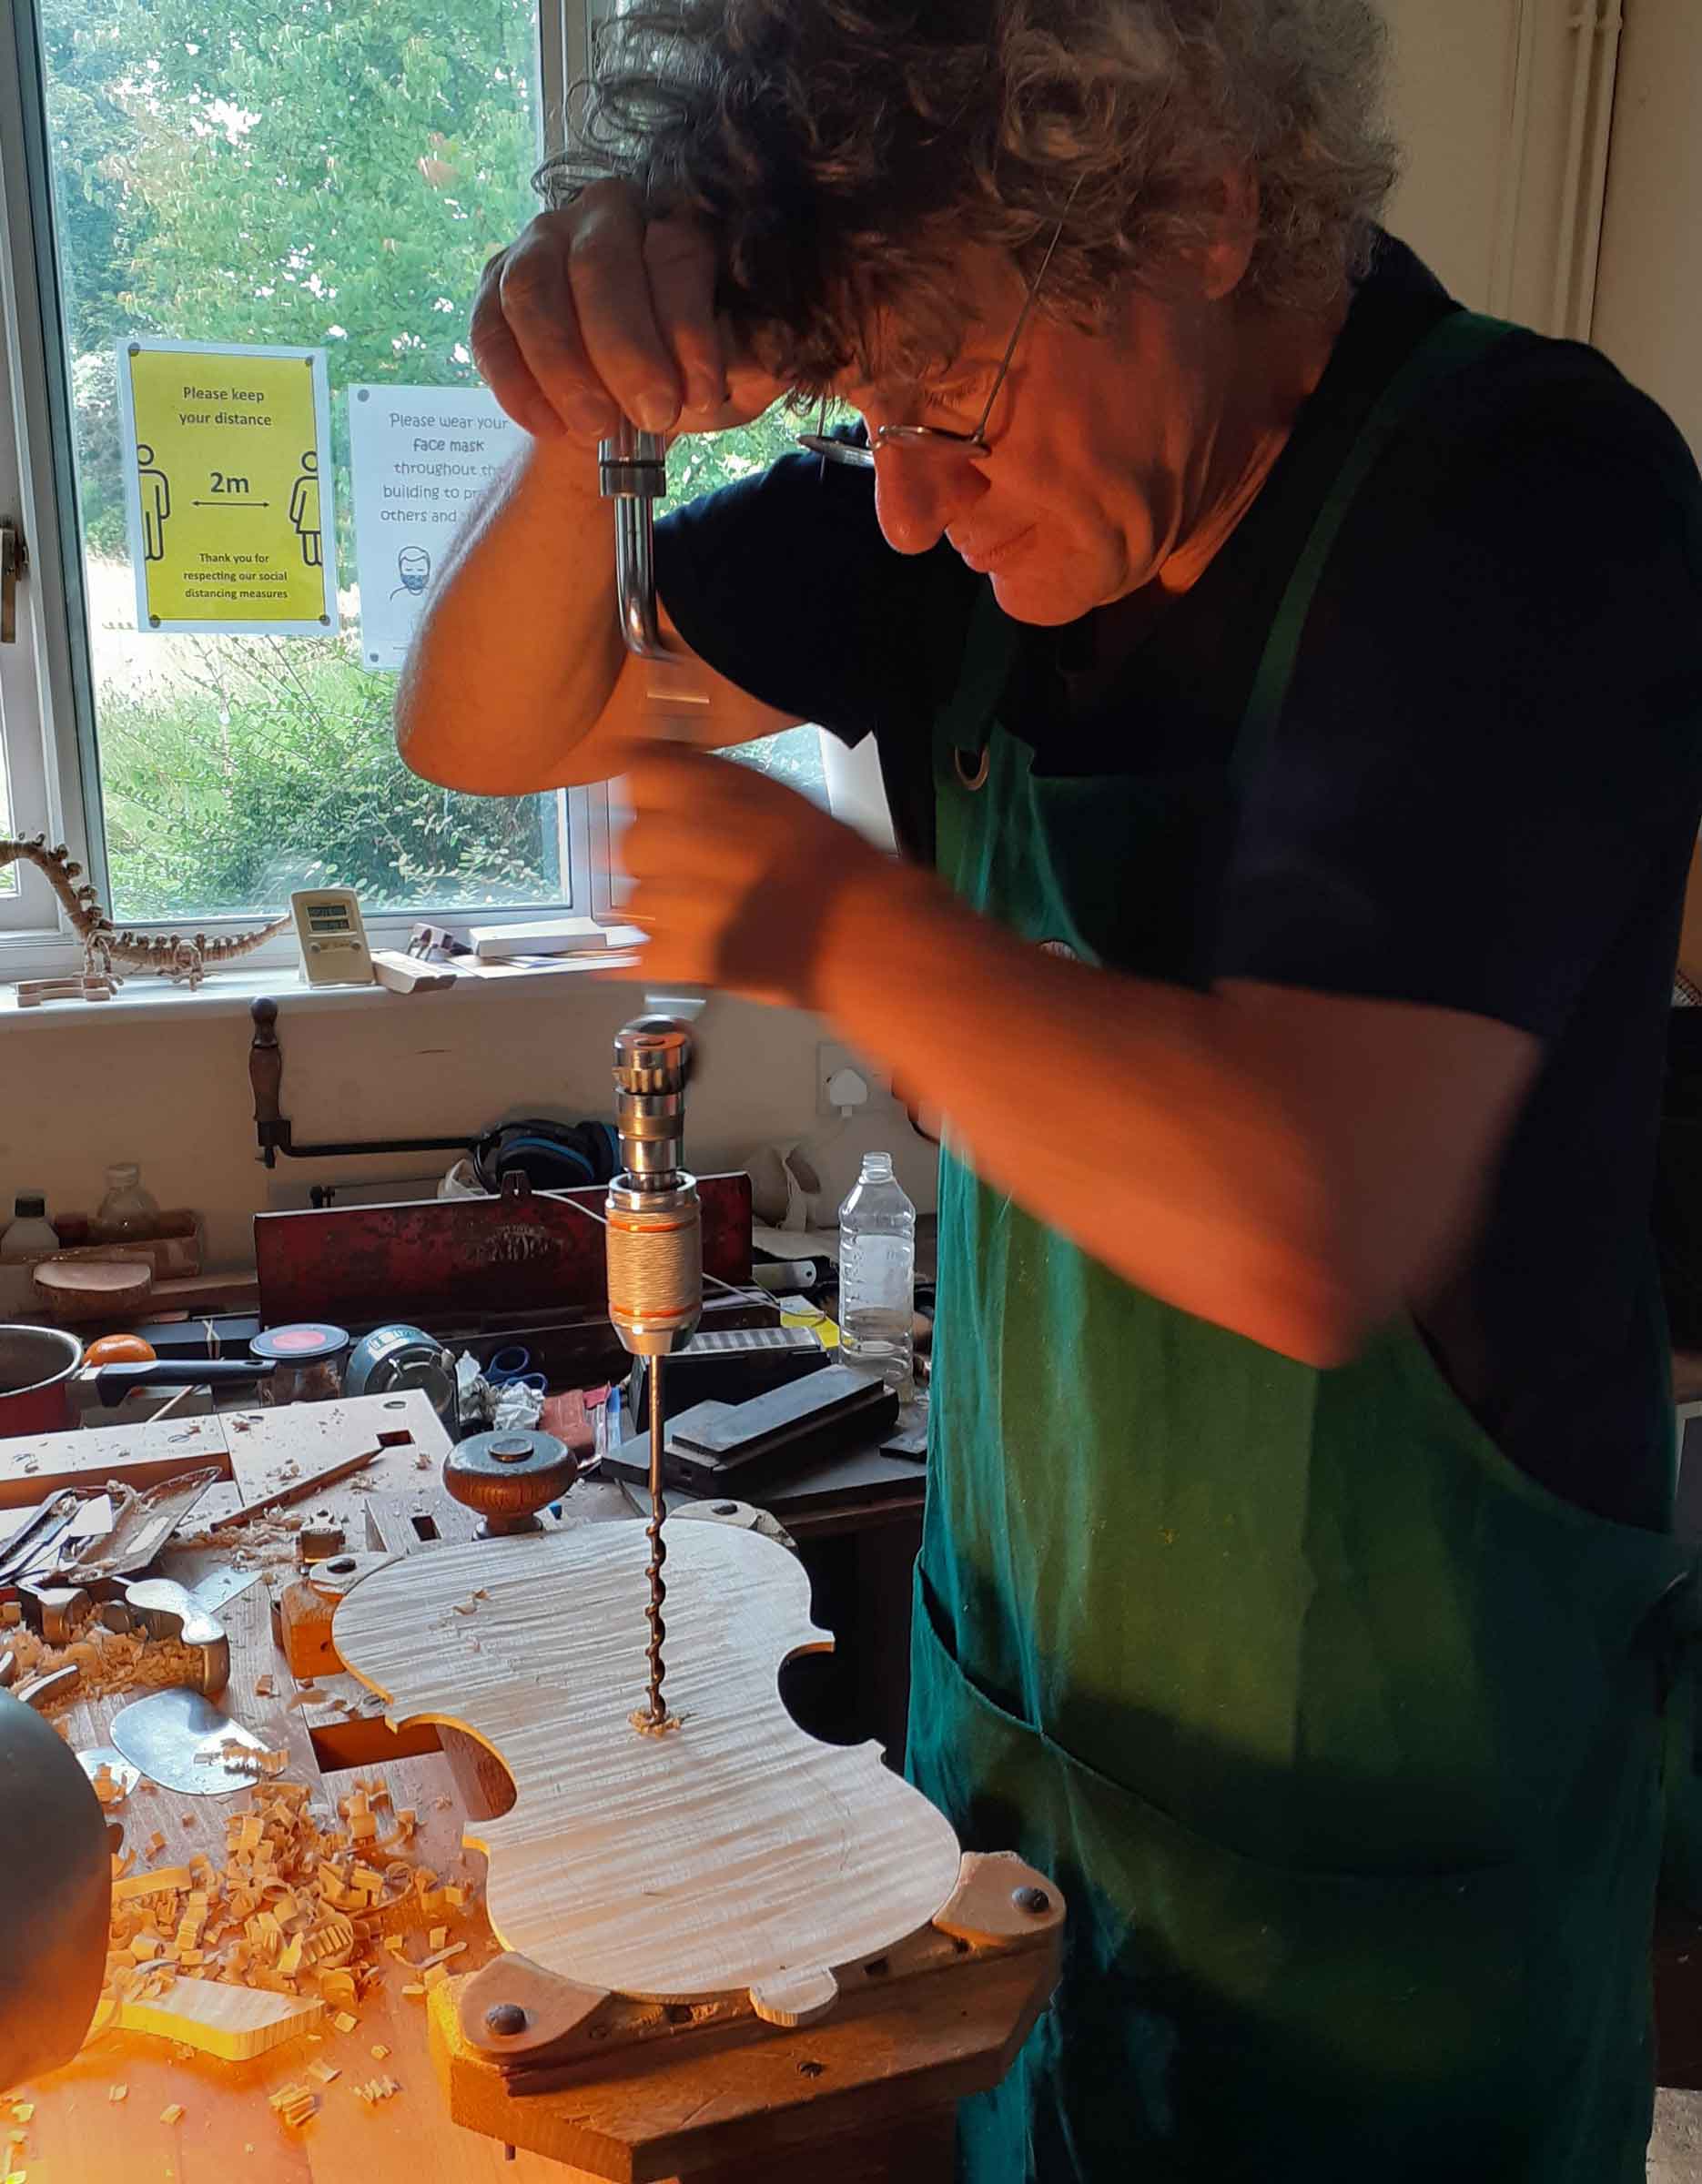
The first few times I tried drilling this hole, I used a standard brace and auger bit with the threads filed off the lead screw to avoid the bit being pulled in too far. It worked reasonably well, you could feel the end of the pin just coming through the wood, leaving a wide hole inside, at the bottom of which was this conical hole, so when you had planed off all the wood inside to the bottom of the wide hole, you were left with a conical hole the length of the centre pin of the bit. It did feel a bit dangerous drilling through a half-finished plate, but once done, the curvature of the scrub plane combined with this reference in the middle and the two block areas at each end does allow for quick work without having to stop and check whether you have gone too far. If you were to use a gouge for rough hollowing however, working across the grain, this pin would be of minimal use, only being helpful an inch or two either side of the hole, because you haven’t got the longitudinal security provided by the sole of the scrub plane.
A number of instruments later, in 2022 I was involved with a joint making project, for which we decided to use the methods I had been working on, and Kai Thomas Roth was going to be thicknessing the back. Just like me, he found drilling the ventral hole scary, pushing the brace down to drill through the back, and as he was getting close to the point coming through, he said he could feel it with his finger on the outside and asked whether I thought he should stop. Seeing it was a del Gesu model, I suggested carrying on until the point just came through, but that conversation prompted Jan Strich, who was working nearby, to offer that Stainer had five such holes down the length of his backs, and that they didn’t quite come through to the outside. Obviously, Kai’s observation in feeling the drill before it came through would be something a careful violin maker like Stainer would do when; not so del Gesu who drilled right through. But it did open the question as to why Stainer drilled five holes. Cremona and Absam are some distance apart, so it should be no surprise that there were variations in method, but a little thought offered a solution. The archings of del Gesu are fairly even, they don’t rise quickly at the ends, so the combination of one ventral pin, the untouched block areas and an appropriately shaped scrub plane means that one point in the centre is quite enough of a guide to avoid planing too much wood away. Stainer, by contrast, used severe archings, steep at top and bottom and fairly flat in between, so he could not rely on the curvature of a scrub plane to keep him safe, so he used five points of reference and probably worked across the grain, maybe even with a gouge!
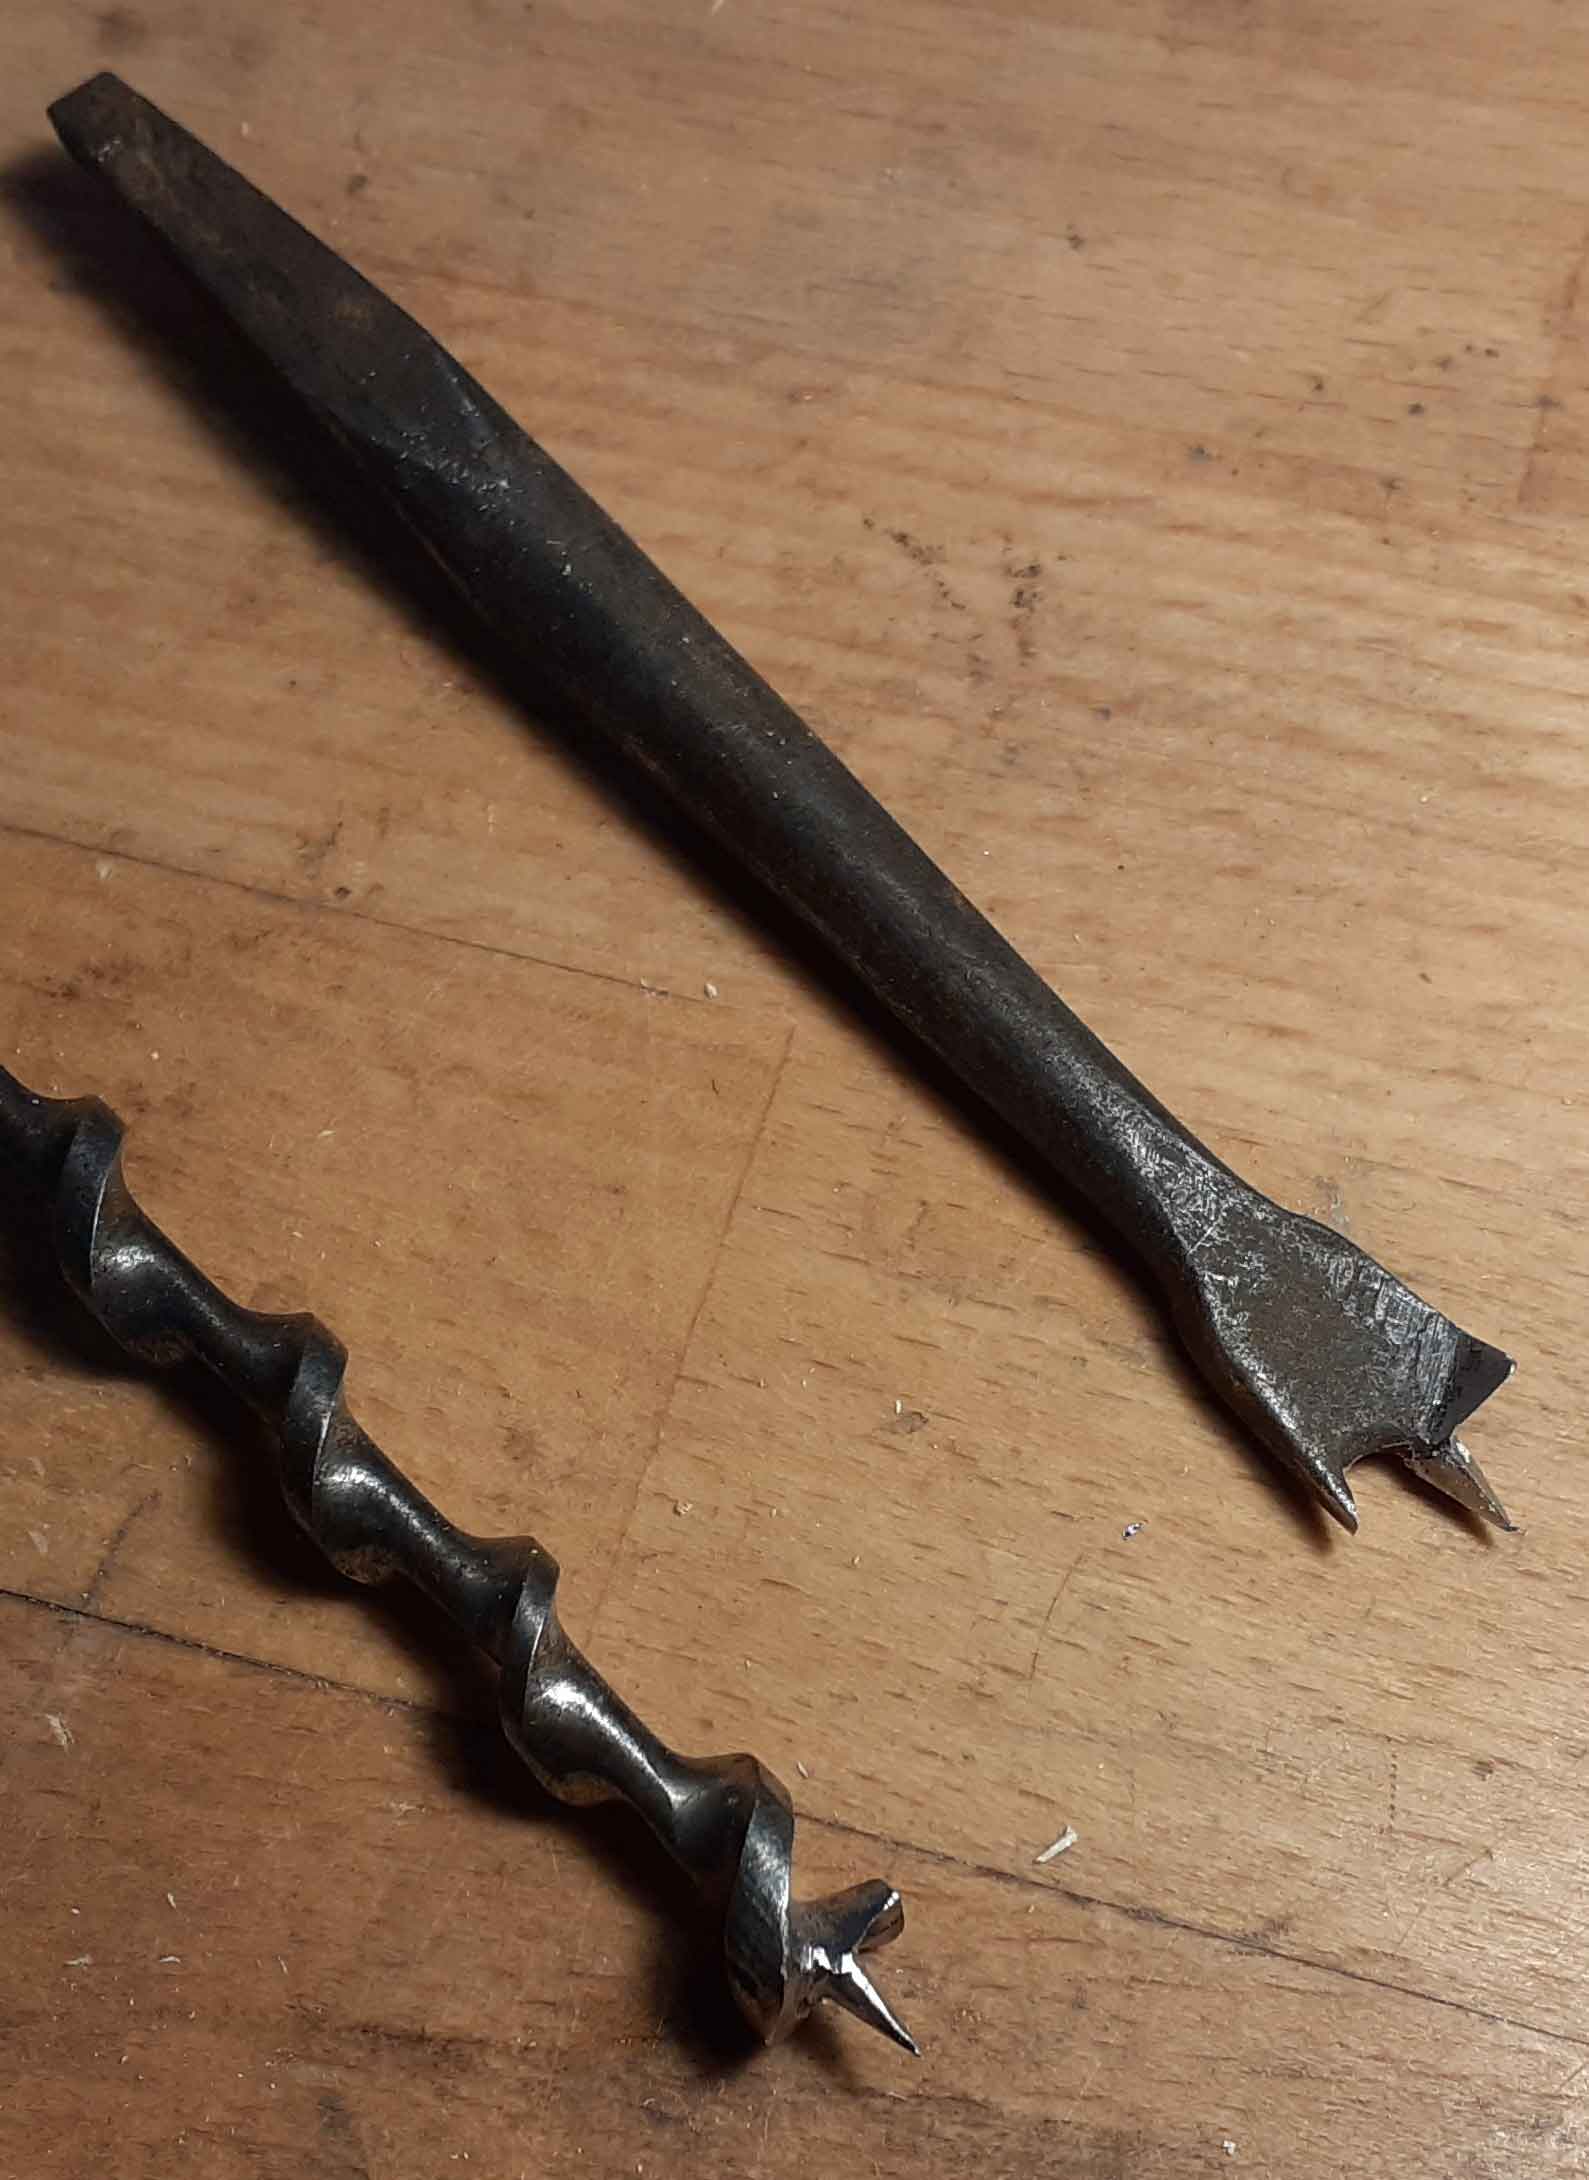
Kai also suggested that the central pin of the drill should be facetted so that it cut rather than being forced into the wood by brute force. This led me to dig out some centre bits bought for the purpose which I hadn’t got round to trying, a much simpler bit which is more authentic to the time, which has three facets on the lead pin, and which works much better.
Having a hole in the middle of the back also offers up the possibility that the hole was also used to hold the back during arching, though unless the violin maker knew exactly the arching height at this early stage, he would have had to drill only part way through initially. If so, perhaps the bellies also had a shallower hole for the same reason, but which left no mark on the final instrument. When I am arching, I usually mount the plate on a board which has four panel pins poking through it, onto which you impale the plate, another useful tool depicted by Diderot, but adding a dowel through the board and into the middle of a plate does make it more secure, especially for the initial rough arching.
The F holes
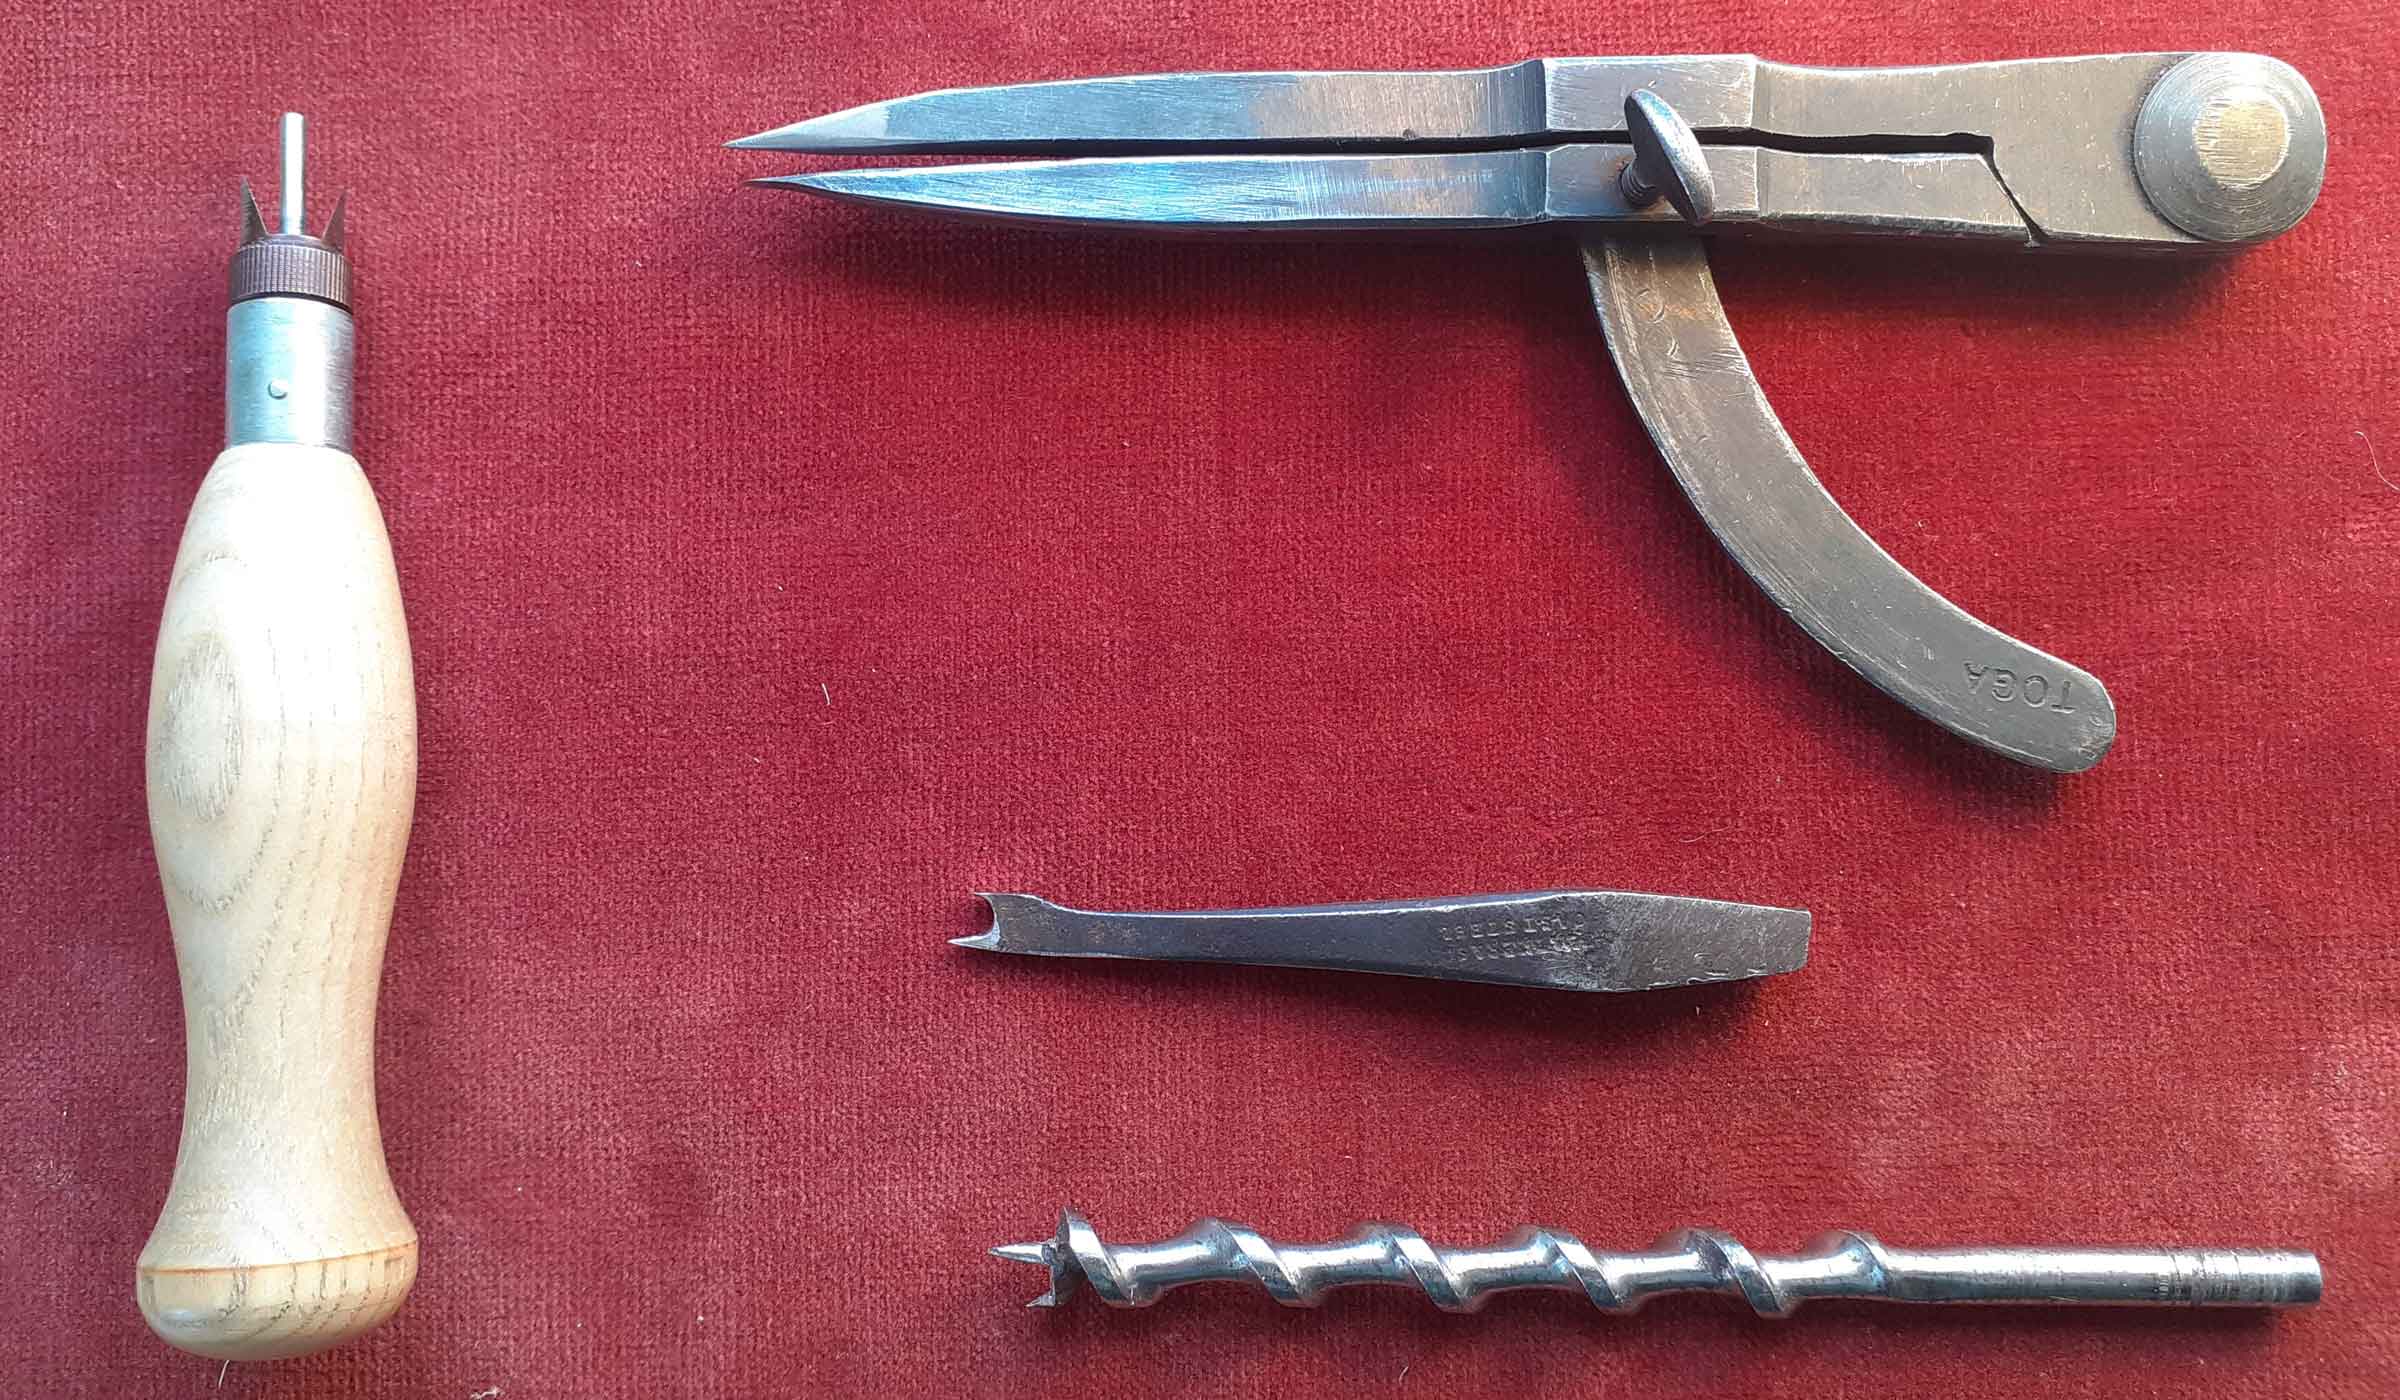
It is fairly well established that the upper and lower circles forming part of the f holes were cut first. The modern cutters made for this job work well but require a small guide hole to be drilled first, and they are a rather precise piece of engineering, unlikely to have been usual in 16th century Italy. Using a single size cutter, with a central guide pin and a blade on the outside, similar to a centre bit, may have been what some violin makers used, and from experience they work well and you don’t have to drill a guide hole first. However, if you look at del Gesu’s f-holes, the circles from the same instrument are very similar in size, only varying a little when his knife took away a bit more wood as the circle was being blended in, but from year to year the size of those circles increased and decreased as it suited him. He could have had individual cutters in half millimetre steps, but it seems more likely he had an adjustable tool like a set of dividers. There are Italian dividers from this time which are remarkably robust in construction, having five leaves of metal at the top where the two legs join, but my version started out as 19th century dividers, reground to a conical pin round which the shorter arm, ground to a cutting edge, rotates.
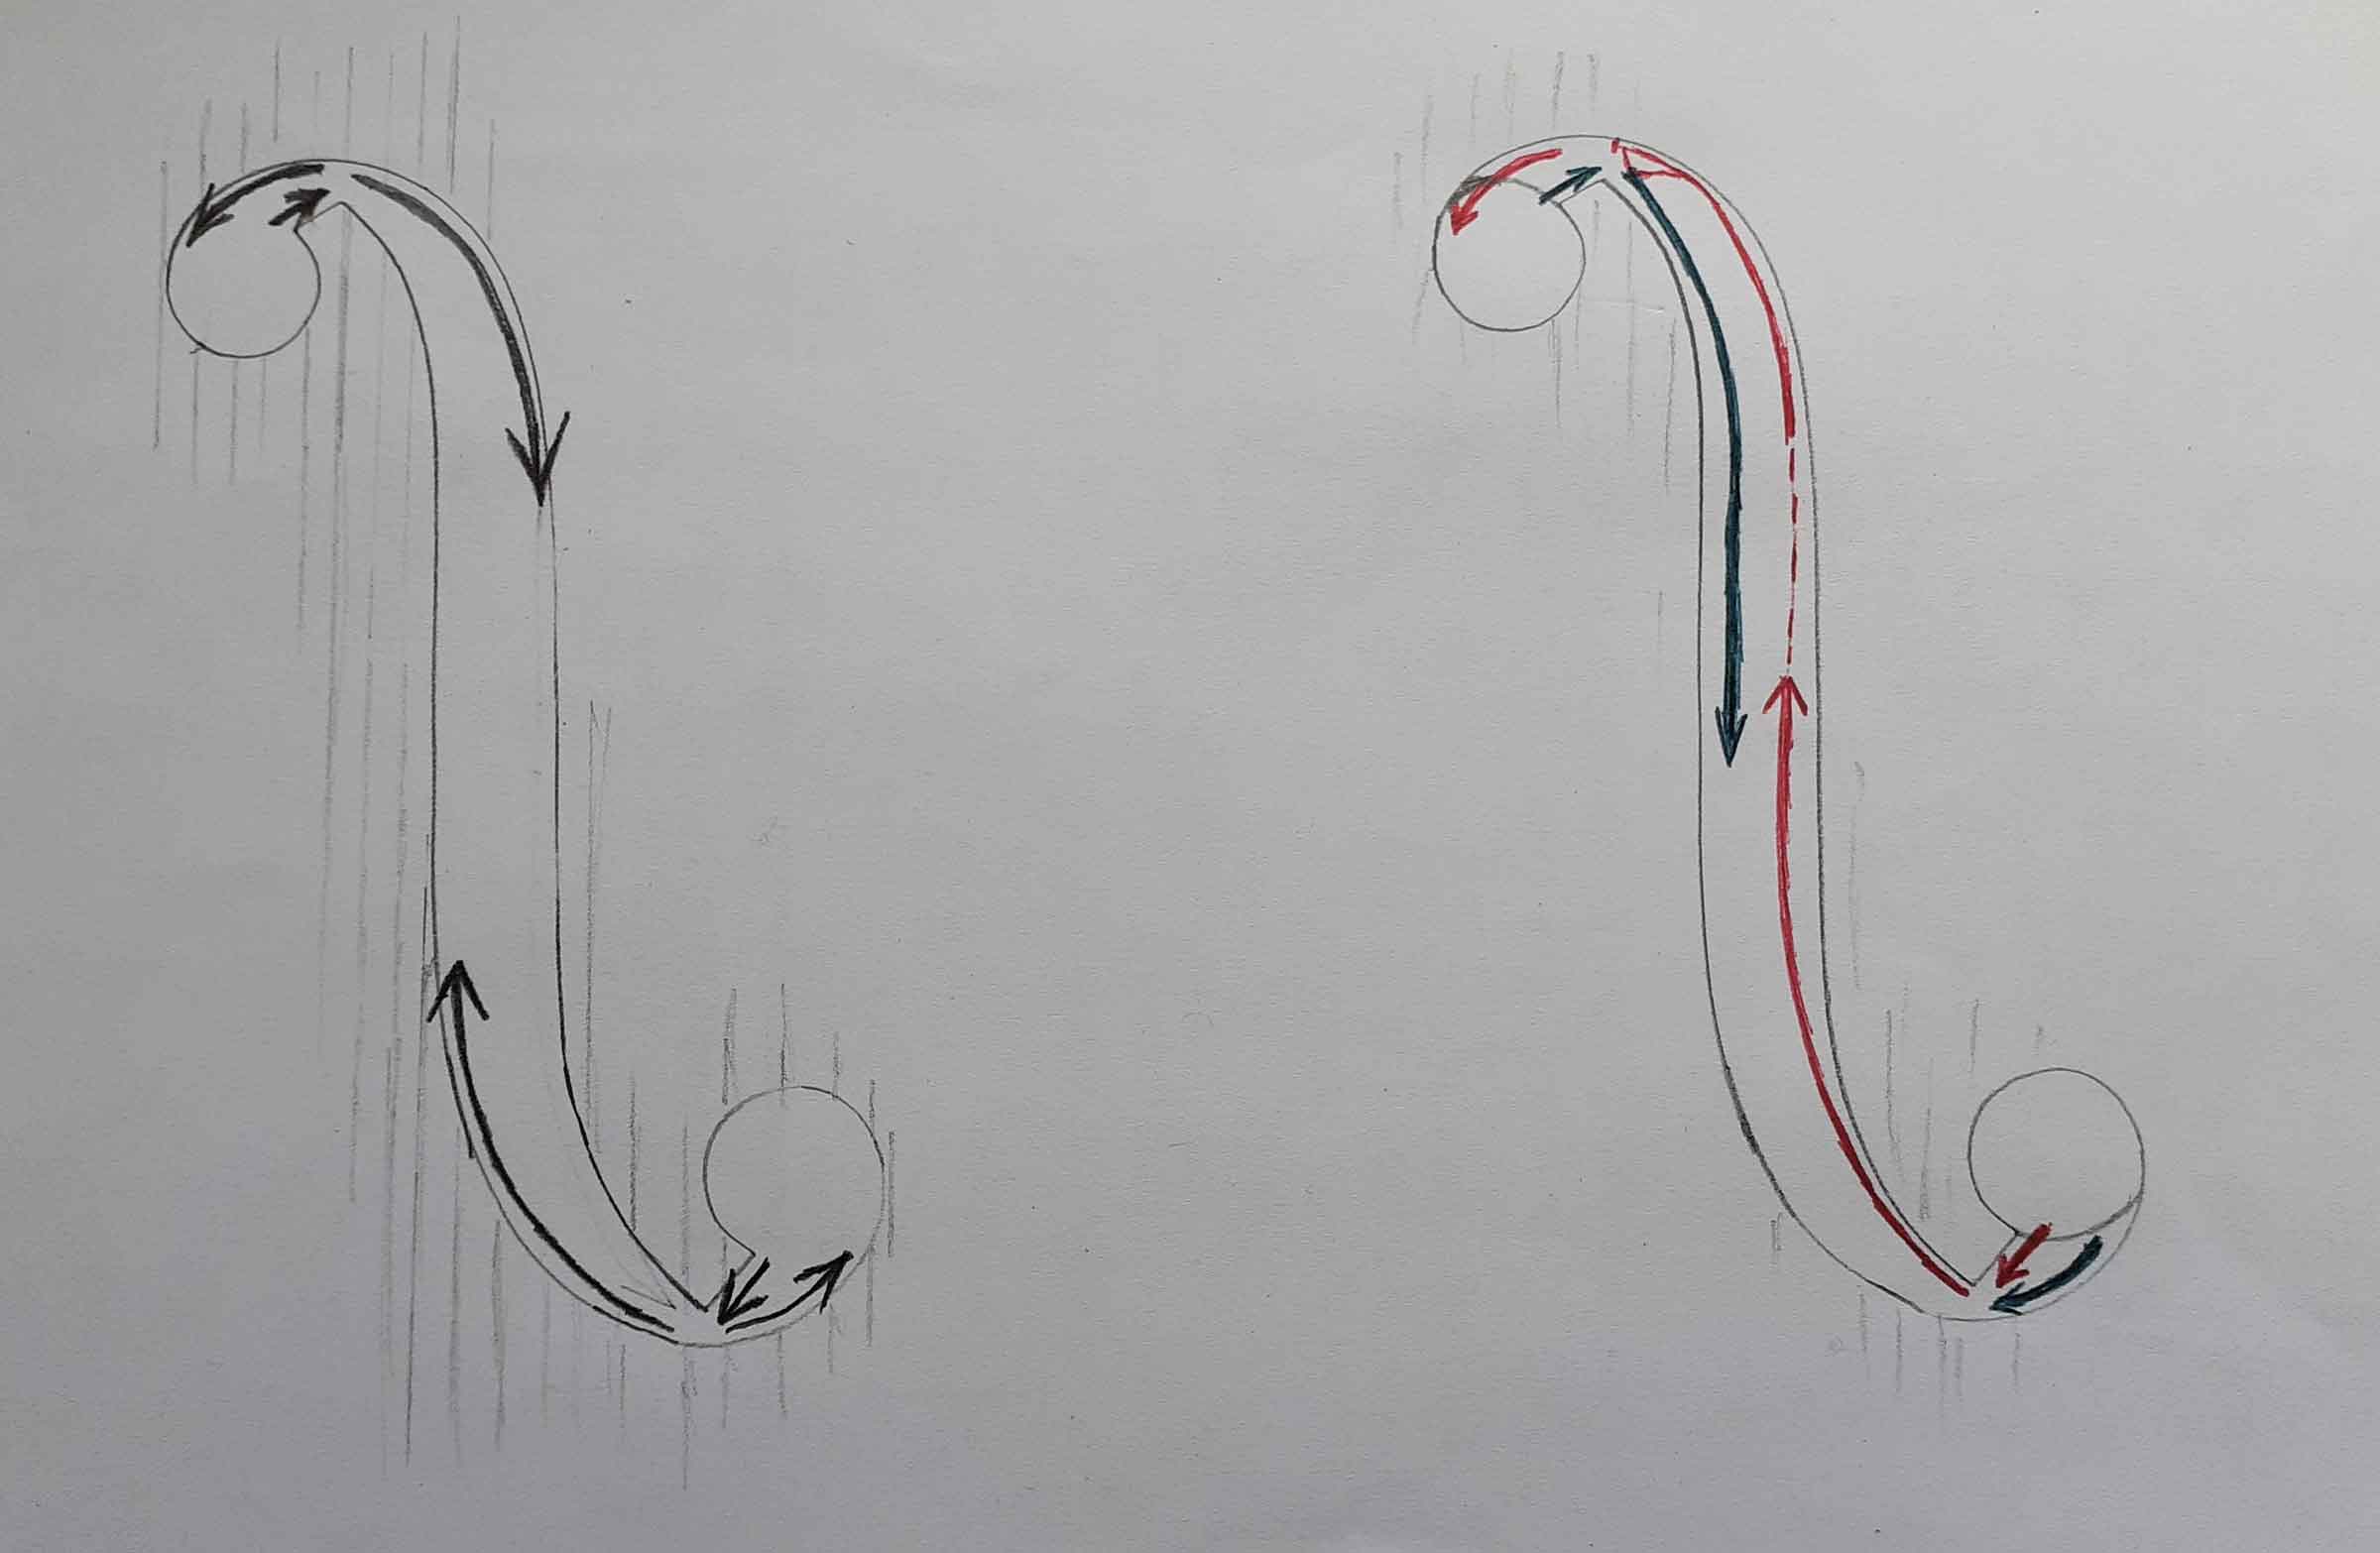
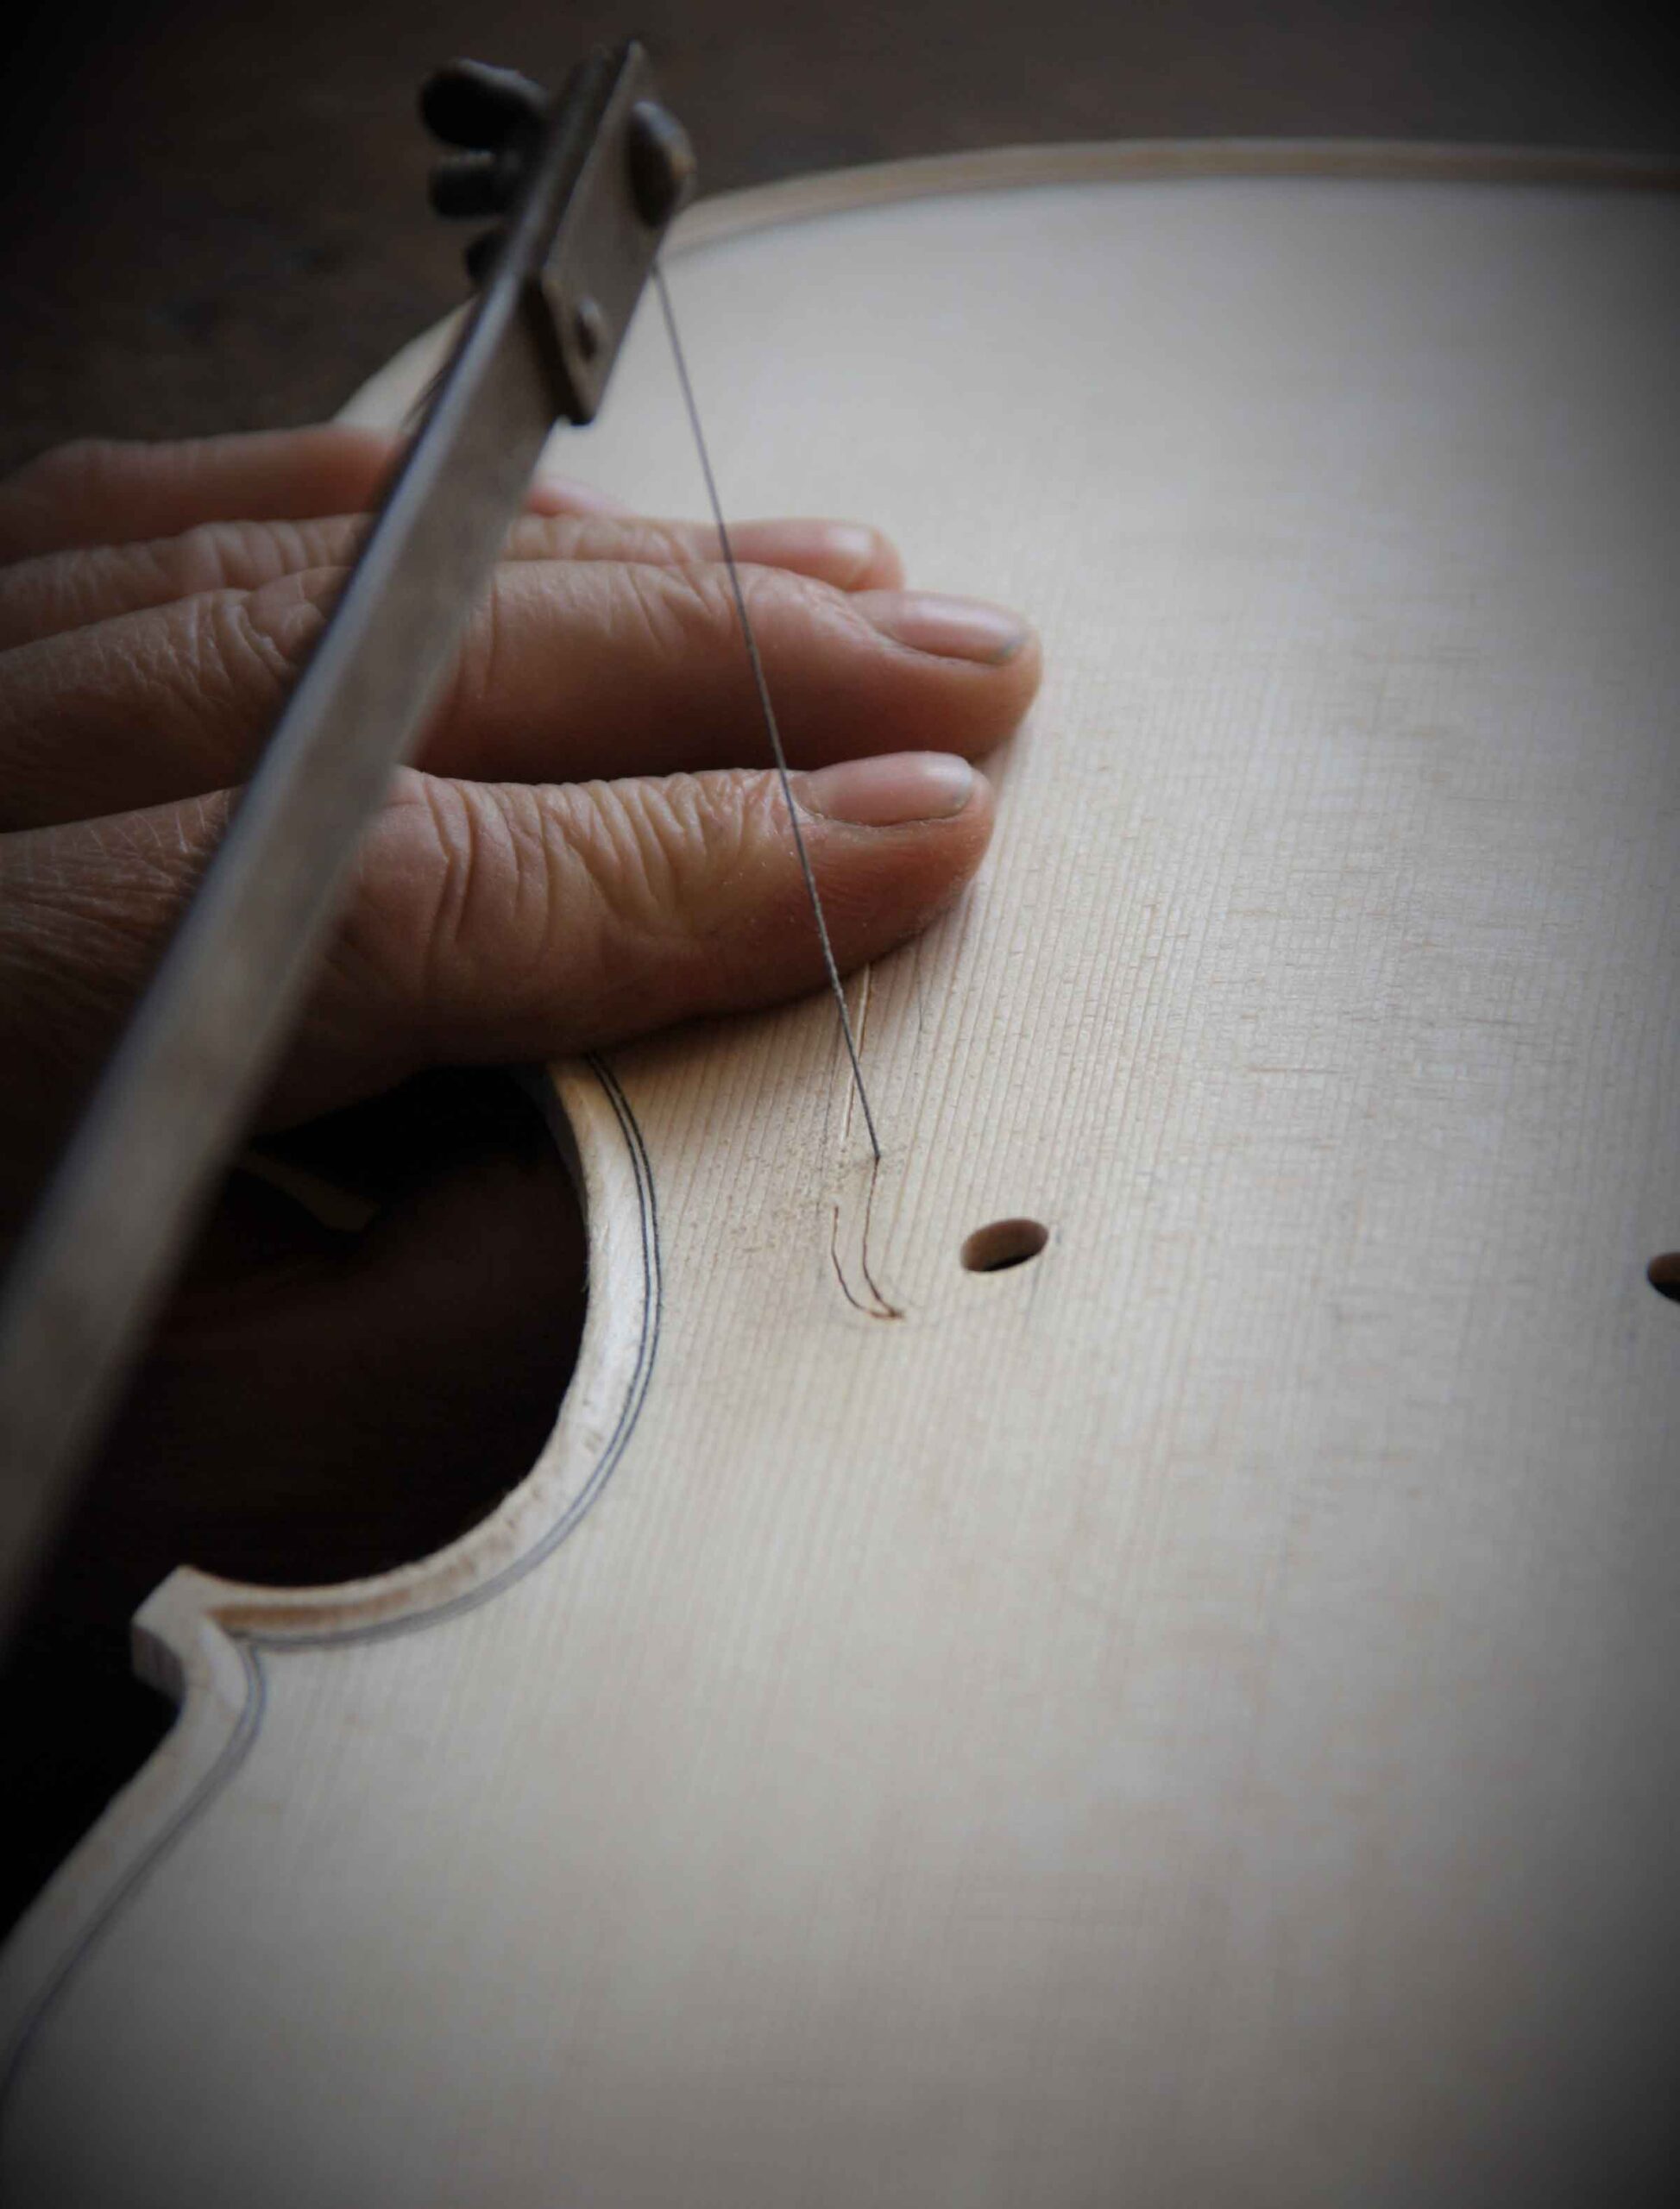
When sawing out the remainder of the f holes, I no longer saw in the same direction as I cut with the knife. [left hand drawing] Instead, I start by removing the bottom triangle and then go up the outside of the central run, past the wing, so the wing is supported until I cut past it, then return down the inside, leaving the top triangle in place to minimise vibration and the bending of the top. [right hand drawing]
Finally, the top triangle is cut out. Except where the f hole is narrow, which is also where the grain is across the direction of the saw cut, I don’t try to cut near the line, because in sawing in the opposite direction to the knife tends to lead the saw blade across the line. The reason I saw in this order is for speed whilst minimising the risk to the belly, removing the extra wood with the knife in the normal directions being a matter of a stroke or two.
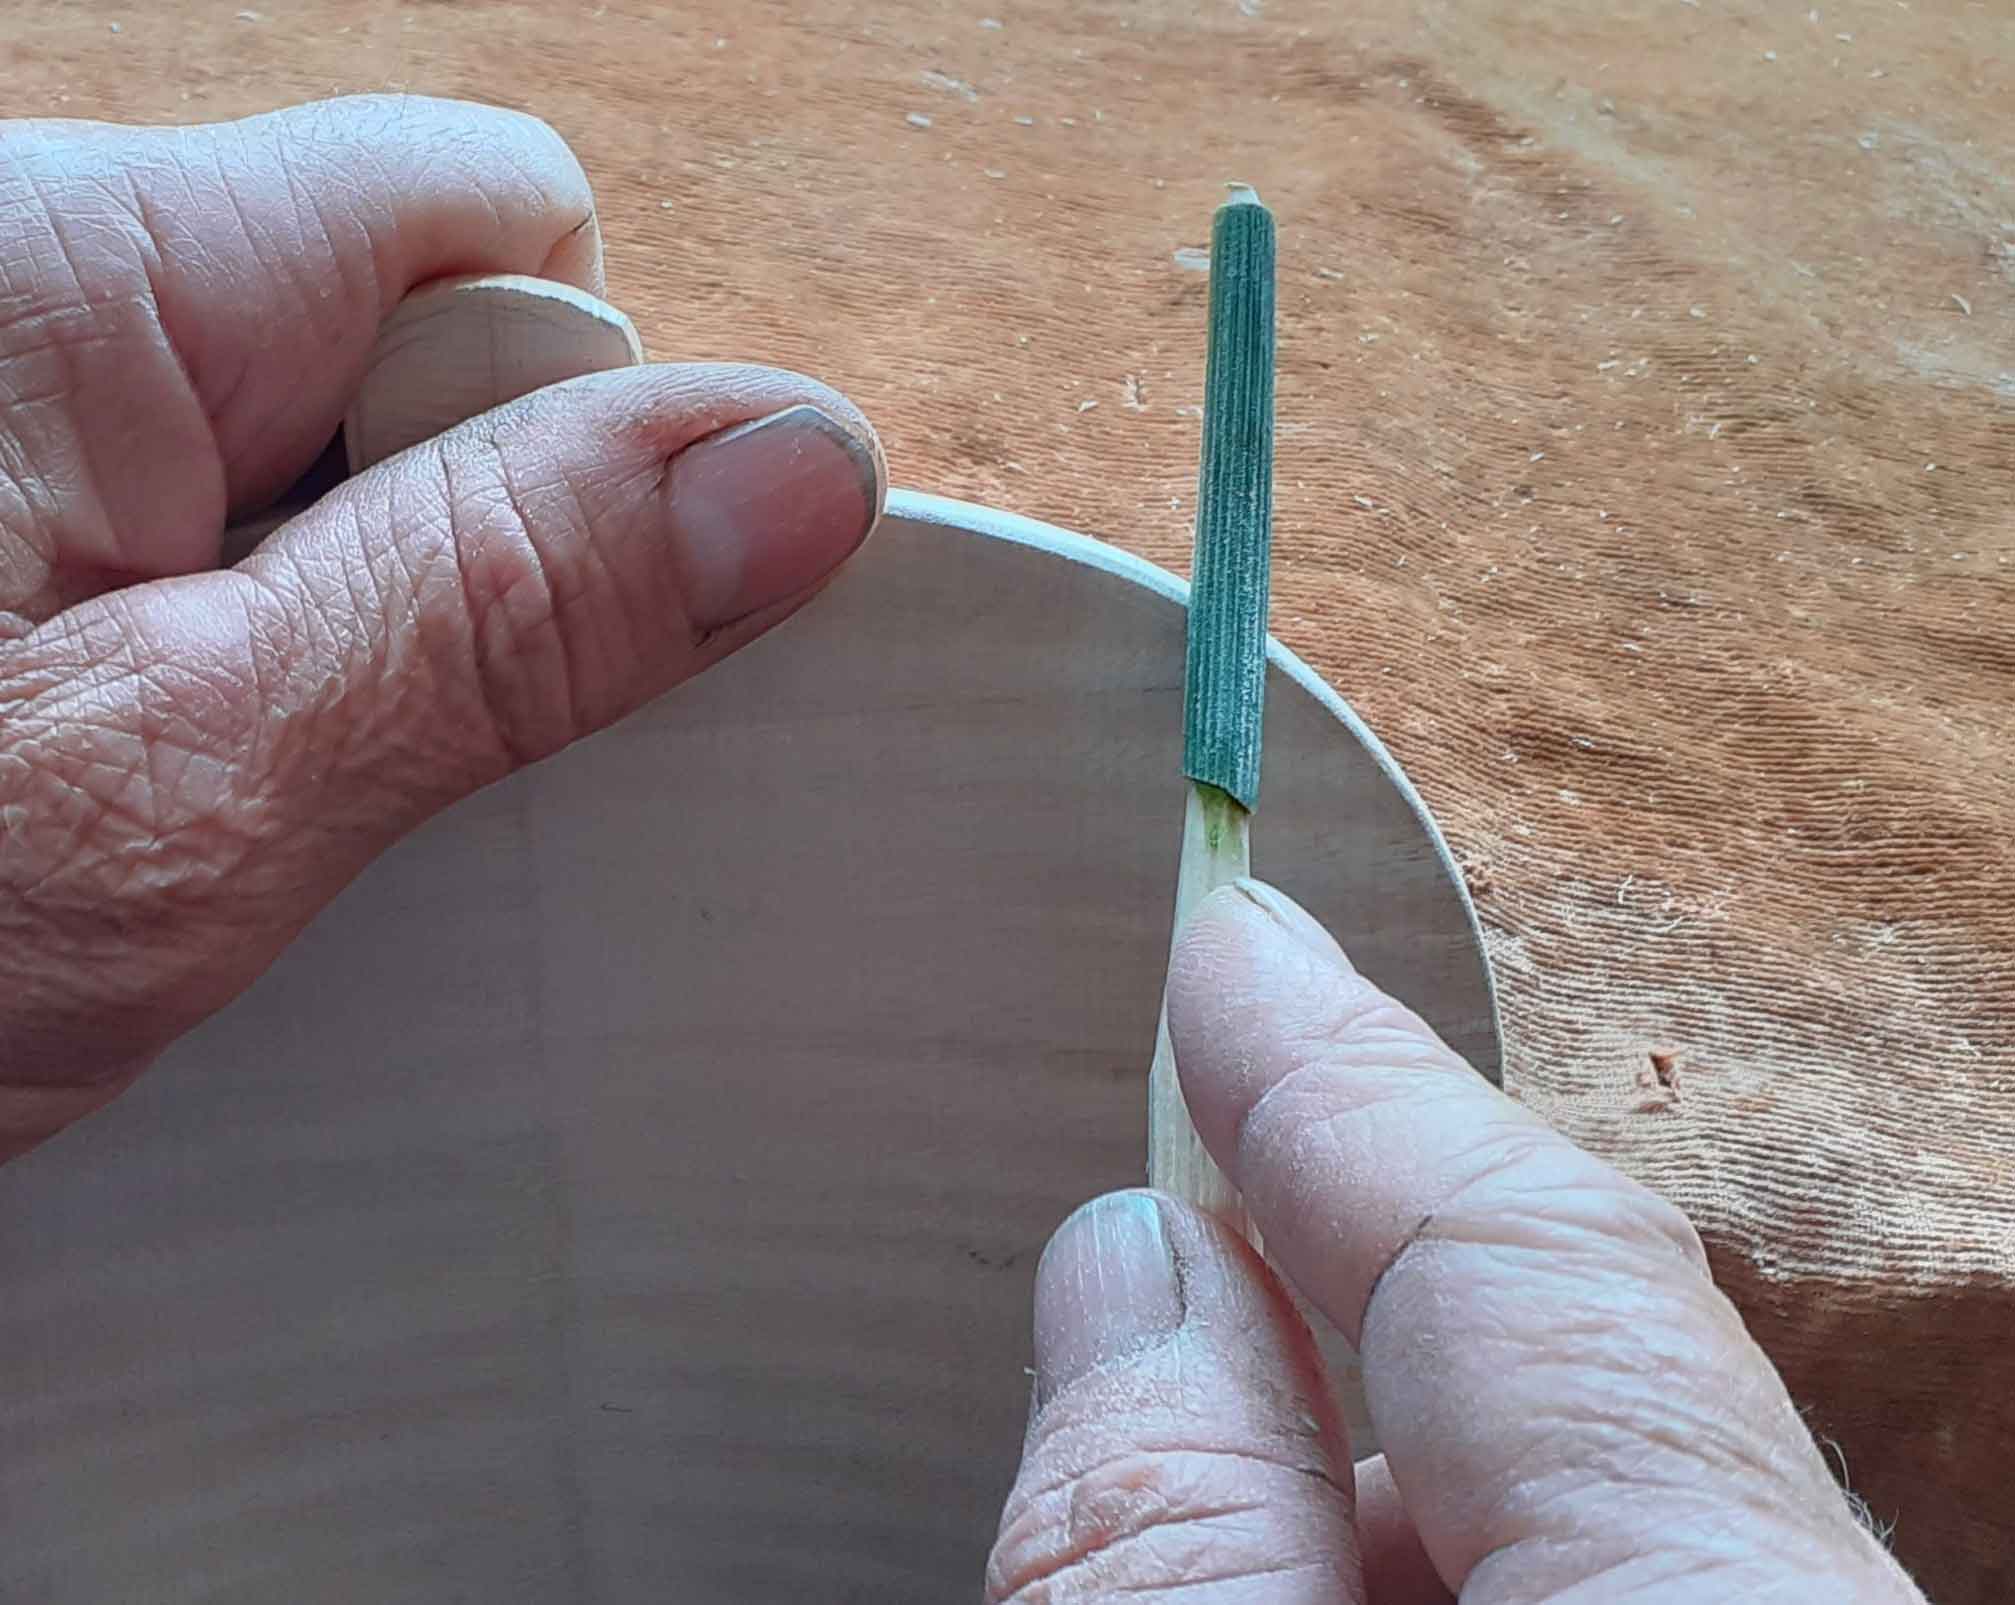
Except for the bass bar, for which I have nothing authentic to offer, before the body is assembled there is only the underneath half of the edgework to do, using the same tools as when doing the outline, followed by equisetum on a stick, in the absence of dogfish skin which is unavailable due to unsustainable fishing practises.
On the maple, it is sufficient to slide a section onto a dowel, but for the belly it is neccessary to slice the equisetum lengthways and clamp it between two flat pieces of wood to dry for 24 hours, before gluing it onto a stick.
Purfling and Fluting
I referred earlier to the hollowed-out willow board in the Museo del Violino; my suggestion is that it was used to hold the instrument for purfling and finishing the fluting, which is likely to have been done after the body was together, at least in Cremona.
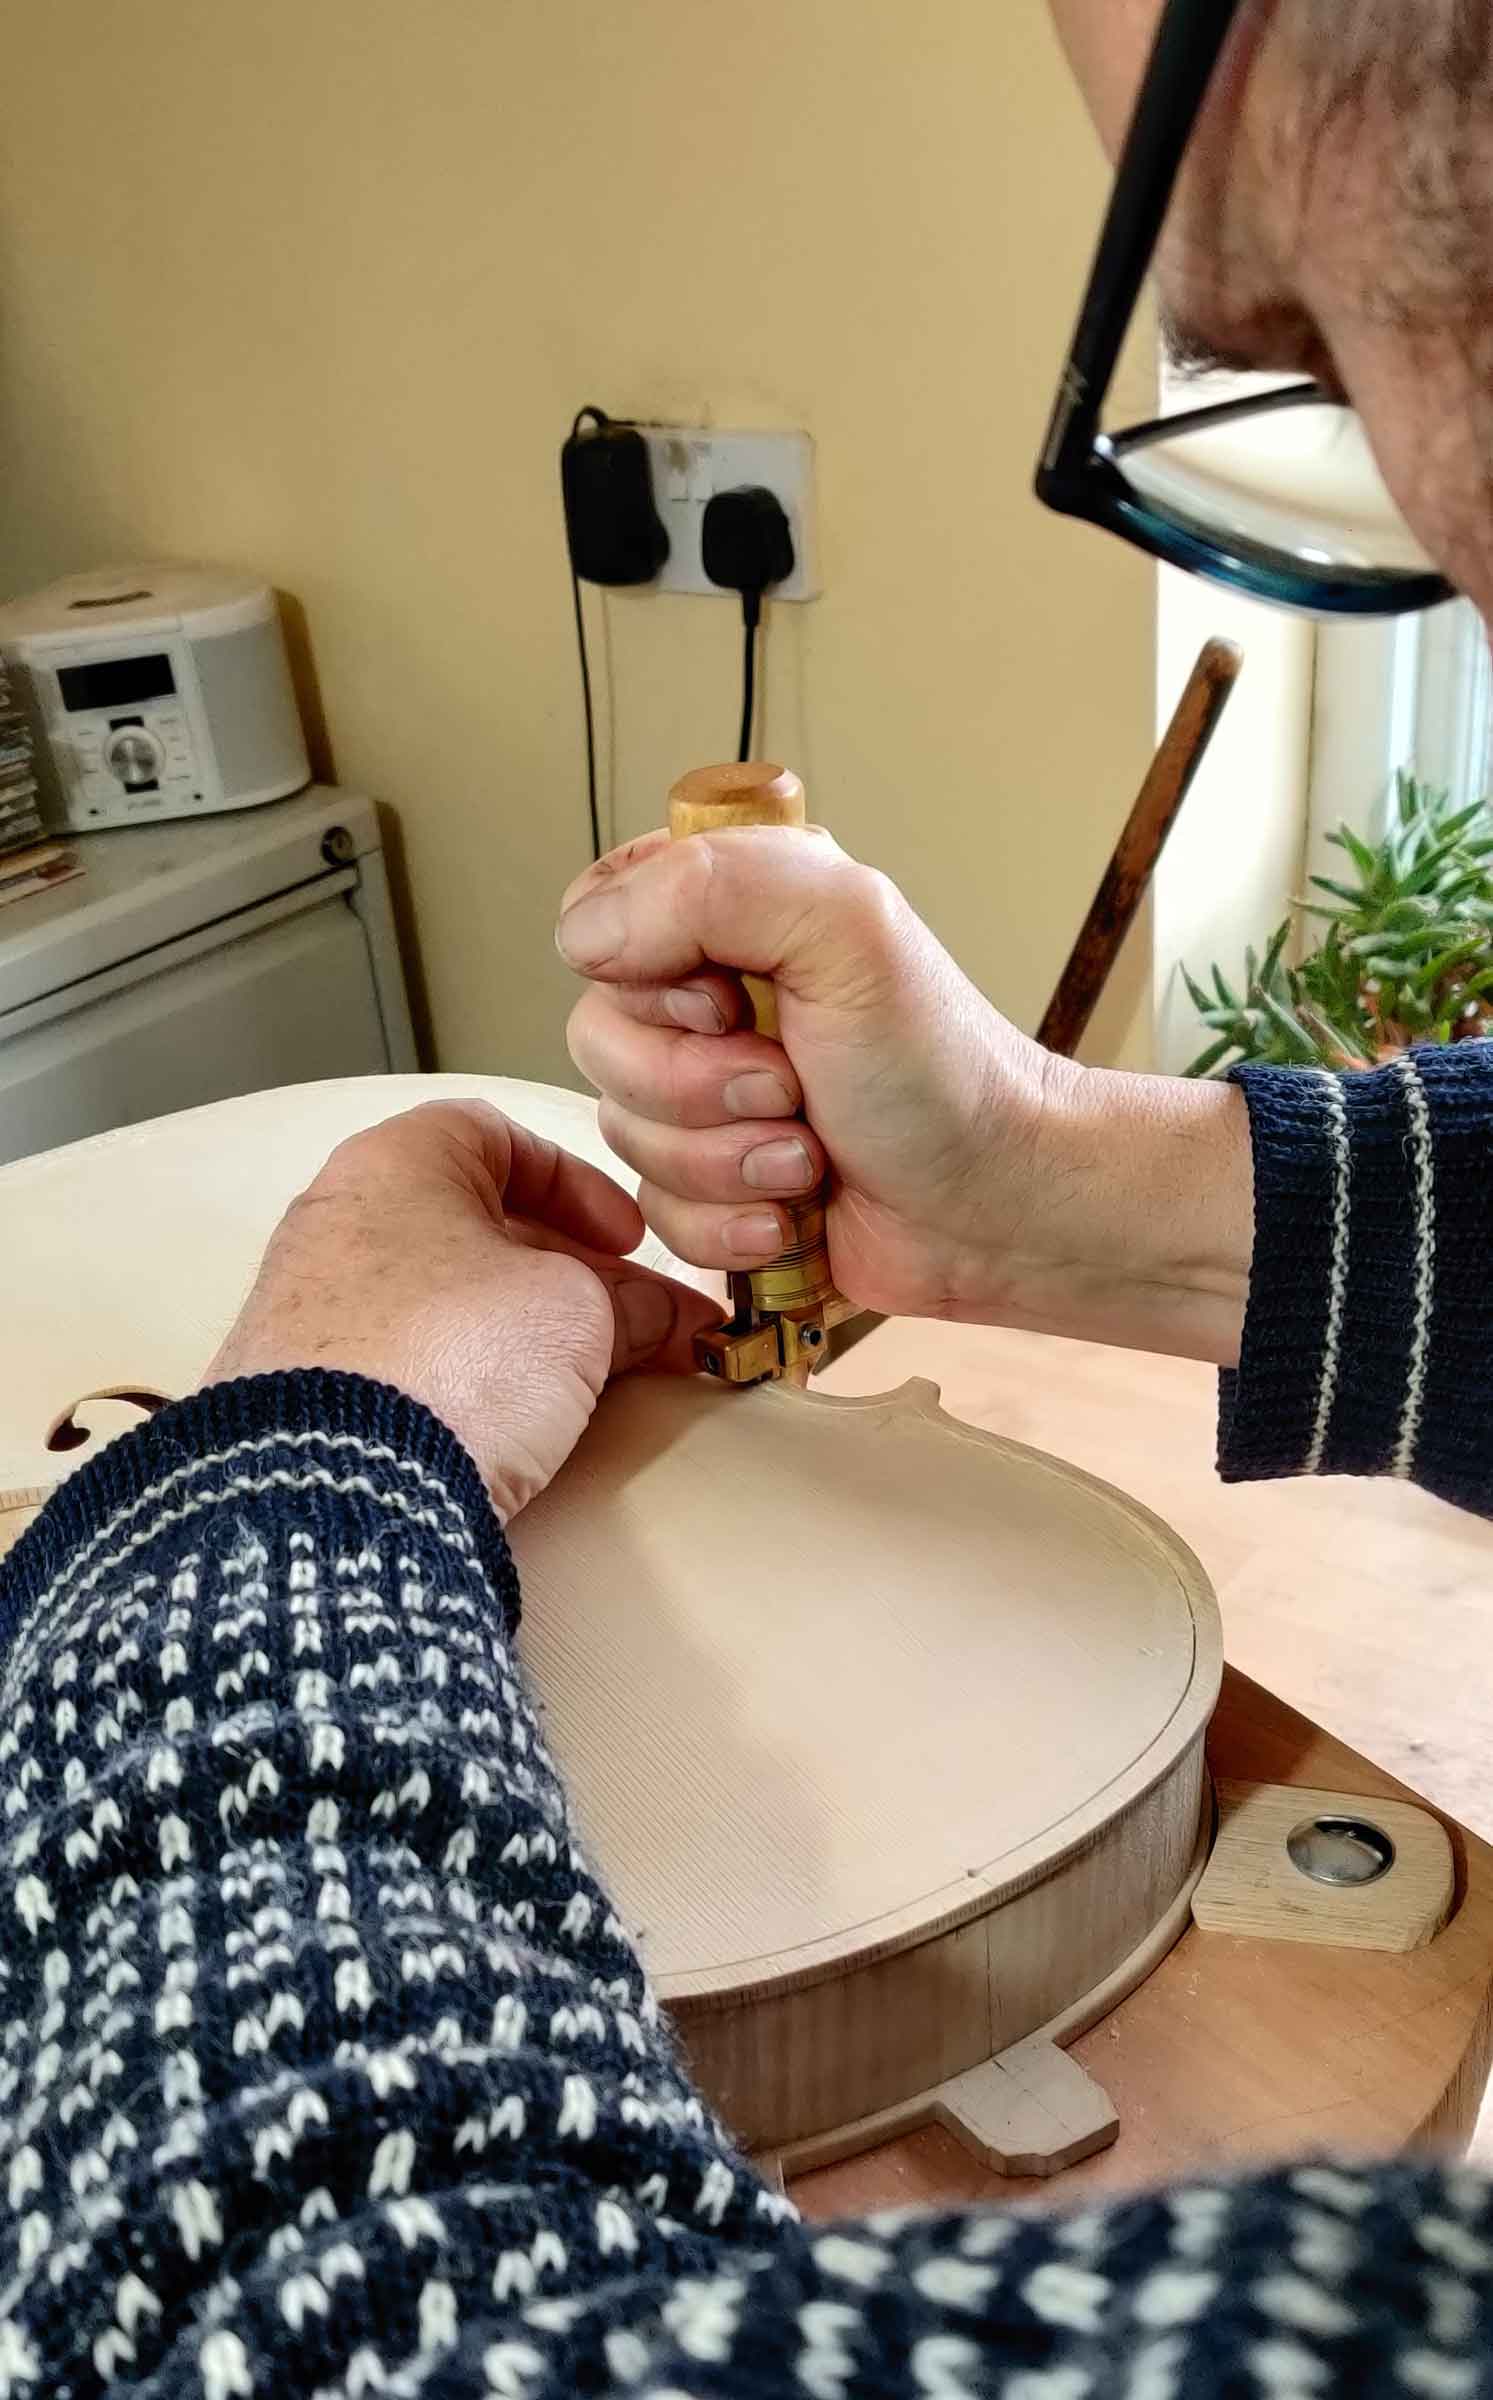
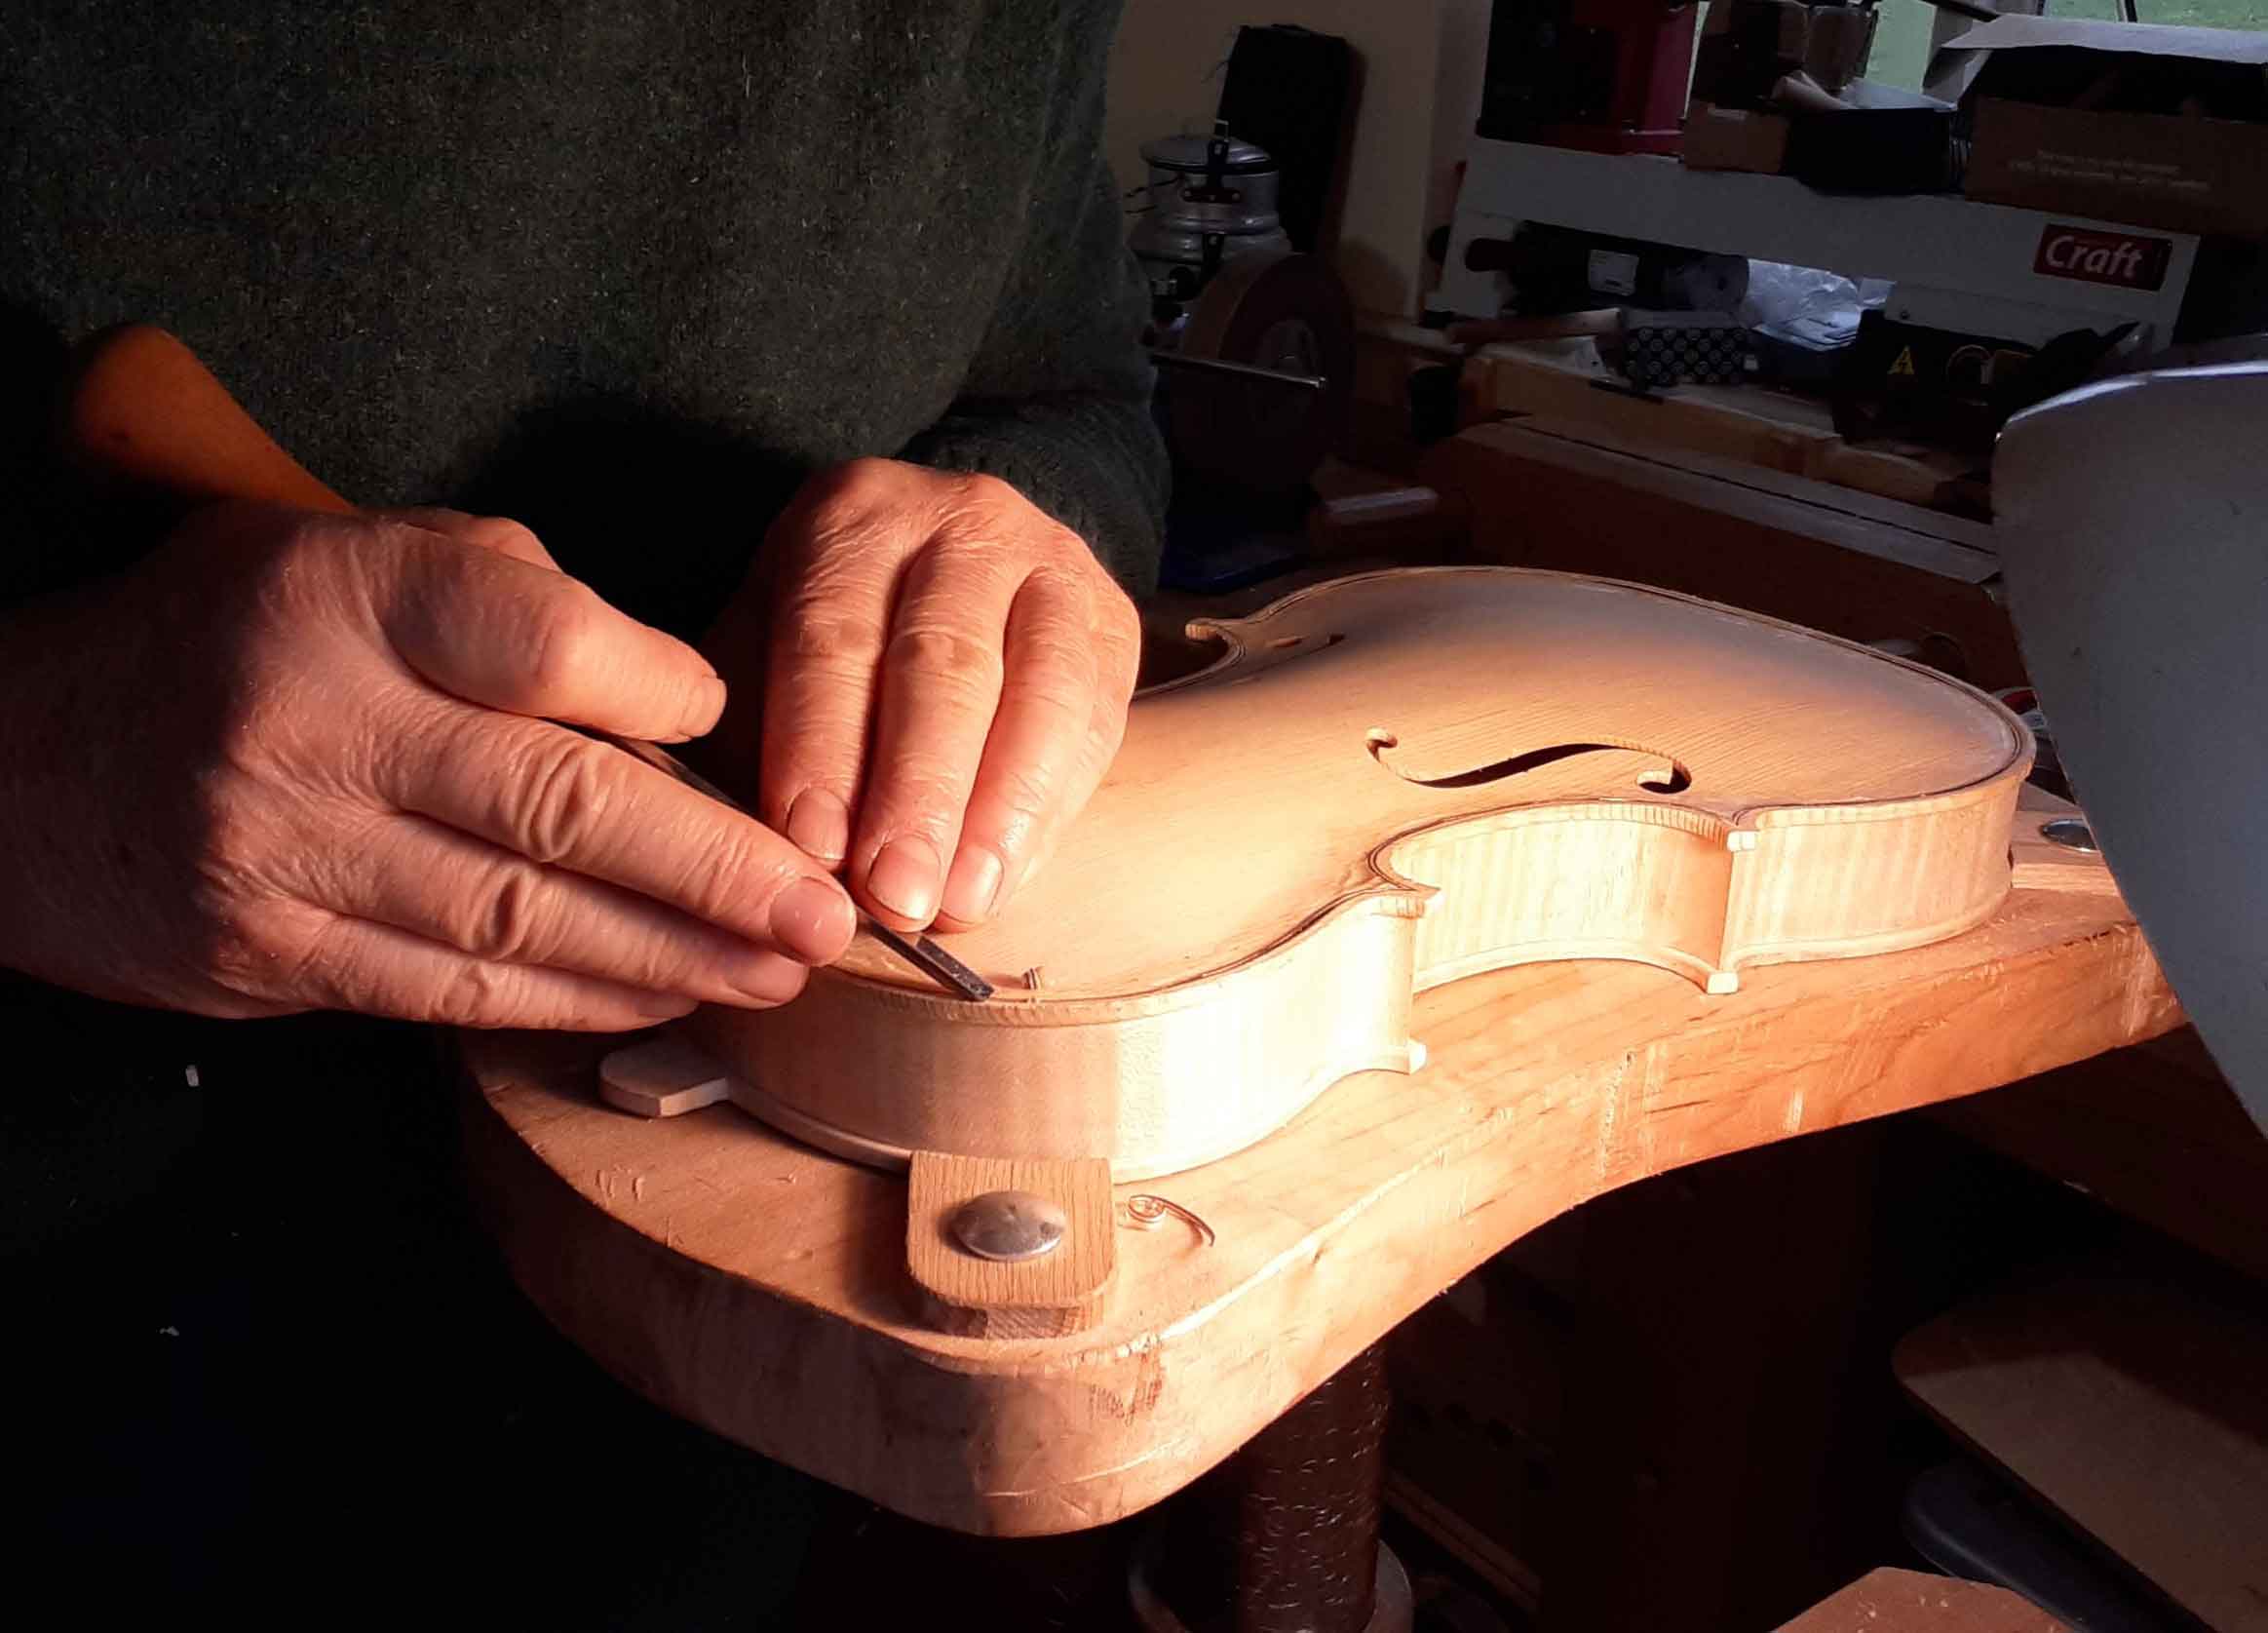
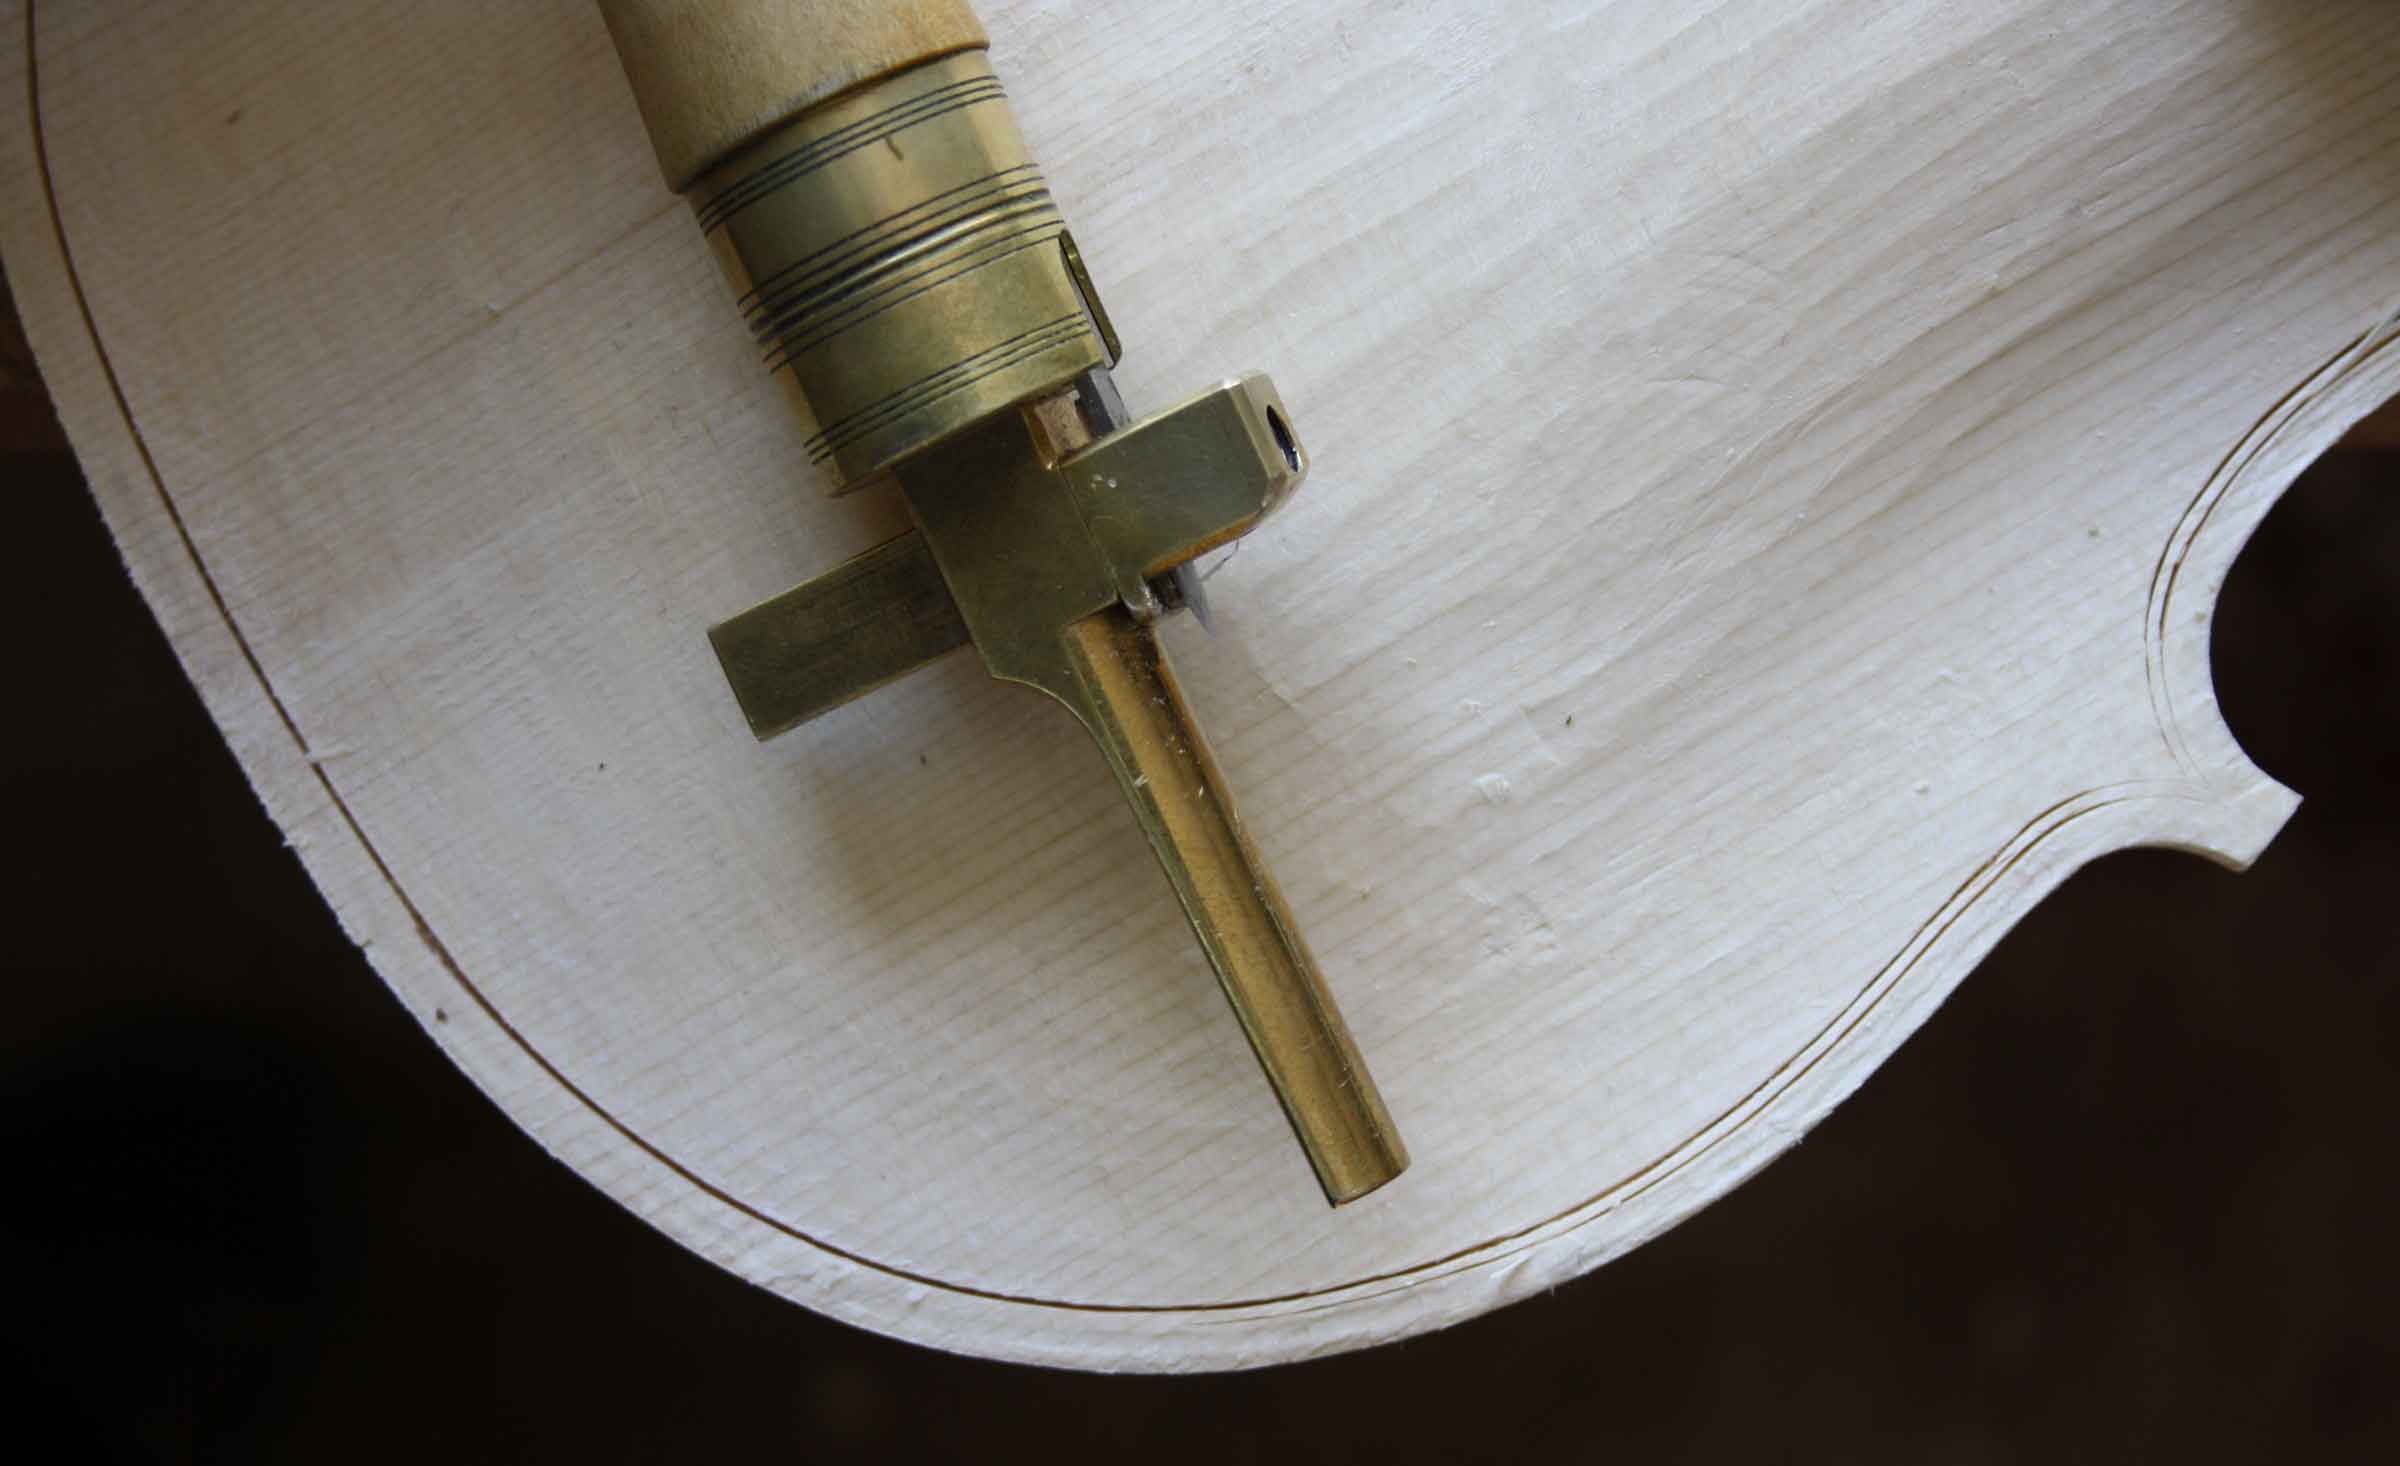
To cut my purfling channel, I used to use a two bladed marker followed by a knife, but after seeing Marc Soubeyran rapidly cutting a precise purfling channel a decade ago I have been using a purfling cutter which cuts one line at a time. Although different in construction from the one attributed to Stradivari, it has the same functions, a thin cutter, a fence and a depth stop, and a handle above the cutting part which is big enough to get your whole hand round. This allows you can use your whole arm to do the work rather than the pathetic muscles of your fingers as when cutting with a knife, and because the fence is there, you do not have to work slowly or carefully, the fence takes care of that. Another advantage of the single line cutter compared with a marker which marks both lines at the same time is that you do not need to waste time making a flat platform for it to run on.
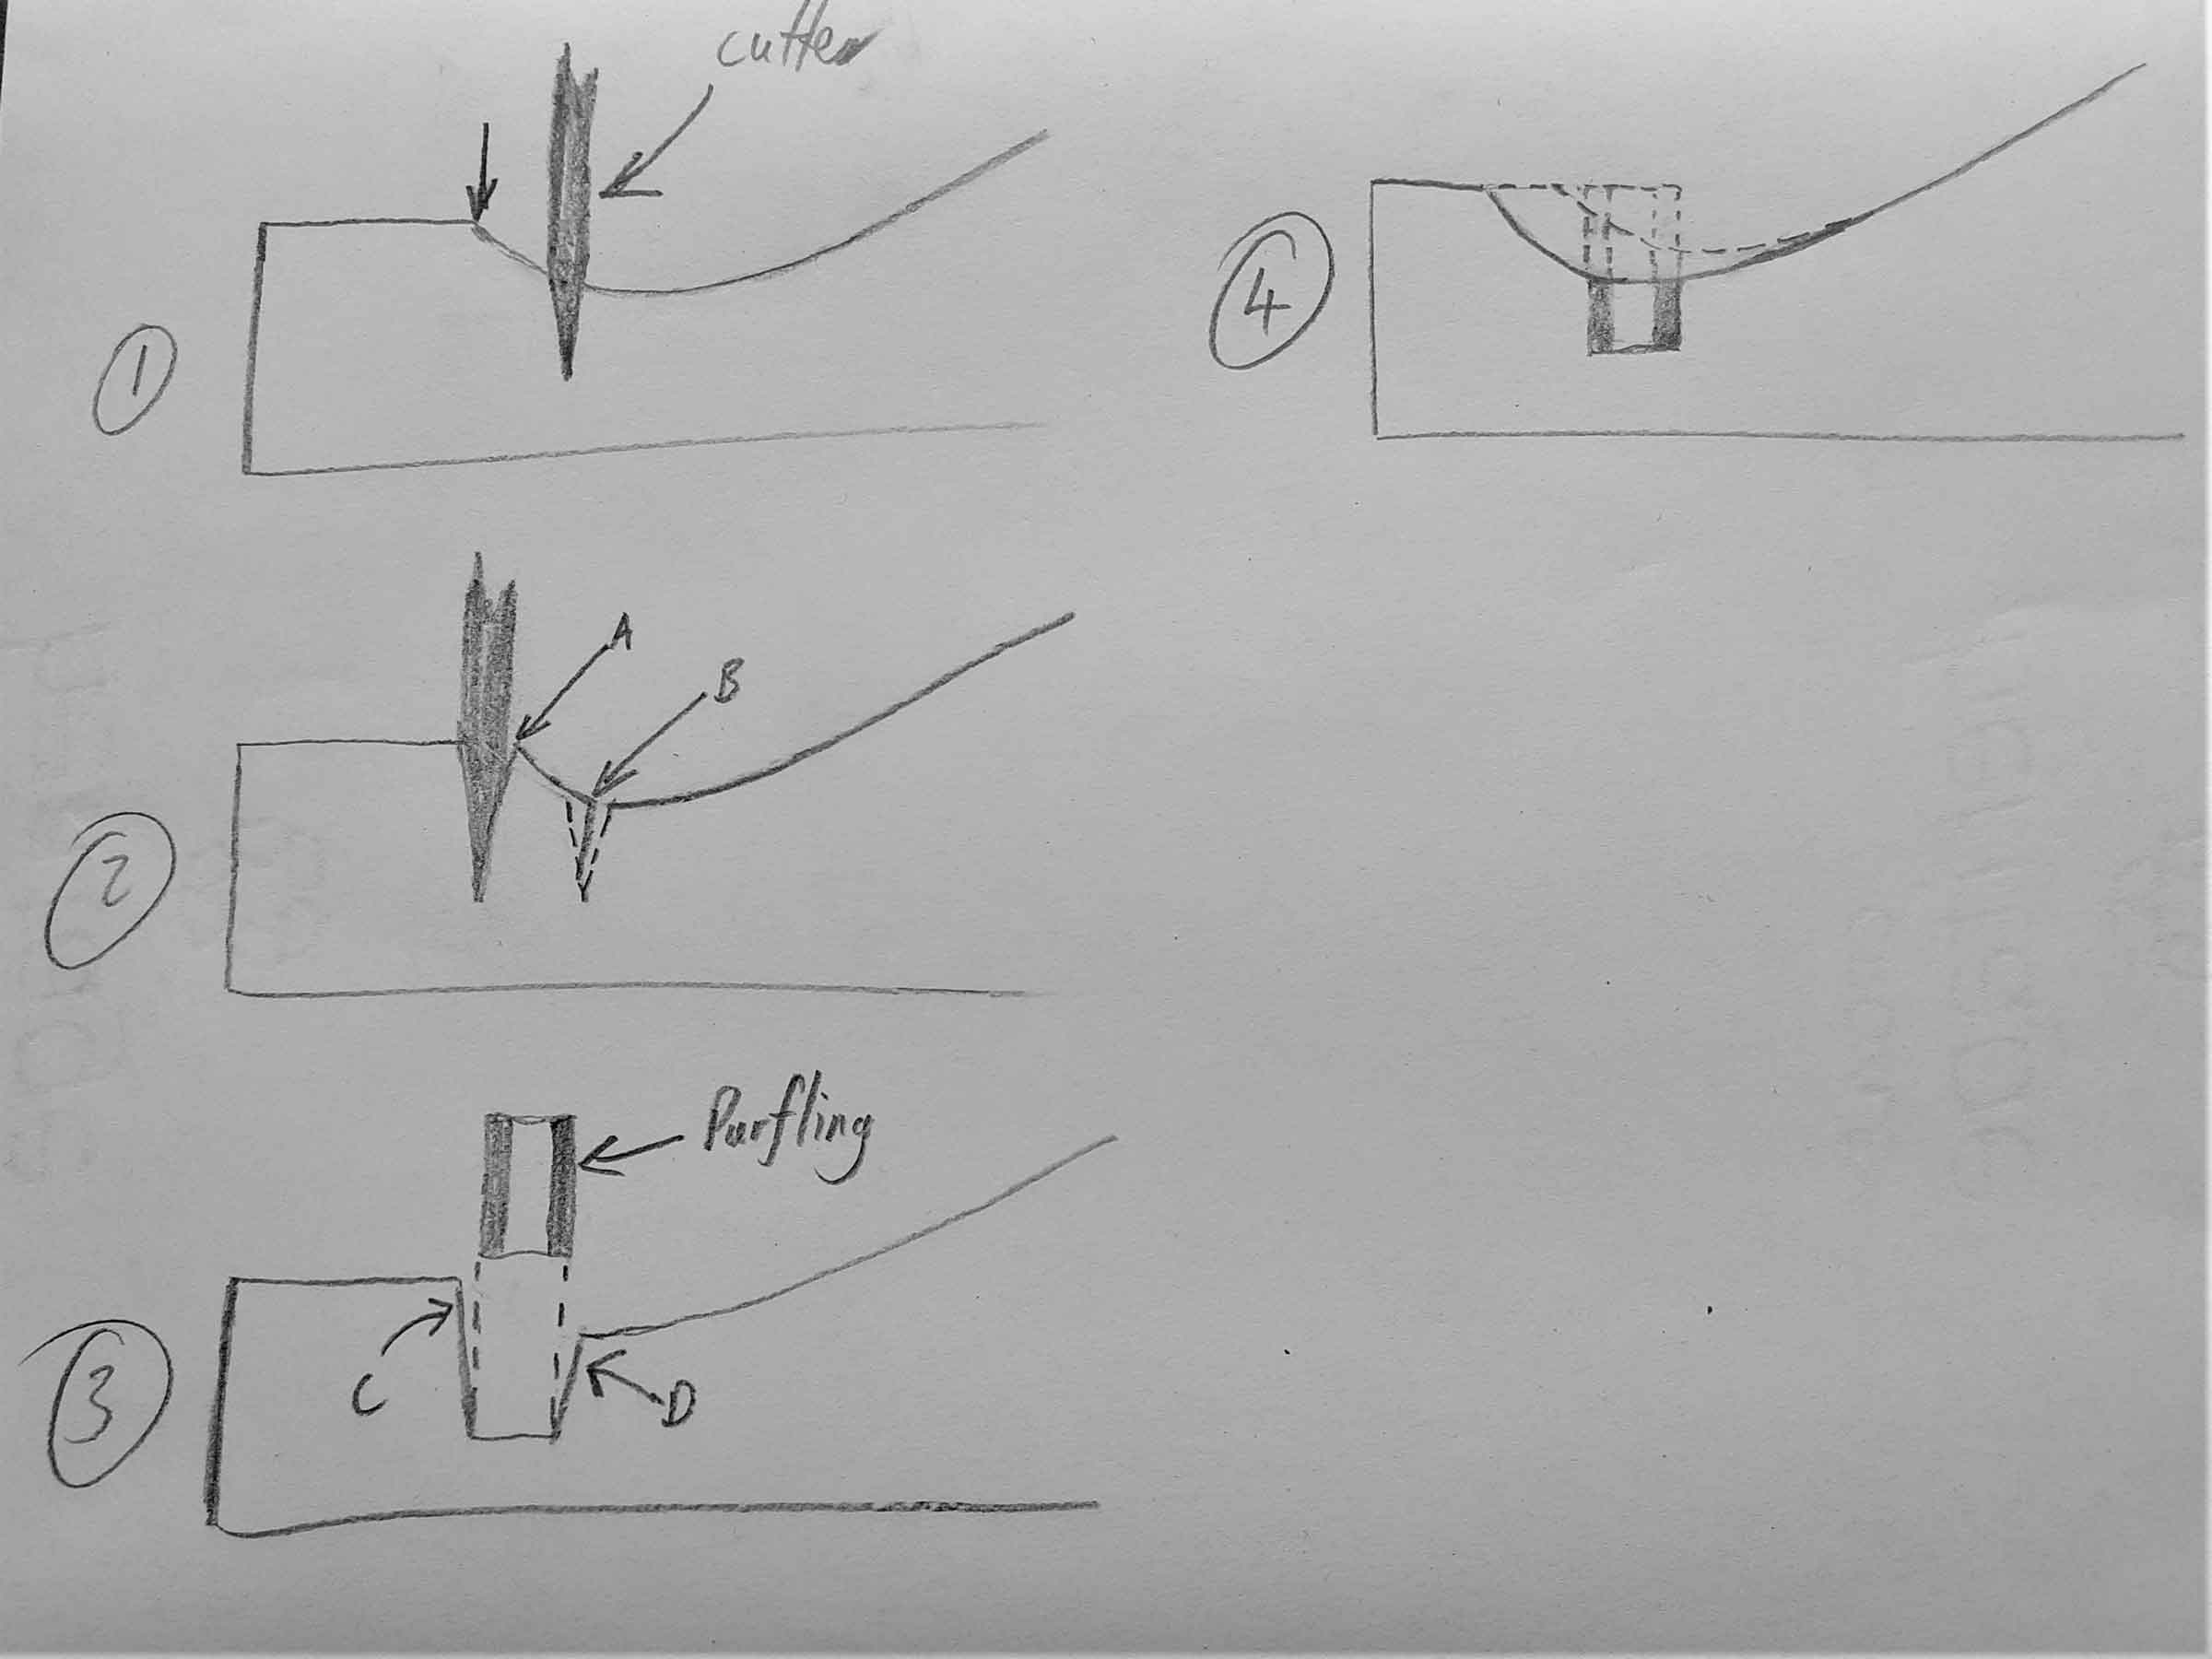
In the drawing you can see the sequence of cutting the channel. In the first drawing, the cutter is cutting the inside line, cutting at the bottom and compressing the wood a little as the blade gets deeper. At 2, the outside line is being cut. Although this time the blade cuts through a greater thickness of wood, the top half is unsupported [a] due to the fluting being partially done, so it requires less force, and at the bottom half the blade pushes the waste wood over towards the first cut. [b] When the purfling is inserted at 3, the channel is still wider at the top from the wood being compressed, but closes once the glue and purfling are put in. Figure 4 shows the cross section in dotted lines when the purfling is glued in, and in a solid line after the fluting is finished.
The Scroll
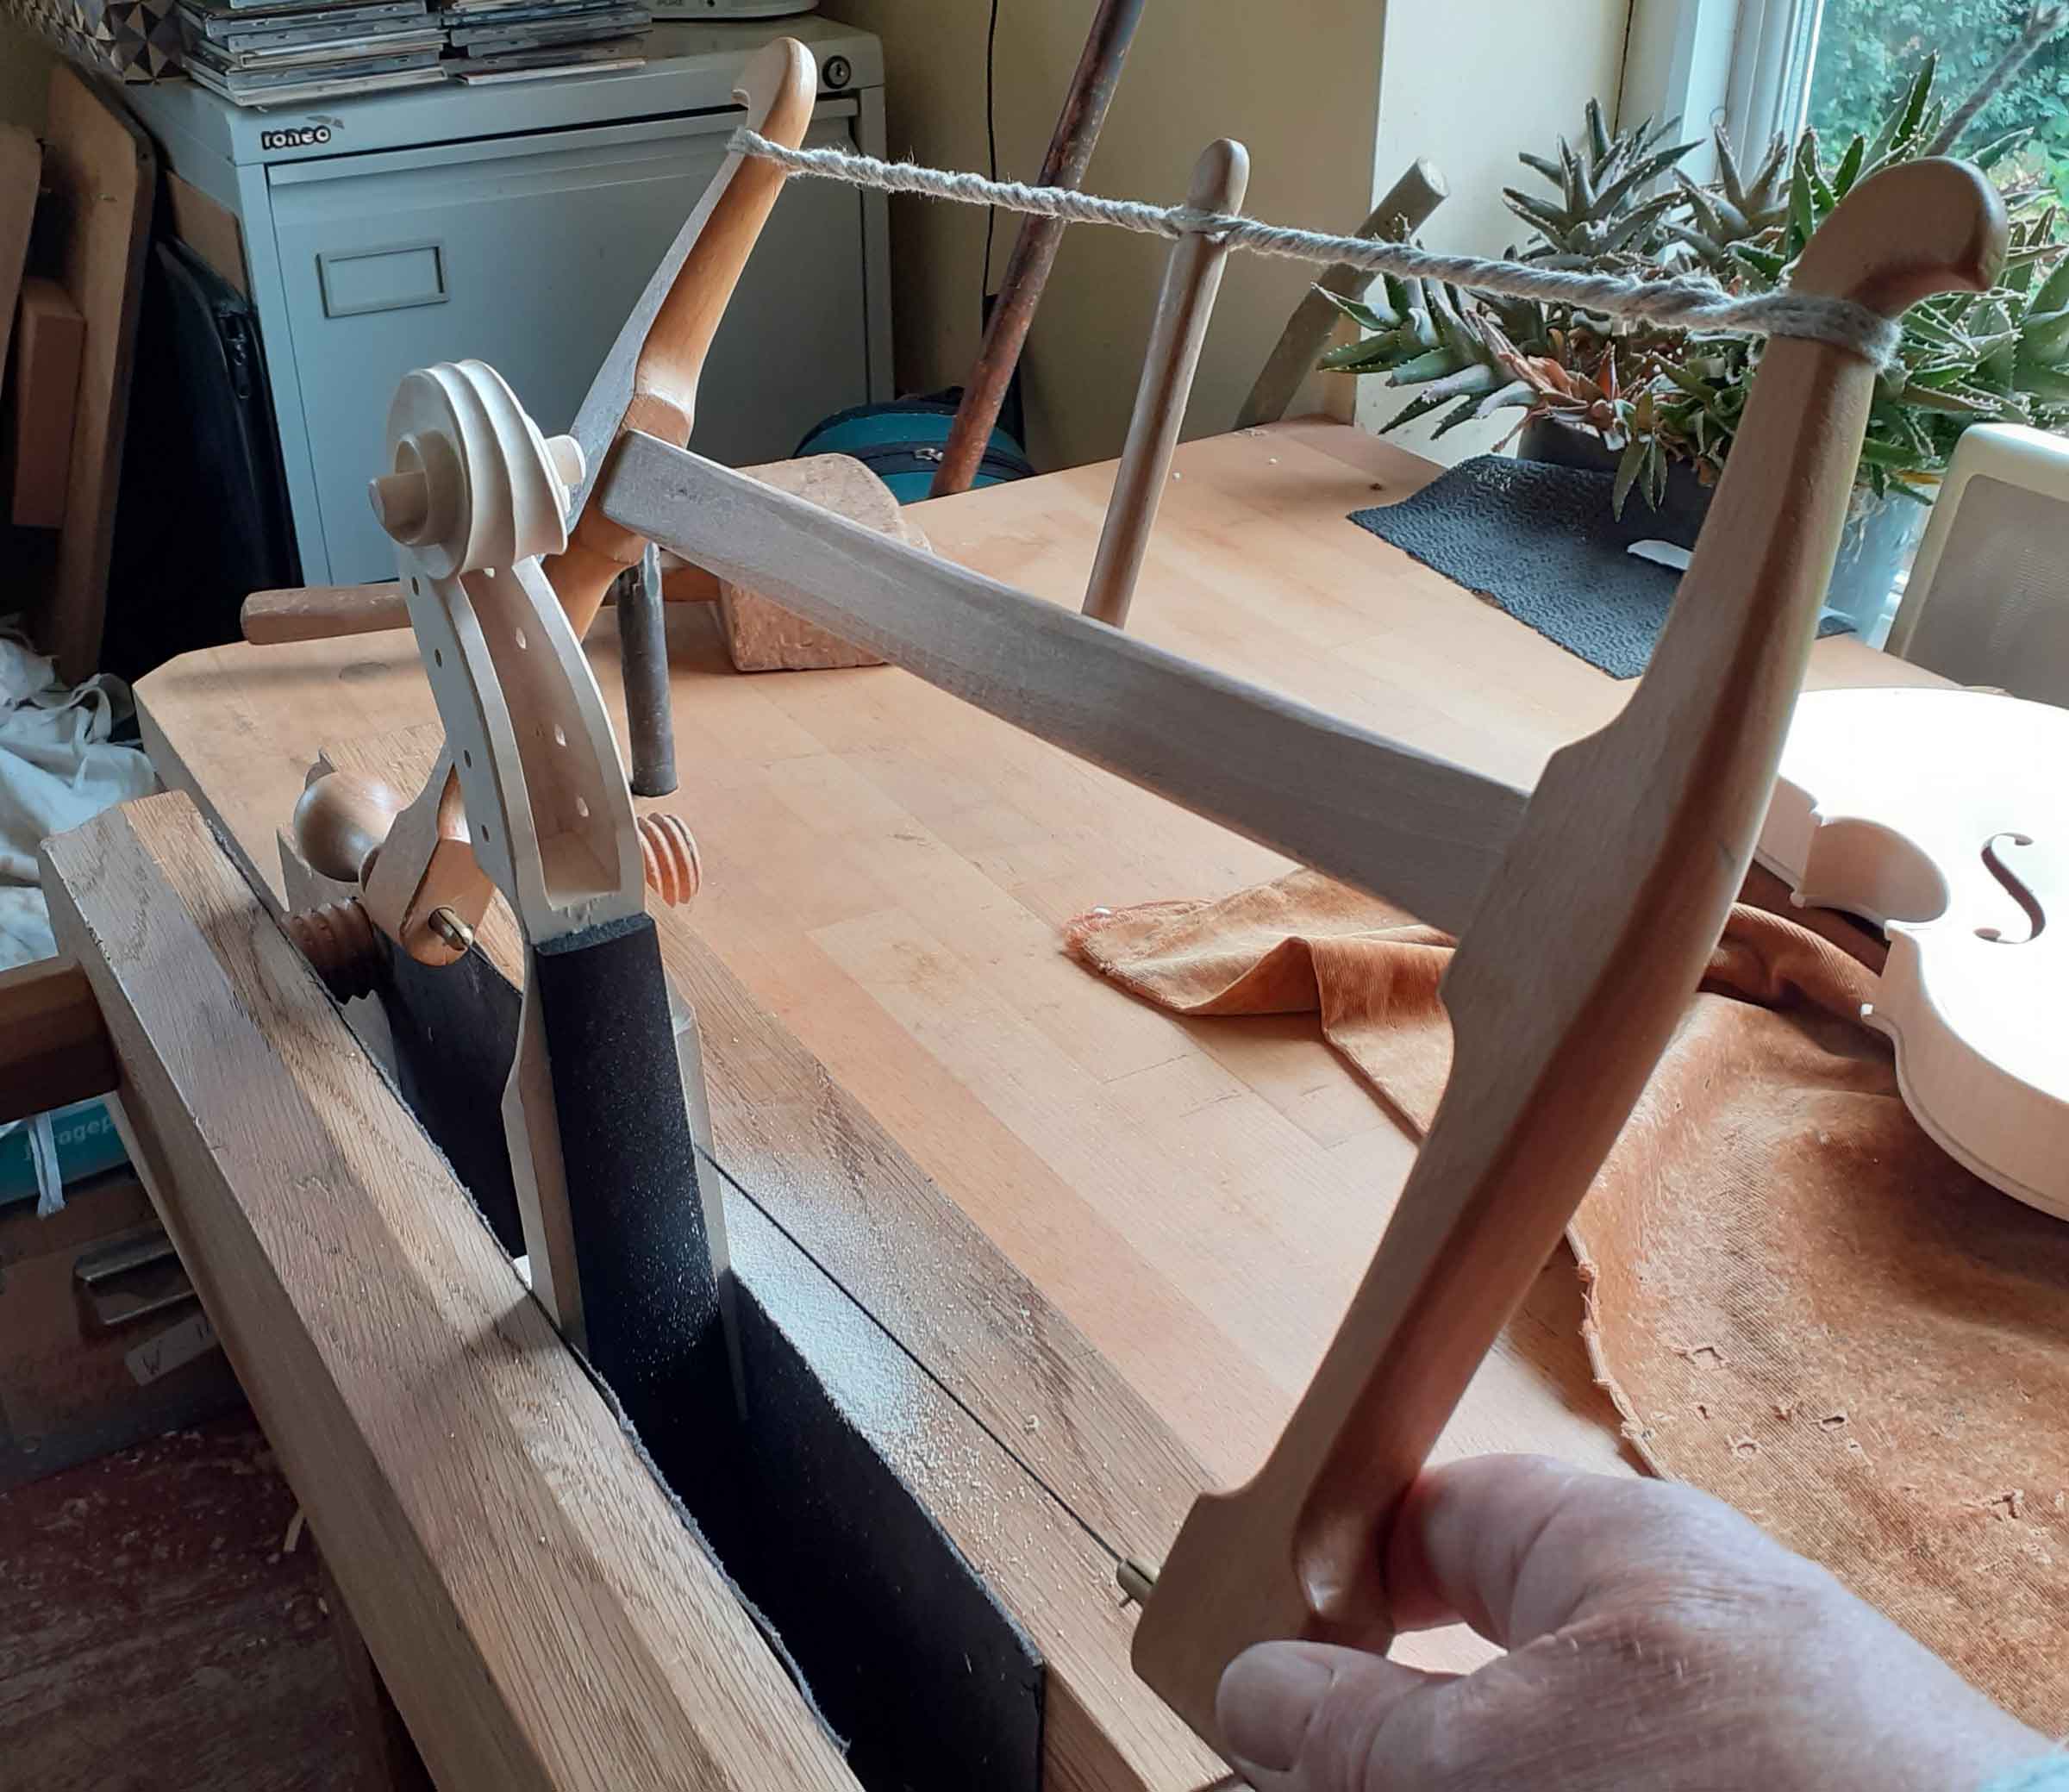
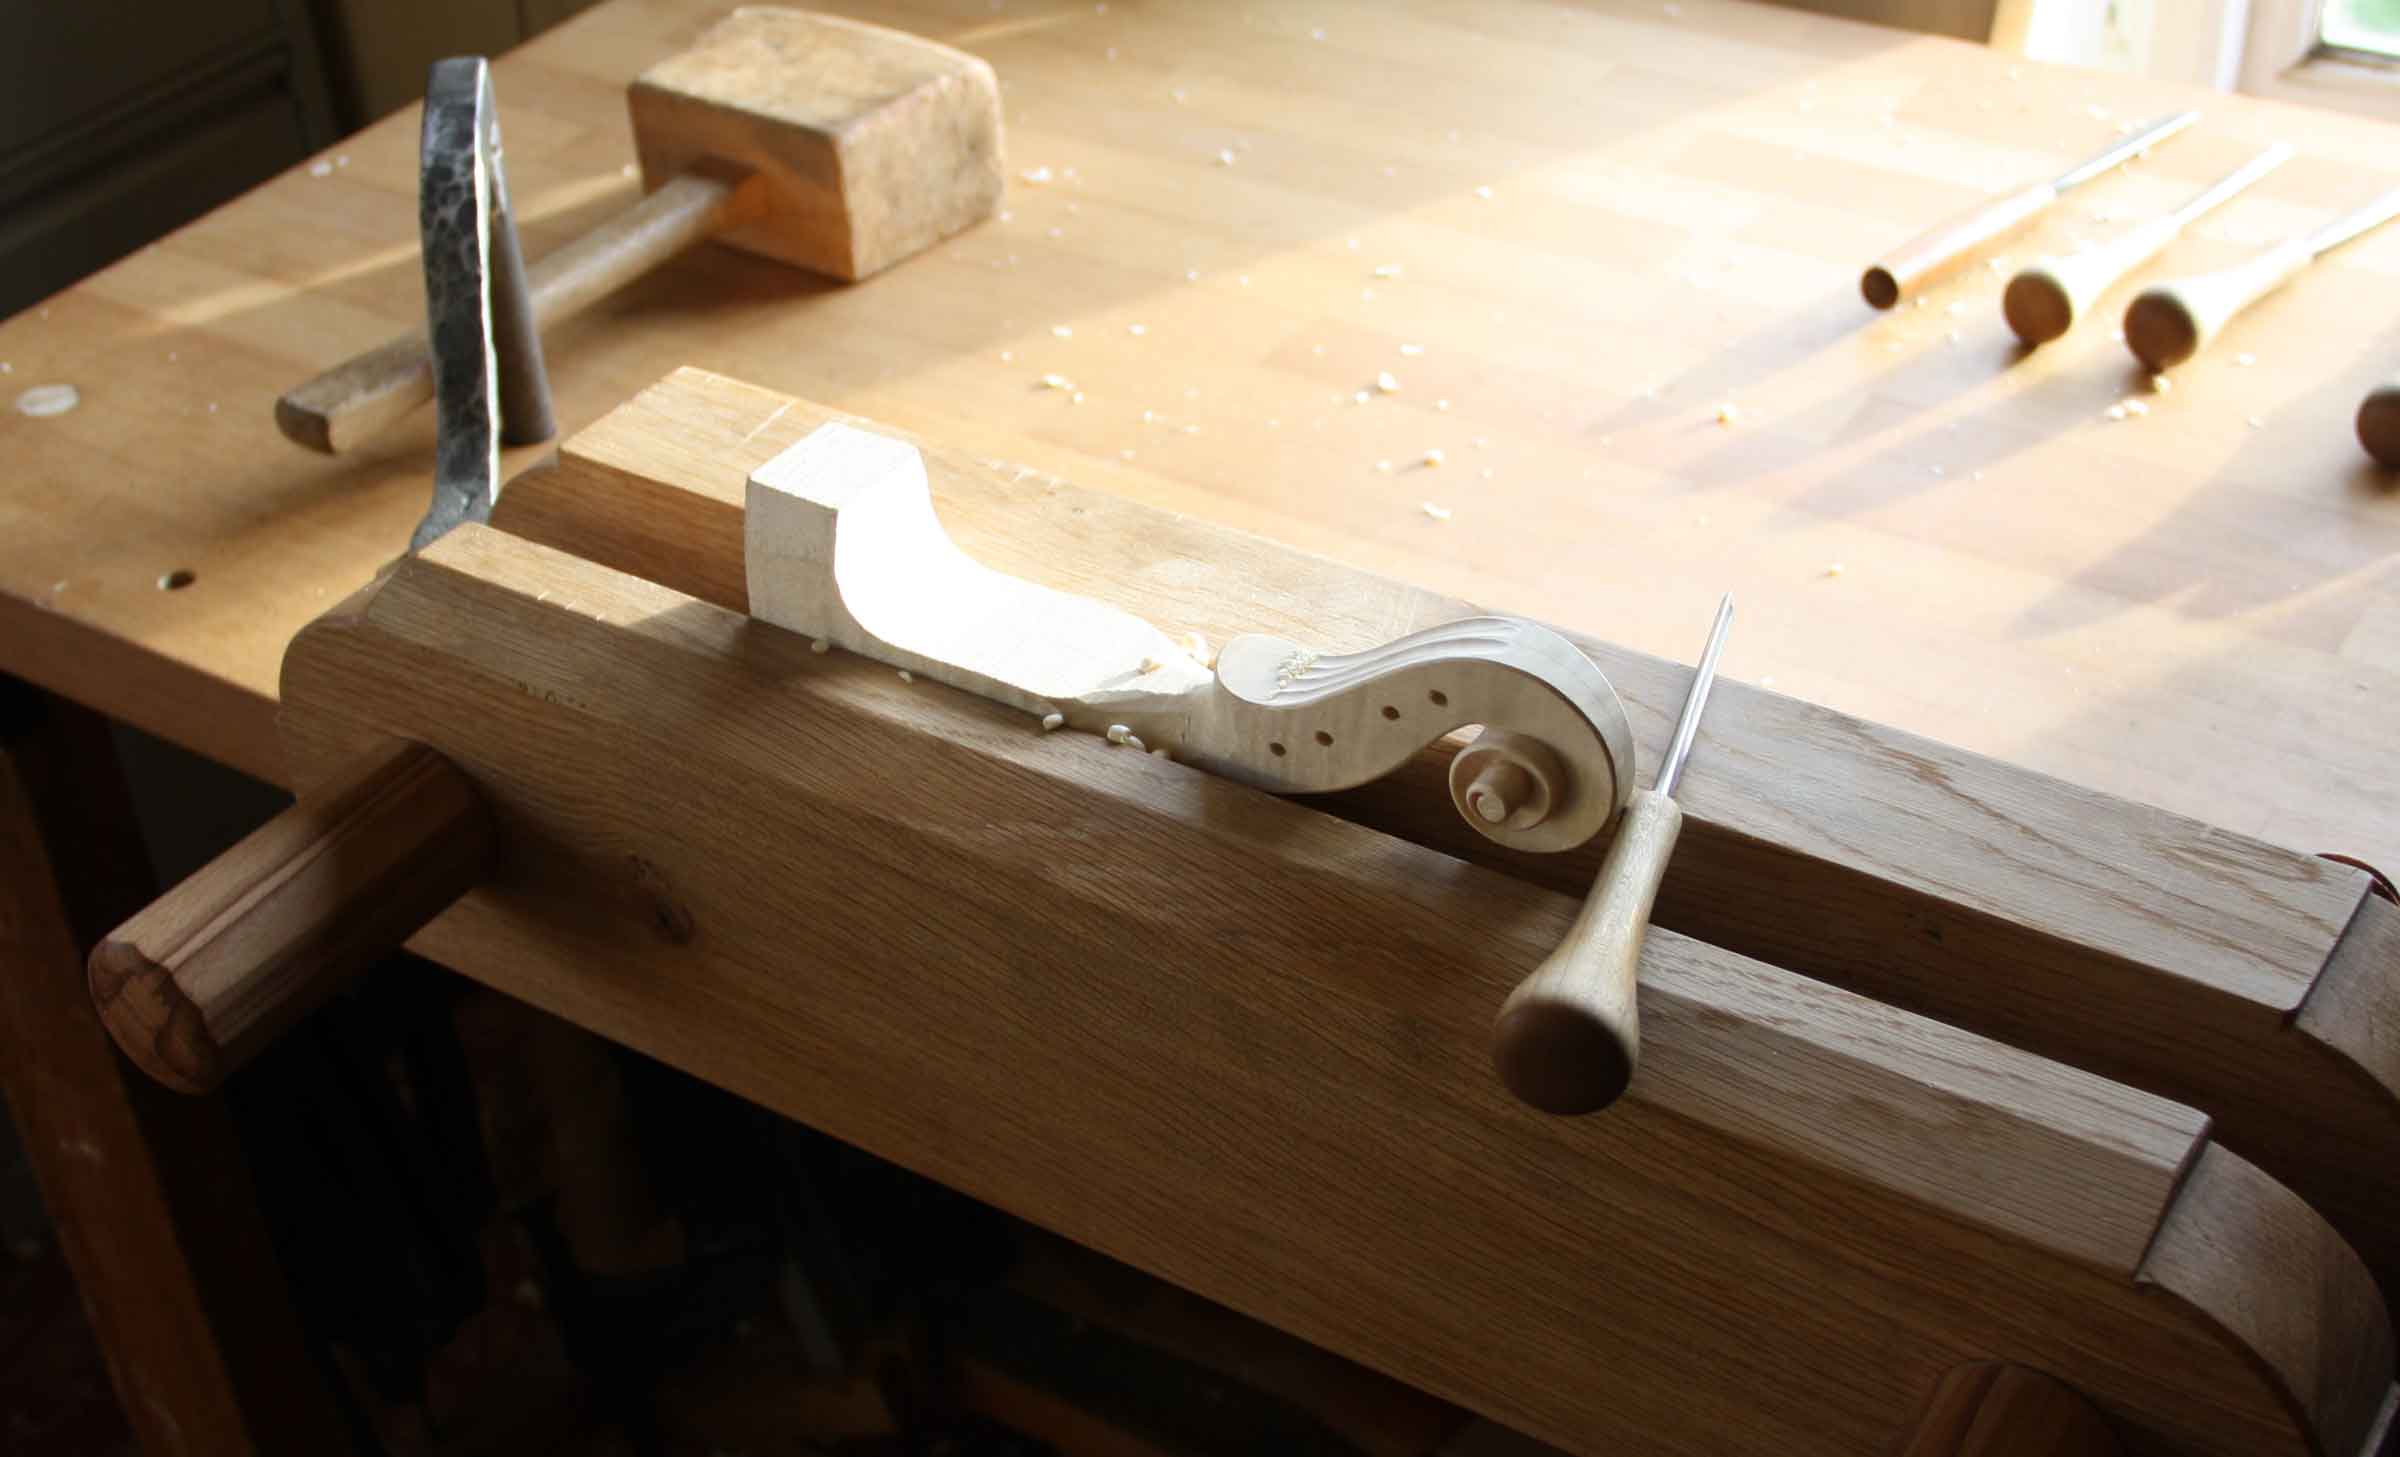
I have, perhaps disappointingly, little new to say on making a scroll! Most of the changes have been in how I hold the wood; I now wouldn’t want to be without the double screw vice at many stages, partly because it holds the work five inches higher than the bench, nor to do without a narrow bladed bowsaw for sawing the outline and for removing wood from the sides of the pegbox, a job which takes a fraction of the time compared with making numerous saw cuts across the pegbox and removing the wood with a chisel.
For the turns of the scroll, I do use transverse cuts with a saw and chisel in between initially, but then I work the pegbox and first turn all together down to the line, before using saw and chisel again for the rough removal of wood on the second turn. My use of the chisel, however, is minimal, once those rough lumps from the saw are removed, I turn to a gouge, holding the scroll to the bench with a holdfast or clamp until I am getting near, as nothing slows you down or makes you more likely to have an accident than not having the work secure. Another reason to use the gouge is that, like when flattening a plate with a radiused iron in the plane, you are not splitting out wood at the edges of the blade, so you can remove thicker chips of wood, and when cutting the turns, you can undercut slightly right from the word go, starting to create some of the volute. Besides eliminating half the subsequent process of voluting, it means you do not have to be careful to avoid damaging the ‘dowels’ of the scroll, because at this stage they are too wide, and you can see the turns more clearly because your eye is not distracted by the excess wood where the volute should be.
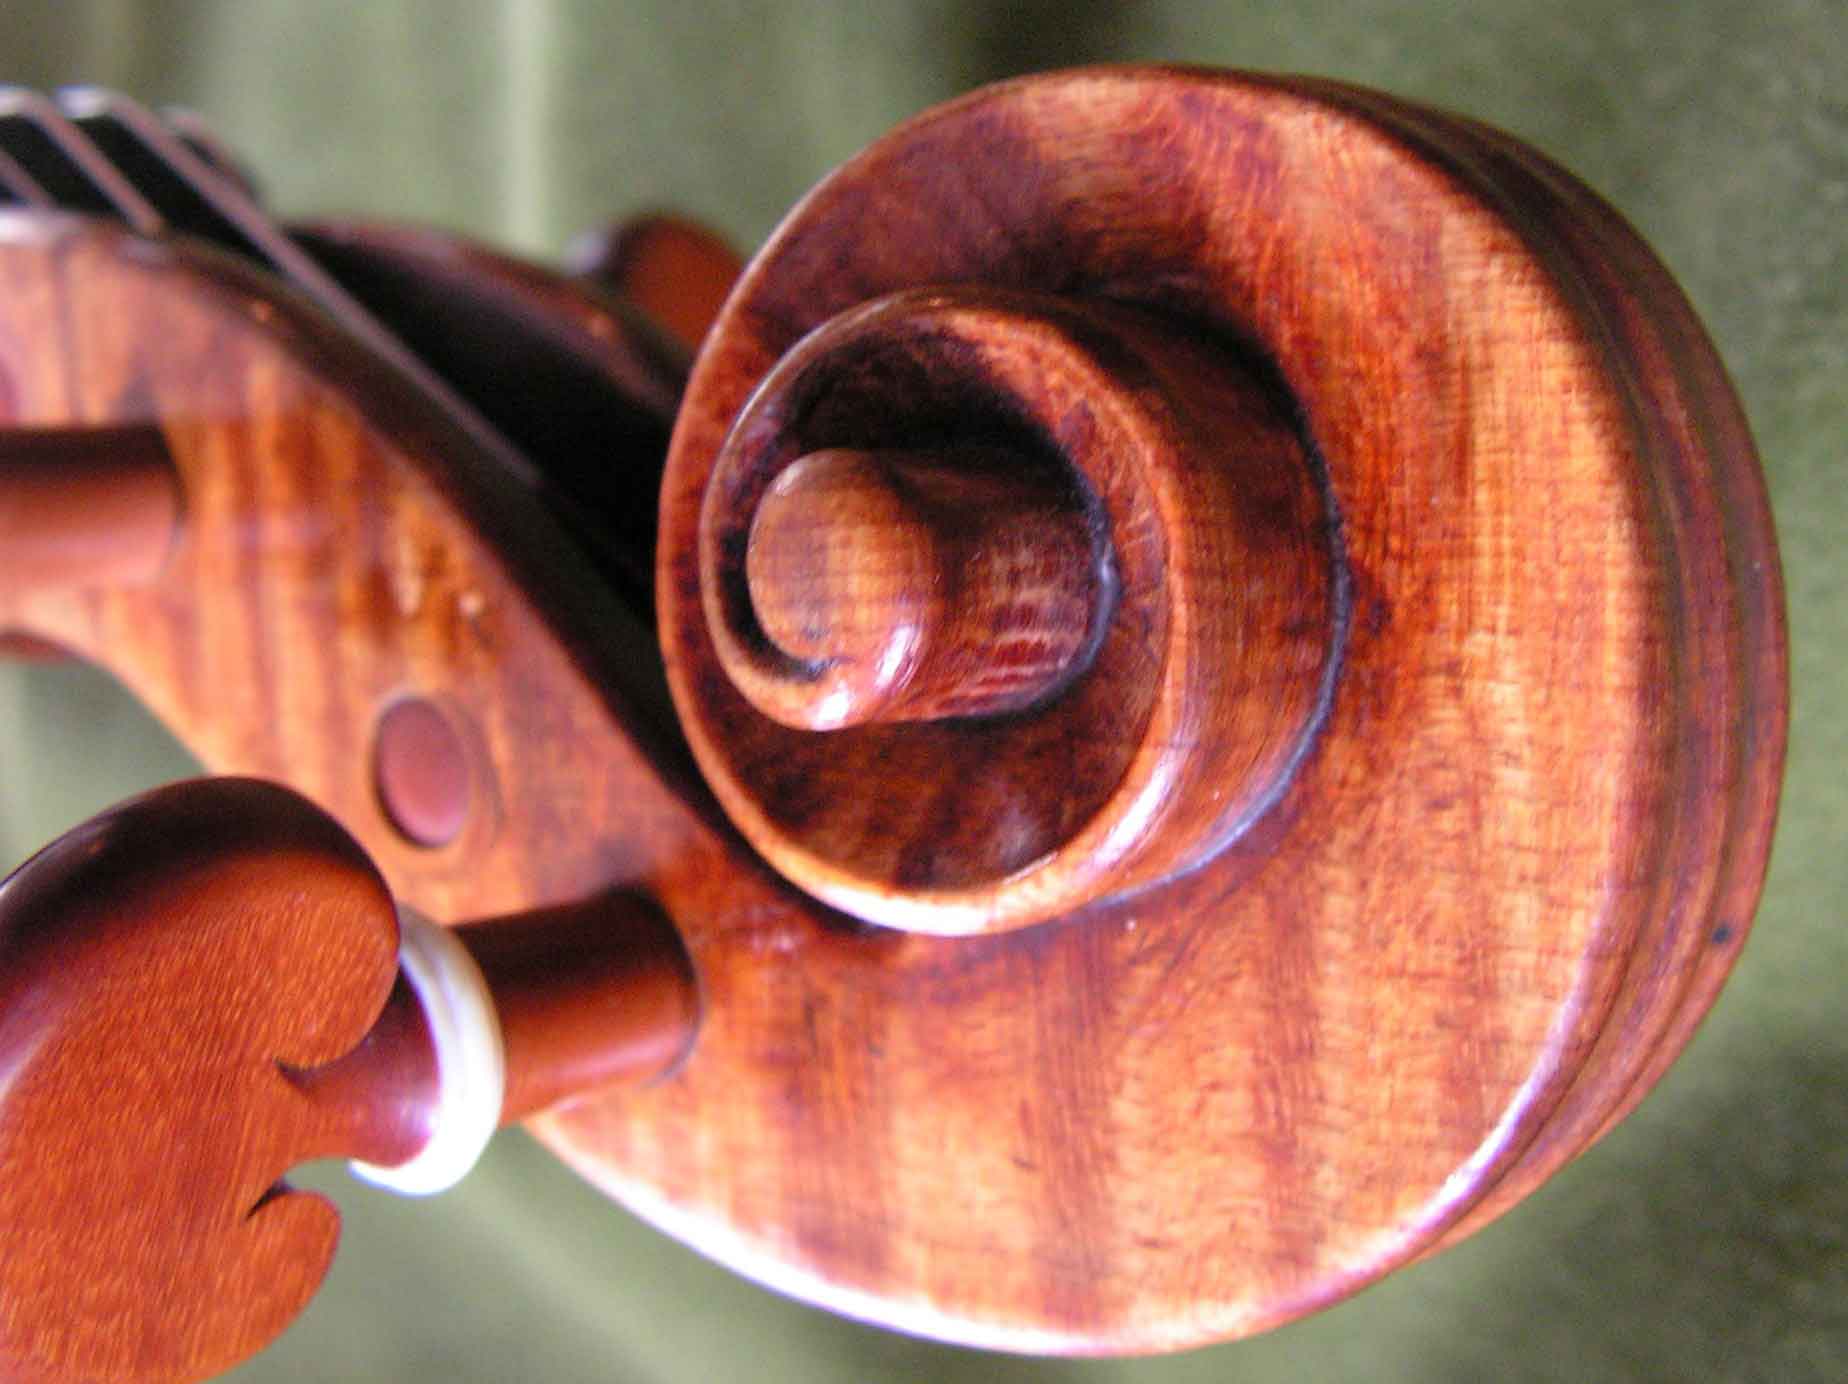
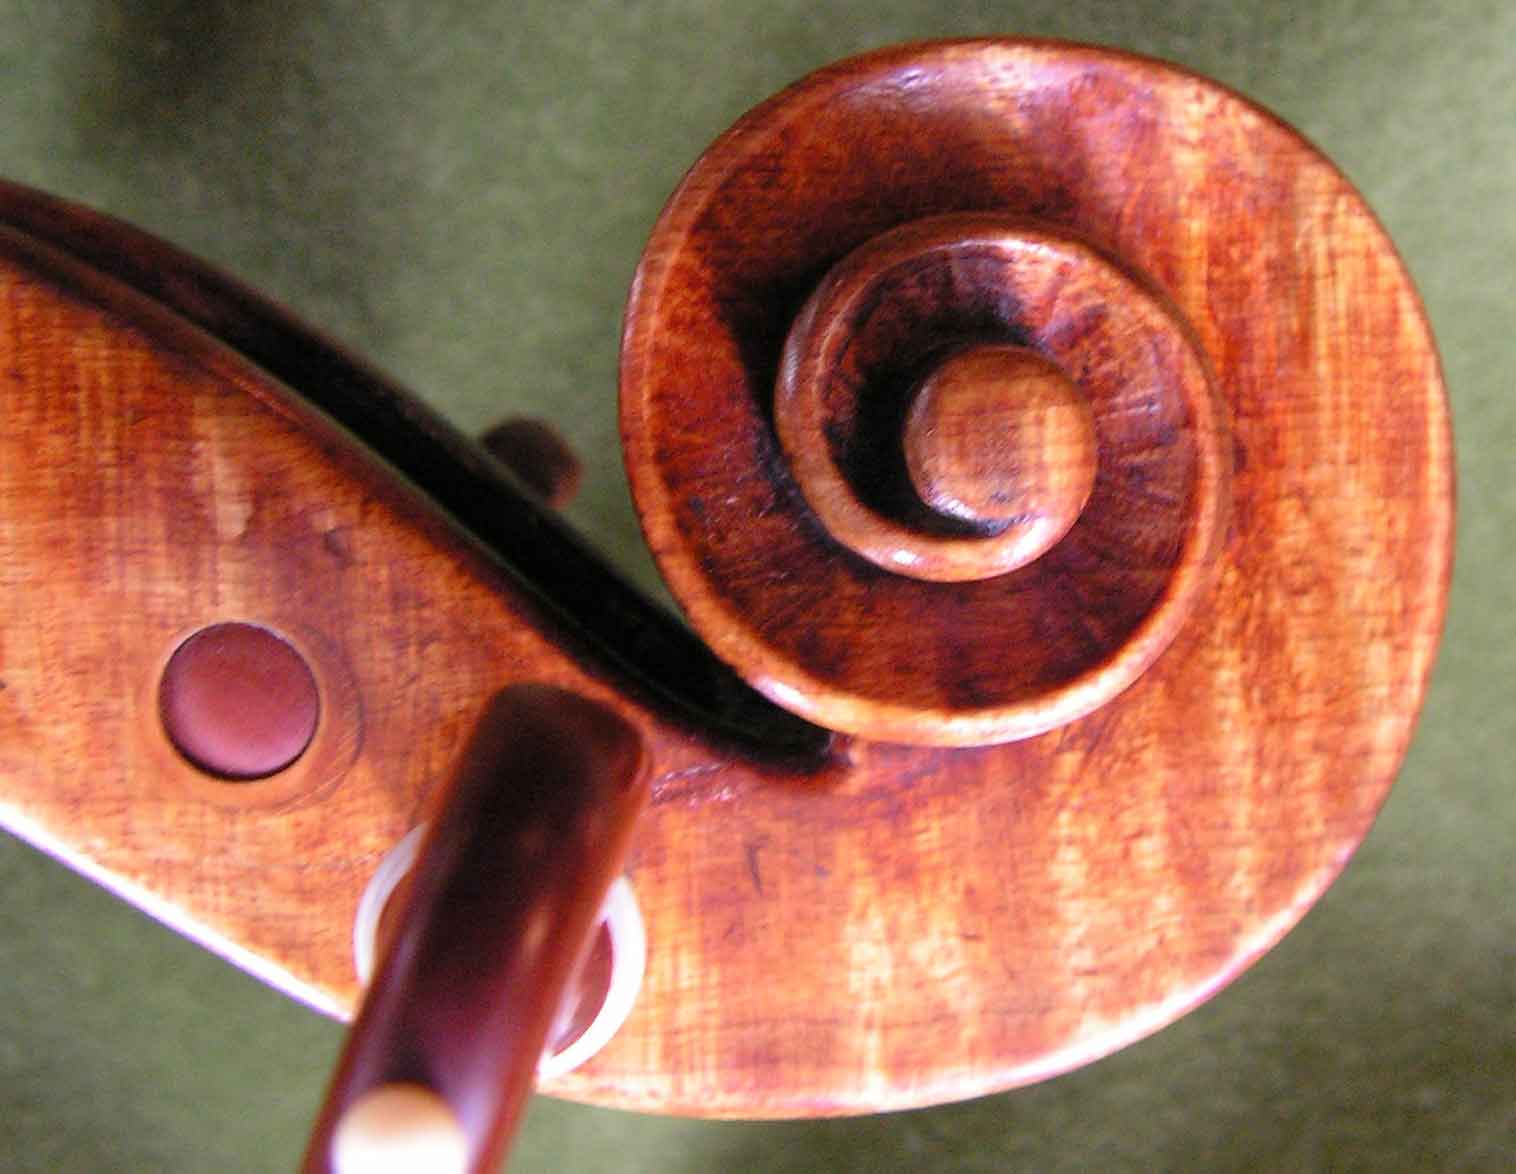
I also like to use the gouge rather than a chisel on the vertical faces, on the dowels, as it avoids the need to file or scrape these surfaces later, the presence of rounded gouge marks being clear on many fine instruments, including this Pietro Guarneri of Venice. In the second picture, you can also see distinct gouge marks in the volute. Whether you want to leave those marks in your own scrolls is up to you, but for me they are indications of confident, bold work leaving a freshness in the final object.
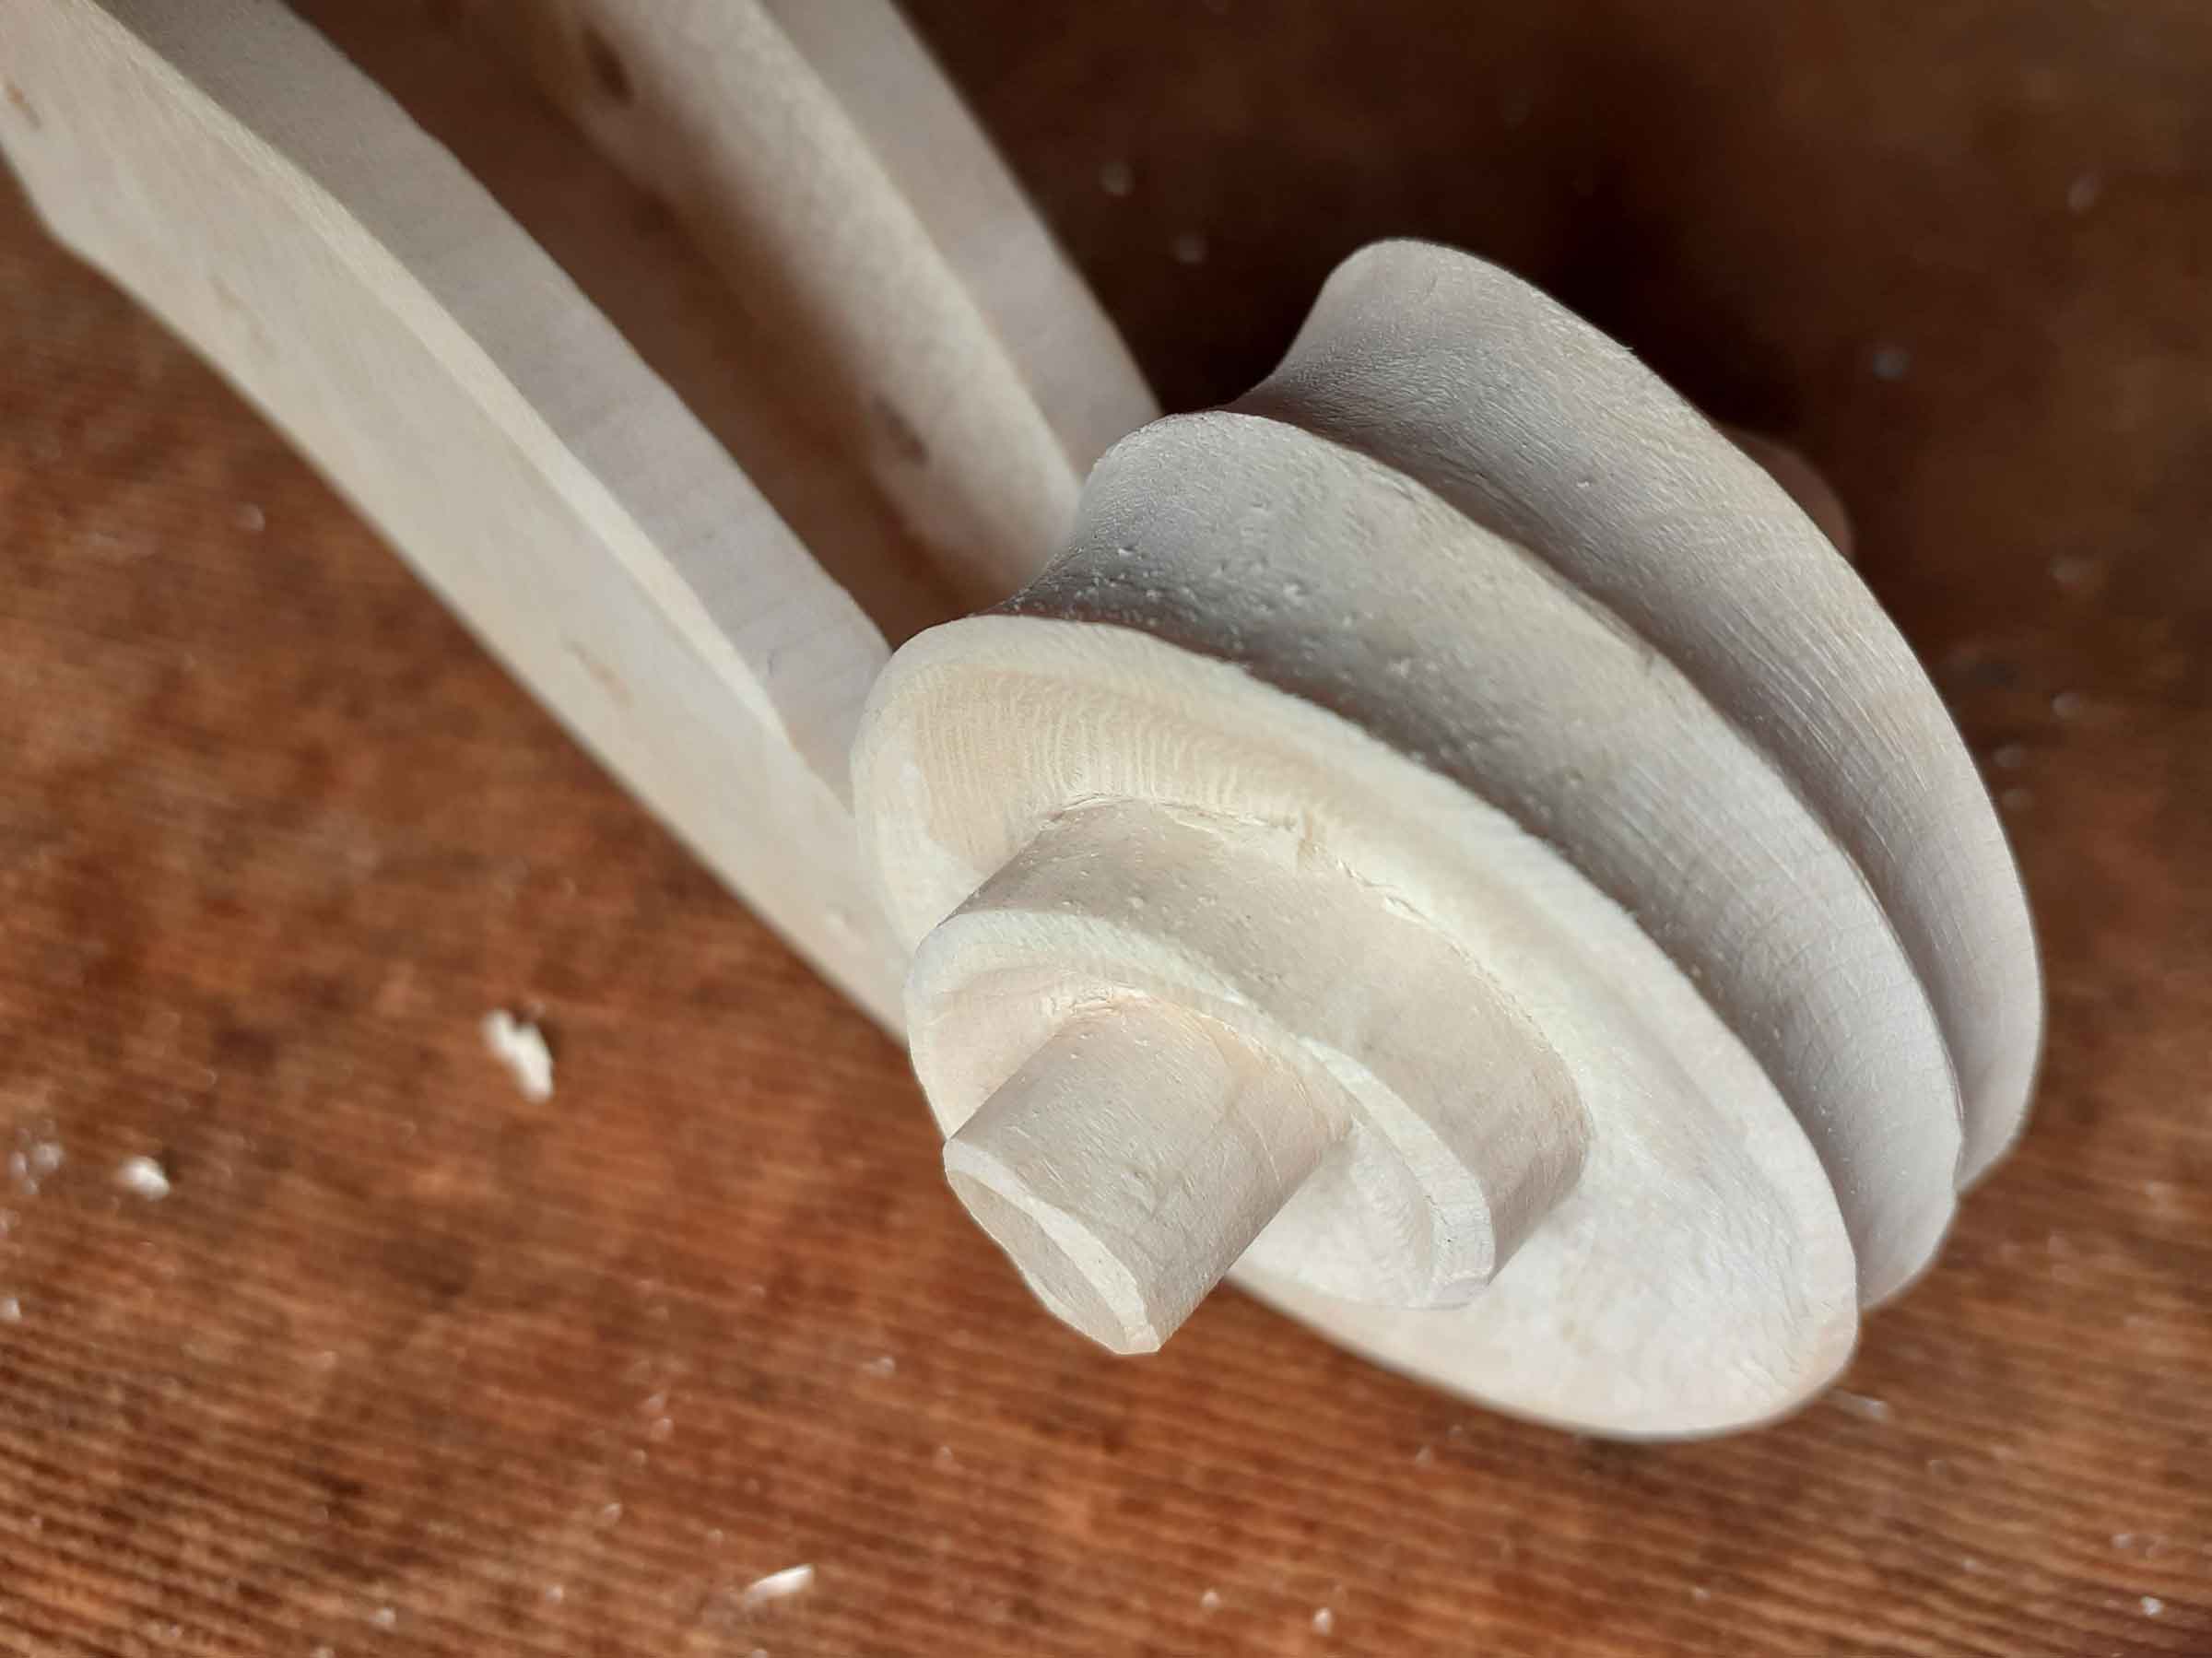
When making the chamfer, I use different tools depending on the wood and the model. On this del Gesu which has a wide chamfer, I started with a thumb plane, which, with the mouth as wide as it is, does leave a risk of wood splitting out, but worth a go on this model, though if I were doing an Amati I think I would go for a file, which on any scroll is what I use to finish the chamfer.
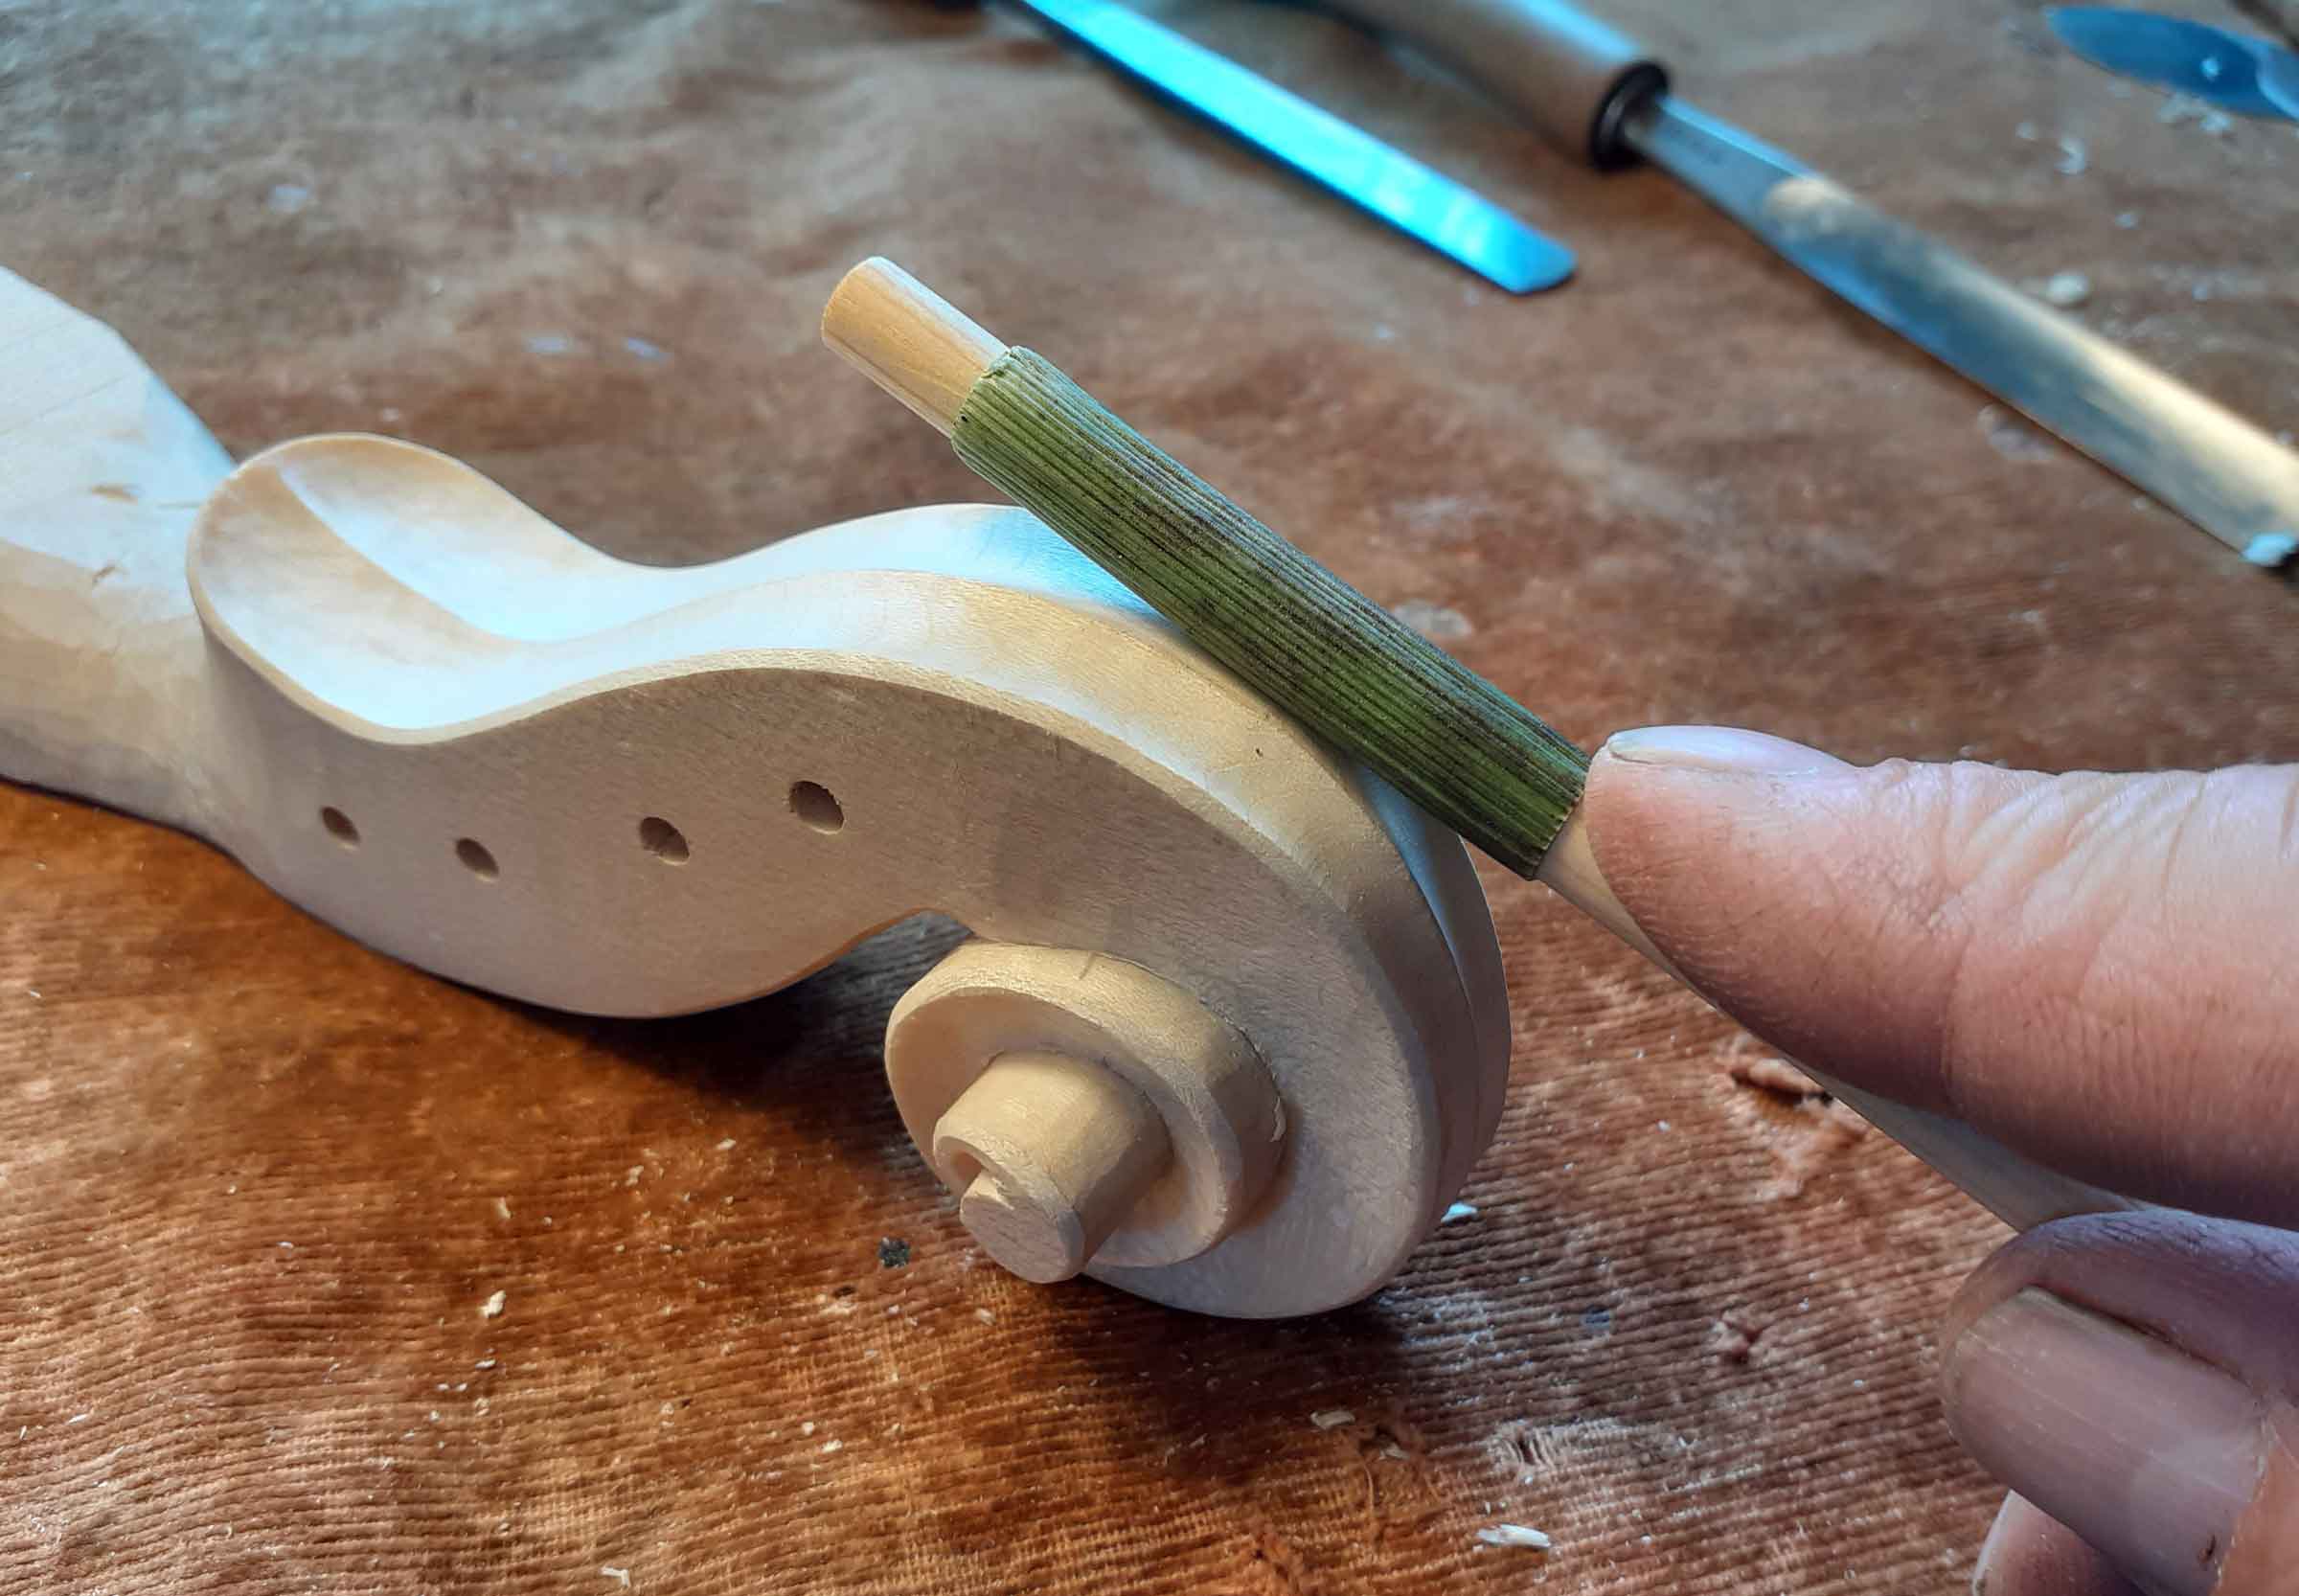
The fluting is just a matter of keeping control of a gouge, the area on the back of the scroll being perhaps the hardest, where a round file is a temping alternative to even it out, or a piece of equisetum on a stick. Used along the fluting it does leave striations caused by the ribs on the plant which is a feature you see on some instruments. Again, the twin-screw comes into its own to hold the scroll.
Conclusion
In conclusion, trying all these tools and methods has probably been the most exciting stage in my violin making career, and all of them, with the exception of the scissor-type thicknessing calipers, have turned out to be quicker and easier than what I was doing before. In some ways I wish I had come across them earlier, though equally I am a little surprised that others have not gone down a similar route before, or maybe they have and were just keeping quiet about it! Part of the excitement has been to try something out and immediately discover how well it works, but not everything has worked out straight away. I don’t think I have had any adject failures yet, though some tools have needed refinement and probably could still be improved. The greatest thrill in this process has been to find out how one development can lead to another; if, for instance, I had still being using a gouge for hollowing rather than a scrub plane, the benefit of a ventral hole in the back would have been minimal at best and I might have ruled it out as an aid to hollowing, whereas its presence and usefulness actually reinforces the likelihood of the historic use of scrub planes. In this talk I have often mentioned speed and ease of working. Speed may be useful, but it should not be seen as the ultimate goal, it is not a shorthand for carelessness. Indeed, being able to do 80% of our work quickly and with less effort enables us to be fresher and have more time when it comes to the jobs where you do need to slow down and take care.
In these experiments and when looking at classical instruments I repeatedly come back to the idea that they were made with fluidity and at some speed, and I am convinced that their working methods were important in enabling them to work with the requisite freedom and control. Without doubt, there will be more clues to be found, which may reinforce or contradict what I have said, but if anyone ever sees a ring scribed round a ventral pin on an original instrument, the remaining marks from a centre bit, I really want to know!
I would like to thank Helen Michetschläger who invited me to give this talk and who has often been the first person to bounce an idea off, and with whom, along with Marc Soubeyran, Kai Thomas Roth and Tibor Szemmelveiss, I have made a number of instruments. Working with these makers has been hugely helpful in developing my making, not just because they may have been doing things better, but through their willingness to discuss and try out different methods. I also want to thank Jan Strich for his observations on Stainer, Hubert de Launay for sending me pictures of long plane marks [scrub plane marks] on the inside of two classical instruments, and to Andrew Atkinson, whose inspiring talk incorporating tools he made following historic paintings and illustrations, given at the twentieth anniversary of the BVMA, spurred me on to embark on my recent experiments.
copyright William Castle 2023

Contact me
I'm happy to talk about instruments anytime, whether you're a professional, student or a keen amateur. Call me to talk through what you're looking for.
01948 880608